AC60F AUTOMATIC TRANSMISSION / TRANSAXLE AUTOMATIC TRANSMISSION SYSTEM P17029F AT Solenoids Operation Shutdown Circuit Stuck Off
DESCRIPTION
The ECM detects a malfunction in the current cut circuit used to transition to a fail-safe gear position.
| DTC No. | Detection Item | DTC Detection Condition | Trouble Area | MIL | Memory | Note |
|---|---|---|---|---|---|---|
| P17029F | AT Solenoids Operation Shutdown Circuit Stuck Off | Once 5.25 seconds elapse after the vehicle is parked with the shift position in P and the ignition switch is turned off, any of the following conditions is continuously met for 0.05 seconds or more during a solenoid current cut request (1 trip detection logic).
·
SL1 solenoid actual current value is 0.2 A or higher
·
SLT solenoid actual current value is 0.2 A or higher
·
SL solenoid is ON |
·
Wire harness or connector
·
ECM power source circuit
·
Transmission revolution sensor (NT)
·
Transmission revolution sensor (SP2)
·
Shift solenoid valve SL1
·
Shift solenoid valve SLT
·
Shift solenoid valve SL
·
Park/neutral position switch assembly
·
ECM |
Does not come on | DTC stored | SAE Code: P1702 |
| Vehicle Condition | ||||
|---|---|---|---|---|
| Pattern 1 | Pattern 2 | Pattern 3 | ||
| Diagnostic Condition | When a solenoid current cut request is sent after 5.25 seconds elapse after the vehicle is parked with the shift position in P and the ignition switch is turned off | ○ | ○ | ○ |
| Malfunction Condition | SL1 solenoid actual current value is 0.2 A or higher | ○ | - | - |
| SLT solenoid actual current value is 0.2 A or higher | - | ○ | - | |
| SL solenoid is ON | - | - | ○ | |
| Duration | 0.05 seconds or more | 0.05 seconds or more | 0.05 seconds or more | |
| Detection Logic | 1 trip detection logic | 1 trip detection logic | 1 trip detection logic | |
- HINT:
-
This DTC is stored when any of the above detection patterns are met.
MONITOR DESCRIPTION
When the ignition switch is off and current is detected as flowing to the solenoid valve during a solenoid current cut request, the ECM illuminates the MIL and stores a DTC.
CONFIRMATION DRIVING PATTERN
- HINT:
-
After repairs have been completed, clear the DTCs and then check that the vehicle has returned to normal by performing the following All Readiness check procedure.
Clear the DTCs (even if no DTCs are stored, perform the clear DTC procedure).
Turn the ignition switch off and wait for 2 minutes or more.
Enter the following menus: Powertrain / Engine / Utility / All Readiness.
Input the DTC: P17029F.
Check the DTC judgment result.
| GTS Display | Description |
|---|---|
| NORMAL |
·
DTC judgment completed
·
System normal |
| ABNORMAL |
·
DTC judgment completed
·
System abnormal |
| INCOMPLETE |
·
DTC judgment not completed
·
Perform driving pattern after confirming DTC enabling conditions |
| N/A |
·
Unable to perform DTC judgment
·
Number of DTCs which do not fulfill DTC preconditions has reached ECU memory limit |
- HINT:
-
·
If the judgment result shows NORMAL, the system is normal.
·If the judgment result shows ABNORMAL, the system has a malfunction.
·If the judgment result shows INCOMPLETE or N/A, perform the Confirmation Driving Pattern and check the DTC judgment result again.
WIRING DIAGRAM
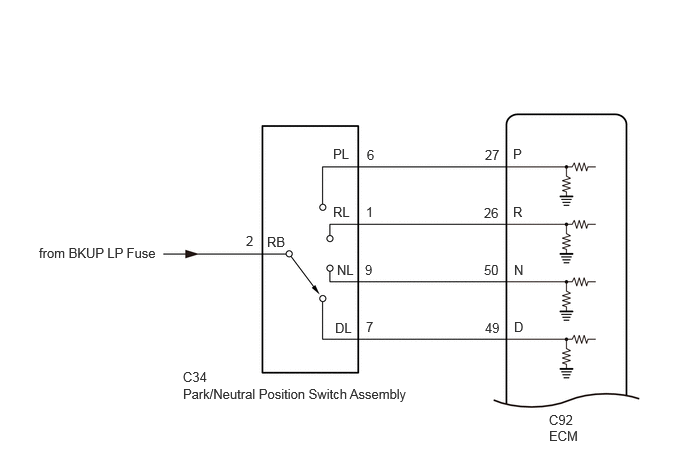
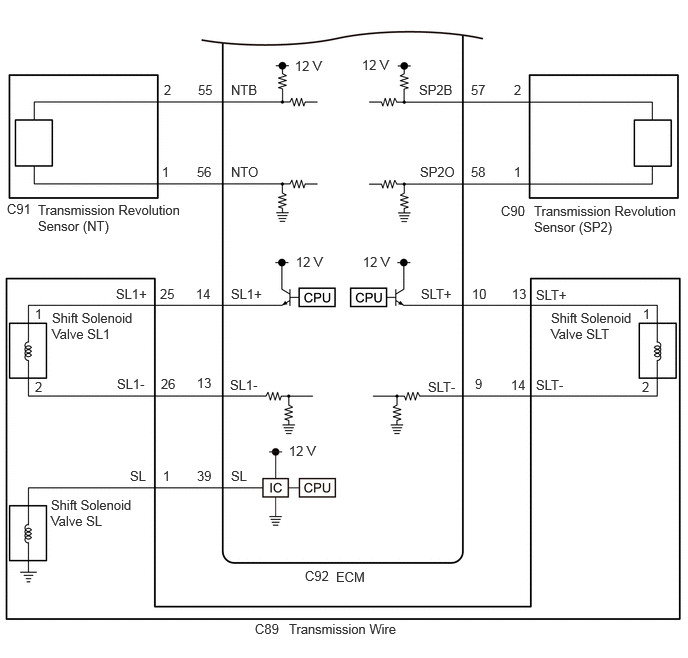
CAUTION / NOTICE / HINT
- NOTICE:
-
Perform registration and/or initialization when parts related to the automatic transmission are replaced
-
Click hereDrivetrain>AC60F (AUTOMATIC TRANSMISSION / TRANSAXLE)>AUTOMATIC TRANSMISSION SYSTEM>PRECAUTION
PROCEDURE
Read the Data List according to the display on the GTS.
- Powertrain > Engine > Data List
-
Tester Display Measurement Item Range Normal Condition Diagnostic Note NT Sensor Speed Input turbine speed Min.: 0 rpm
Max.: 12750 rpm·Lock-up on (after warming up the engine): Value from transmission revolution sensor (NT) equal to engine speed
·Lock-up off (idling with shift lever in N): Value from transmission revolution sensor (NT) nearly equal to engine speed
Data is displayed in increments of 50 rpm. NT Sensor Voltage Transmission revolution sensor (NT) output voltage Min.: 0.000 V
Max.: 4.999 V0.2 to 1.8 V: Engine idling -
- Powertrain > Engine > Data List
-
Tester Display NT Sensor Speed NT Sensor Voltage - 50003 372 174,175
- Result:
-
Result Proceed to Data display is within Normal Condition range A Data display is not within Normal Condition range B
A
B
Read the Data List according to the display on the GTS.
- Powertrain > Engine > Data List
-
Tester Display Measurement Item Range Normal Condition Diagnostic Note Speed (SP2) Output shaft speed Min.: 0 km/h (0 mph)
Max.: 255 km/h (158 mph)0 km/h (0 mph): Vehicle stopped (equal to vehicle speed) - SP2 Sensor Voltage Transmission revolution sensor (SP2) sensor voltage Min.: 0.000 V
Max.: 4.999 V0.2 to 1.8 V: Engine idling -
- Powertrain > Engine > Data List
-
Tester Display Speed (SP2) SP2 Sensor Voltage - 50003 372 362,391
- Result:
-
Result Proceed to Data display is within Normal Condition range A Data display is not within Normal Condition range B
A
B
Disconnect the park/neutral position switch assembly connector.
Measure the voltage according to the value(s) in the table below.
- Standard Voltage:
-
Tester Connection Condition Specified Condition Click Location & Routing(C34)Location & Routingewd_type=routing;type=c;code=C34
C34-2 (RB) - Body ground Ignition switch ON 11 to 14 V C34-2 (RB) - Body ground Ignition switch off Below 1 V
- Result:
-
Proceed to OK NG
OK
NG
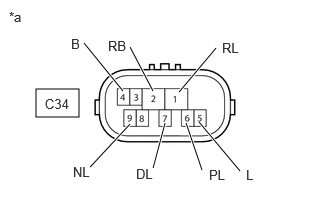
| *a | Component without harness connected (Park/Neutral Position Switch Assembly) |
Disconnect the park/neutral position switch assembly connector.
Measure the resistance according to the value(s) in the table below.
- Standard Resistance:
-
Tester Connection Condition Specified Condition Click Location & Routing(C34)Location & Routingewd_type=routing;type=c;code=C34
C34-4 (B) - C34-5 (L) Shift lever in P or N Below 1 Ω C34-2 (RB) - C34-6 (PL) Shift lever in P Below 1 Ω C34-2 (RB) - C34-1 (RL) Shift lever in R Below 1 Ω C34-2 (RB) - C34-9 (NL) Shift lever in N Below 1 Ω C34-2 (RB) - C34-7 (DL) Shift lever in D, S, "+" or "-" Below 1 Ω C34-4 (B) - C34-5 (L) Shift lever not in P or N 10 kΩ or higher C34-2 (RB) - C34-6 (PL) Shift lever not in P 10 kΩ or higher C34-2 (RB) - C34-1 (RL) Shift lever not in R 10 kΩ or higher C34-2 (RB) - C34-9 (NL) Shift lever not in N 10 kΩ or higher C34-2 (RB) - C34-7 (DL) Shift lever not in D, S, "+" or "-" 10 kΩ or higher
- Result:
-
Proceed to OK NG
OK
NG
Click hereDrivetrain>AC60F (AUTOMATIC TRANSMISSION / TRANSAXLE)>PARK / NEUTRAL POSITION SWITCH>REMOVAL
Disconnect the ECM connector.
Turn the ignition switch to ON.
Measure the voltage according to the value(s) in the table below.
- Standard Voltage:
-
Tester Connection Condition Specified Condition Click Location & Routing(C92)Location & Routingewd_type=routing;type=c;code=C92
C92-27 (P) - Body ground ·Ignition switch ON
·Shift lever in P
11 to 14 V C92-27 (P) - Body ground ·Ignition switch ON
·Shift lever not in P
Below 1 V
- Result:
-
Proceed to OK NG
OK
NG
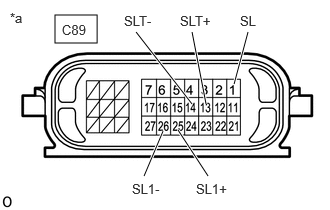
| *a | Component without harness connected (Transmission Wire) |
Disconnect the transmission wire connector.
Measure the resistance according to the value(s) in the table below.
- Standard Resistance:
-
Tester Connection Condition Specified Condition Click Location & Routing(C89)Location & Routingewd_type=routing;type=c;code=C89
C89-25 (SL1+) - C89-26 (SL1-) 20°C (68°F) 5.0 to 5.6 Ω C89-13 (SLT+) - C89-14 (SLT-) 20°C (68°F) 5.0 to 5.6 Ω C89-1 (SL) - Body ground 20°C (68°F) 11 to 15 Ω C89-25 (SL1+) or C89-26 (SL1-) - Body ground and other terminals Always 10 kΩ or higher C89-13 (SLT+) or C89-14 (SLT-) - Body ground and other terminals Always 10 kΩ or higher C89-1 (SL) - other terminals Always 10 kΩ or higher
- Result:
-
Proceed to OK NG
OK
NG
Disconnect the ECM connector.
Measure the resistance according to the value(s) in the table below.
- Standard Resistance:
-
Tester Connection Condition Specified Condition Click Location & Routing(C92)Location & Routingewd_type=routing;type=c;code=C92
C92-14 (SL1+) - C92-13 (SL1-) 20°C (68°F) 5.0 to 5.6 Ω C92-10 (SLT+) - C92-9 (SLT-) 20°C (68°F) 5.0 to 5.6 Ω C92-39 (SL) - Body ground 20°C (68°F) 11 to 15 Ω C92-14 (SL1+) or C92-13 (SL1-) - Body ground and other terminals Always 10 kΩ or higher C92-10 (SLT+) or C92-9 (SLT-) - Body ground and other terminals Always 10 kΩ or higher C92-39 (SL) - other terminals Always 10 kΩ or higher
- Result:
-
Proceed to OK NG
OK
NG
Check the ECM power source circuit of the SFI system.
Click hereEngine / Hybrid System>1GR-FE (ENGINE CONTROL)>SFI SYSTEM>ECM Power Source Circuit
Check the ECM power source circuit, and proceed to the next step if no malfunction is recognized.
- Result:
-
Proceed to NEXT
NEXT
Remove shift solenoid valves SL1, SLT and SL.
Click hereDrivetrain>AC60F (AUTOMATIC TRANSMISSION / TRANSAXLE)>VALVE BODY ASSEMBLY>DISASSEMBLY
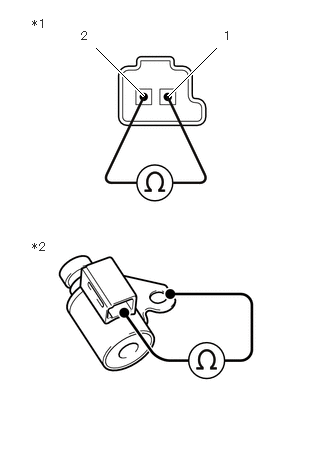
| *1 | Shift Solenoid Valve SL1 and SLT |
| *2 | Shift Solenoid Valve SL |
Measure the resistance according to the value(s) in the table below.
- Standard Resistance:
-
Tester Connection Condition Specified Condition Shift solenoid valve SL1 connector terminal 1 - terminal 2 20°C (68°F) 5.0 to 5.6 Ω Shift solenoid valve SLT connector terminal 1 - terminal 2 20°C (68°F) 5.0 to 5.6 Ω Shift solenoid valve SL connector terminal - Shift solenoid valve SL body 20°C (68°F) 11 to 15 Ω
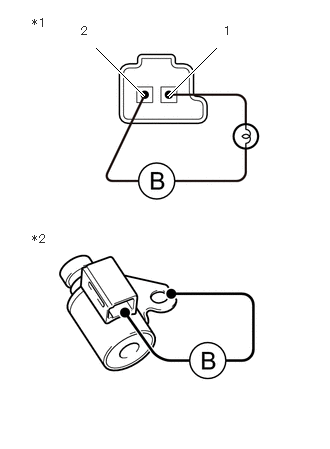
| *1 | Shift Solenoid Valve SL1 and SLT |
| *2 | Shift Solenoid Valve SL |
Apply 12 V battery voltage to the shift solenoid valve and check that the valve moves and makes an operating noise.
- OK:
-
Measurement Condition Specified Condition ·Battery positive (+) with a 21 W bulb → Shift solenoid valve SL1 connector Terminal 1
·Battery negative (-) → Shift solenoid valve SL1 connector Terminal 2
Valve moves and makes an operating noise ·Battery positive (+) with a 21 W bulb → Shift solenoid valve SLT connector Terminal 1
·Battery negative (-) → Shift solenoid valve SLT connector Terminal 2
Valve moves and makes an operating noise ·Battery positive (+) → Shift solenoid valve SL connector
·Battery negative (-) → Shift solenoid valve SL body
Valve moves and makes an operating noise
- Result:
-
Proceed to OK NG
OK
NG
Remove the transmission revolution sensor (SP2).
Click hereDrivetrain>AC60F (AUTOMATIC TRANSMISSION / TRANSAXLE)>SPEED SENSOR>REMOVAL
Connect the battery to the sensor as shown in the illustration.
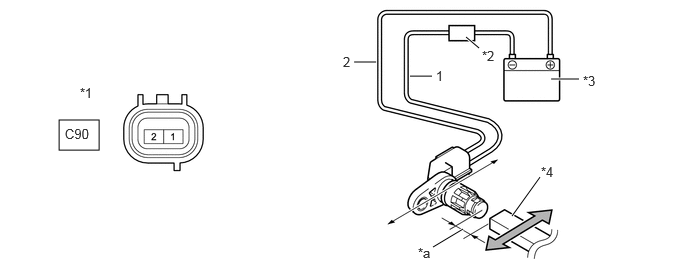
| *1 | Transmission Revolution Sensor (SP2) | *2 | Ammeter |
| *3 | Battery | *4 | Magnet |
| *a | 5 mm (0.197 in.) or less | - | - |
Wave a magnetic object left and right in front of the transmission revolution sensor (SP2) tip (5 mm (0.197 in.) or less) to change the high/low signals while measuring the current.
- NOTICE:
-
Make sure to wave the magnetic object during the inspection. The current will not change without waving the magnetic object as indicated by the arrow in the illustration.
Measure the current according to the value(s) in the table below.
- Standard Current:
-
Tester Connection Condition Specified Condition Click Location & Routing(C90)Location & Routingewd_type=routing;type=c;code=C90
C90-1 - C90-2 Low signal 4 to 8 mA C90-1 - C90-2 High signal 12 to 16 mA
- Result:
-
Proceed to OK NG
OK
NG
Disconnect the transmission revolution sensor (SP2) connector.
Disconnect the ECM connector.
Measure the resistance according to the value(s) in the table below.
- Standard Resistance:
-
Tester Connection Condition Specified Condition Click Location & Routing(C90,C92)Location & Routingewd_type=routing;type=c,c;code=C90,C92
C90-2 - C92-57 (SP2B) Always Below 1 Ω C90-1 - C92-58 (SP2O) Always Below 1 Ω C90-2 - Body ground Always 10 kΩ or higher C90-1 - Body ground Always 10 kΩ or higher
- Result:
-
Proceed to OK NG
OK
NG
Remove the transmission revolution sensor (NT).
Click hereDrivetrain>AC60F (AUTOMATIC TRANSMISSION / TRANSAXLE)>SPEED SENSOR>REMOVAL
Connect the battery to the sensor as shown in the illustration.
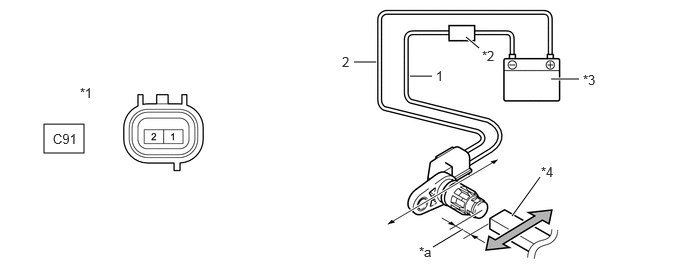
| *1 | Transmission Revolution Sensor (NT) | *2 | Ammeter |
| *3 | Battery | *4 | Magnet |
| *a | 5 mm (0.197 in.) or less | - | - |
Wave a magnetic object left and right in front of the transmission revolution sensor (NT) tip (5 mm (0.197 in.) or less) to change the high/low signals while measuring the current.
- NOTICE:
-
Make sure to wave the magnetic object during the inspection. The current will not change without waving the magnetic object as indicated by the arrow in the illustration.
Measure the current according to the value(s) in the table below.
- Standard Current:
-
Tester Connection Condition Specified Condition Click Location & Routing(C91)Location & Routingewd_type=routing;type=c;code=C91
C91-1 - C91-2 Low signal 4 to 8 mA C91-1 - C91-2 High signal 12 to 16 mA
- Result:
-
Proceed to OK NG
OK
NG
Disconnect the transmission revolution sensor (NT) connector.
Disconnect the ECM connector.
Measure the resistance according to the value(s) in the table below.
- Standard Resistance:
-
Tester Connection Condition Specified Condition Click Location & Routing(C91,C92)Location & Routingewd_type=routing;type=c,c;code=C91,C92
C91-2 - C92-55 (NTB) Always Below 1 Ω C91-1 - C92-56 (NTO) Always Below 1 Ω C91-2 - Body ground Always 10 kΩ or higher C91-1 - Body ground Always 10 kΩ or higher
- Result:
-
Proceed to OK NG
OK
NG