JF2BM TRANSFER / 4WD / AWD TRANSFER CASE REAR OIL SEAL REPLACEMENT
CAUTION / NOTICE / HINT
The necessary procedures (adjustment, calibration, initialization or registration) that must be performed after parts are removed and installed, or replaced during transfer cover type T oil seal removal/installation are shown below.
| Replaced Part or Performed Procedures | Necessary Procedures | Effect/Inoperative Function when Necessary Procedures are not Performed | Link |
|---|---|---|---|
|
for 1GR-FE:
Gas leaks from exhaust system |
Inspection after repair |
·
Poor idle, etc.
·
Engine start function, etc. |
( ) |
|
for V35A-FTS:
Gas leaks from exhaust system |
Inspection after repair |
·
Poor idle, etc.
·
Engine start function, etc. |
() |
PROCEDURE

 37110F 1.REMOVE REAR PROPELLER SHAFT ASSEMBLY
2.DRAIN TRANSFER OIL
33309B 3.REMOVE OUTPUT SHAFT COMPANION FLANGE SUB-ASSEMBLY (REAR)
36102J 4.REMOVE TRANSFER COVER TYPE T OIL SEAL
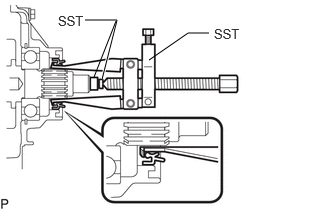
Using SST, tap out the transfer cover type T oil seal.
- SST
-
09308-10010
09950-40011 (09957-04010)
09950-60011 (09951-00210)
- NOTICE:
-
·
Apply grease to the tip of SST center bolt before use.
·Be careful not to damage the transfer cover type T oil seal and rear transfer case contact surface.
36102J 5.INSTALL TRANSFER COVER TYPE T OIL SEAL
Coat the lip of a new transfer cover type T oil seal with MP grease.
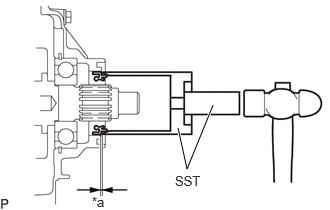
| *a | Depth |
Using SST and a hammer, install the transfer cover type T oil seal to the rear transfer case.
- SST
-
09649-17010
09950-70010 (09951-07150)
- Standard Depth:
-
0.17 to 0.67 mm (0.00670 to 0.0263 in.)
- NOTICE:
-
·
Tap the transfer cover type T oil seal evenly so that the transfer cover type T oil seal is straight.
·Do not excessively tap the transfer cover type T oil seal.
33309B 6.INSTALL OUTPUT SHAFT COMPANION FLANGE SUB-ASSEMBLY (REAR)
7.ADD TRANSFER OIL
8.INSPECT FOR TRANSFER OIL LEAK
37110F 9.INSTALL REAR PROPELLER SHAFT ASSEMBLY