V35A-FTS COOLING RADIATOR INSTALLATION
CAUTION / NOTICE / HINT
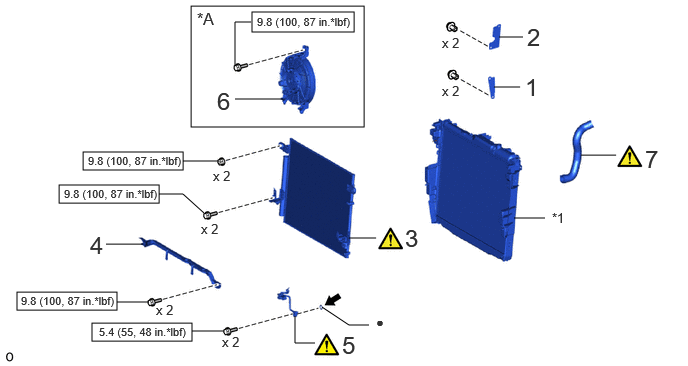
| Procedure | Part Name Code |

|

|

|
|
|---|---|---|---|---|---|
| 1 | NO. 1 RADIATOR TO SUPPORT SEAL | 16561 | - | - | - |
| 2 | UPPER RADIATOR AIR GUIDE PLATE | 16681 | - | - | - |
| 3 | COOLER CONDENSER ASSEMBLY | 884A0 | ( ) |
- | - |
| 4 | COOLER BRACKET | - | - | - | - |
| 5 | NO. 2 AIR CONDITIONING TUBE AND ACCESSORY ASSEMBLY | 88710G | () |
- | - |
| 6 | BLOWER ASSEMBLY WITH SHROUD | 88590 | - | - | - |
| 7 | NO. 2 RADIATOR HOSE | 16572D | () |
- | - |
| *A | w/ Condenser Fan | - | - |
| *1 | RADIATOR ASSEMBLY | - | - |

|
N*m (kgf*cm, ft.*lbf): Specified torque | ● | Non-reusable part |

|
Compressor oil ND-OIL 8 or equivalent | - | - |
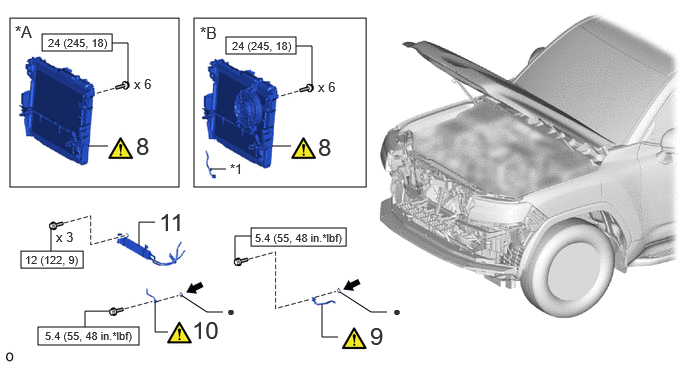
| Procedure | Part Name Code |
|
|
|
|
|---|---|---|---|---|---|
| 8 | RADIATOR WITH COOLER CONDENSER ASSEMBLY | - | () |
- | - |
| 9 | NO. 1 COOLER REFRIGERANT DISCHARGE HOSE | 88711 | () |
- | - |
| 10 | AIR CONDITIONING TUBE AND ACCESSORY ASSEMBLY | 88710E | () |
- | - |
| 11 | NO. 1 POWER STEERING OIL COOLER SUB-ASSEMBLY | 44402 | - | - | - |
| *A | w/o Condenser Fan | *B | w/ Condenser Fan |
| *1 | ENGINE ROOM MAIN WIRE | - | - |
|
|
N*m (kgf*cm, ft.*lbf): Specified torque | ● | Non-reusable part |
|
|
Compressor oil ND-OIL 8 or equivalent | - | - |
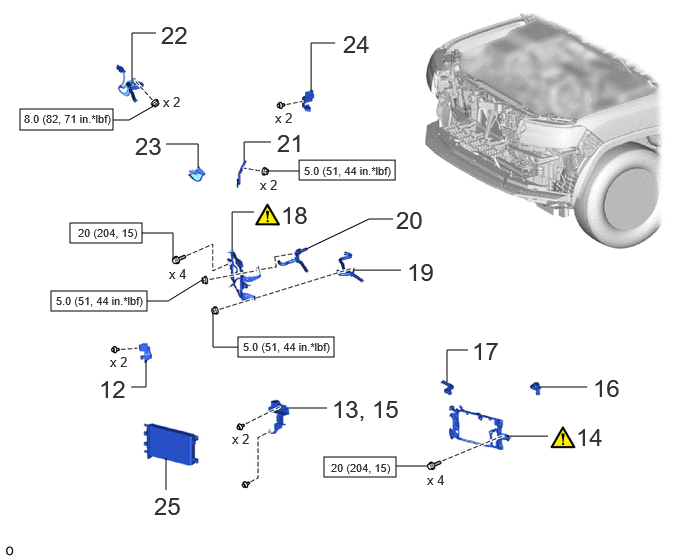
| Procedure | Part Name Code |
|
|
|
|
|---|---|---|---|---|---|
| 12 | FRONT RADIATOR SIDE AIR GUIDE PLATE RH | 16691A | - | - | - |
| 13 | INSTALL FRONT RADIATOR SIDE AIR GUIDE PLATE LH | 16695A | - | - | - |
| 14 | NO. 2 RADIATOR BRACKET | 16583 | () |
- | - |
| 15 | CONNECT FRONT RADIATOR SIDE AIR GUIDE PLATE LH | 16695A | - | - | - |
| 16 | NO. 8 WATER BY-PASS HOSE | 16296 | - | - | - |
| 17 | NO. 9 WATER BY-PASS HOSE | 16297 | - | - | - |
| 18 | NO. 1 RADIATOR BRACKET | 16582 | () |
- | - |
| 19 | FRONT WATER BY-PASS JOINT SUB-ASSEMBLY | 16035B | - | - | - |
| 20 | WATER HOSE JOINT | 16035 | - | - | - |
| 21 | NO. 1 WATER BY-PASS PIPE | 16268 | - | - | - |
| 22 | ELECTRIC WATER PUMP ASSEMBLY | 161B0 | - | - | - |
| 23 | CONNECTOR COVER | 82H21F | - | - | - |
| 24 | NO. 1 RADIATOR TO SUPPORT SEAL | 16561C | - | - | - |
| 25 | NO. 2 INTERCOOLER COOLING RADIATOR ASSEMBLY | 16550B | - | - | - |
|
|
N*m (kgf*cm, ft.*lbf): Specified torque | - | - |
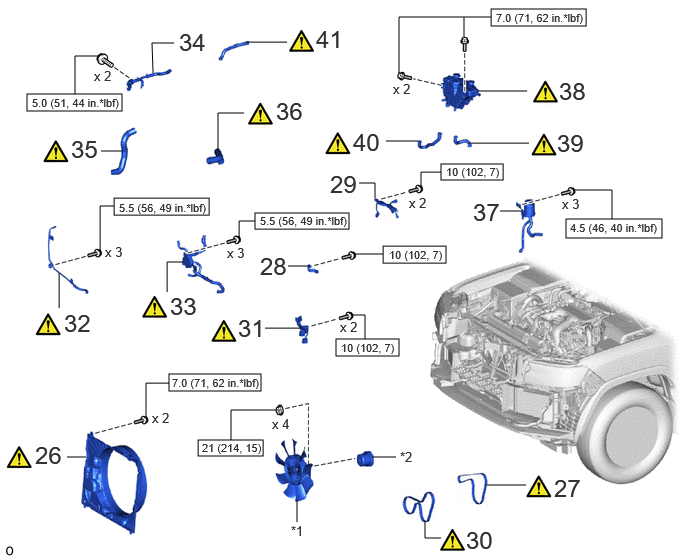
| Procedure | Part Name Code |
|
|
|
|
|---|---|---|---|---|---|
| 26 | FAN SHROUD | 16711 | () |
- | - |
| 27 | FAN AND GENERATOR V BELT | 16361A | () |
- | - |
| 28 | NO. 1 AIR TUBE SUPPORT | 17368G | - | - | - |
| 29 | ENGINE WIRE | 82121 | - | - | - |
| 30 | NO. 1 V BELT (COOLER COMPRESSOR TO CRANKSHAFT PULLEY) | 88310A | () |
- | - |
| 31 | COOLING FAN WIRE | 16364A | () |
- | - |
| 32 | OIL COOLER TUBE SUB-ASSEMBLY | - | () |
- | - |
| 33 | OIL COOLER ASSEMBLY WITH OIL COOLER HOSE | - | () |
- | - |
| 34 | NO. 2 WATER BY-PASS PIPE | 16278 | - | - | - |
| 35 | NO. 2 RADIATOR HOSE | 16572D | () |
- | - |
| 36 | NO. 1 RADIATOR HOSE | 16571C | () |
- | - |
| 37 | NO. 1 OIL RESERVOIR BRACKET | 44369A | - | - | - |
| 38 | RADIATOR RESERVE TANK ASSEMBLY | 164A2 | () |
- | - |
| 39 | NO. 2 WATER BY-PASS HOSE | 16264D | () |
- | - |
| 40 | WATER BY-PASS HOSE ASSEMBLY | 16260 | () |
- | - |
| 41 | WATER BY-PASS HOSE | 16261 | () |
- | - |
| *1 | FLUID COUPLING ASSEMBLY WITH FAN | *2 | FAN PULLEY |
|
|
N*m (kgf*cm, ft.*lbf): Specified torque | - | - |
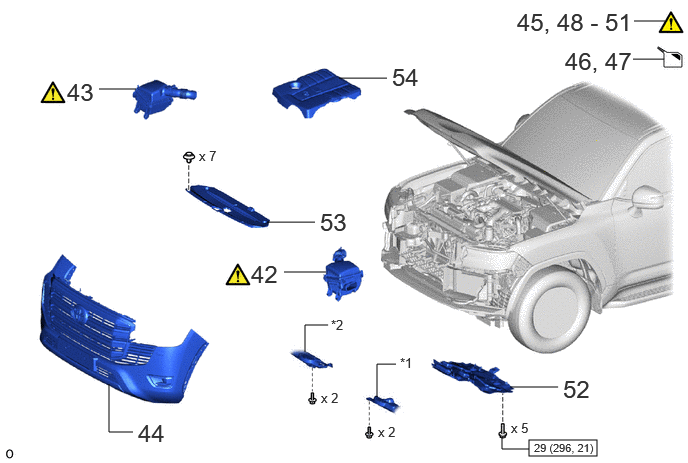
| Procedure | Part Name Code |
|
|
|
|
|---|---|---|---|---|---|
| 42 | AIR CLEANER ASSEMBLY LH WITH AIR CLEANER HOSE ASSEMBLY LH | 17800 | () |
- | - |
| 43 | AIR CLEANER ASSEMBLY RH WITH AIR CLEANER HOSE ASSEMBLY RH | 17700L | () |
- | - |
| 44 | FRONT BUMPER ASSEMBLY | - | - | - | - |
| 45 | CHARGE AIR CONDITIONING SYSTEM WITH REFRIGERANT | - | () |
- | - |
| 46 | ADD ENGINE COOLANT | - | - | () |
- |
| 47 | ADD COOLANT (for Intercooler) | - | - | () |
- |
| 48 | WARM UP ENGINE | - | () |
- | - |
| 49 | INSPECT FOR REFRIGERANT LEAK | - | () |
- | - |
| 50 | INSPECT FOR COOLANT LEAK | - | () |
- | - |
| 51 | INSPECT FOR COOLANT LEAK (for Intercooler) | - | () |
- | - |
| 52 | NO. 1 ENGINE UNDER COVER ASSEMBLY | 51410 | - | - | - |
| 53 | UPPER RADIATOR SUPPORT SEAL | 53292A | - | - | - |
| 54 | V-BANK COVER SUB-ASSEMBLY | 11209 | - | - | - |
| *1 | ENGINE SIDE COVER SUB-ASSEMBLY LH | *2 | ENGINE SIDE COVER SUB-ASSEMBLY RH |
|
|
N*m (kgf*cm, ft.*lbf): Specified torque | - | - |
PROCEDURE

 16561 1.INSTALL NO. 1 RADIATOR TO SUPPORT SEAL
16681 2.INSTALL UPPER RADIATOR AIR GUIDE PLATE
884A0 3.INSTALL COOLER CONDENSER ASSEMBLY
|
|
Click here() |
4.INSTALL COOLER BRACKET
88710G 5.INSTALL NO. 2 AIR CONDITIONING TUBE AND ACCESSORY ASSEMBLY
|
|
Click here() |
88590 6.INSTALL BLOWER ASSEMBLY WITH SHROUD (w/ Condenser Fan)
- Torque:
- 9.8 N*m (100 kgf*cm, 87 in.*lbf)
16572D 7.INSTALL NO. 2 RADIATOR HOSE
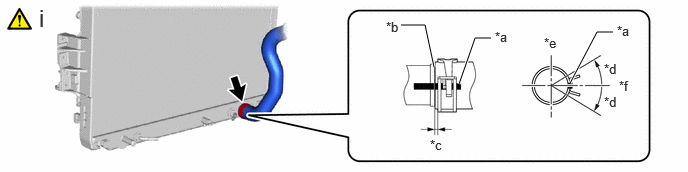
| *a | Paint Mark | *b | Stopper |
| *c | 2.0 to 7.0 mm (0.0787 to 0.276 in.) | *d | 30° |
| *e | Upper Side | *f | RH Side |
Install the No. 2 radiator hose to the radiator assembly and slide the hose clip to secure it as shown in the illustration.
- NOTICE:
-
·
Install so that the paint mark and positioning stopper are securely overlapped.
·Make sure the No. 2 radiator hose is securely inserted to the stopper.
8.INSTALL RADIATOR WITH COOLER CONDENSER ASSEMBLY
w/ Condenser Fan
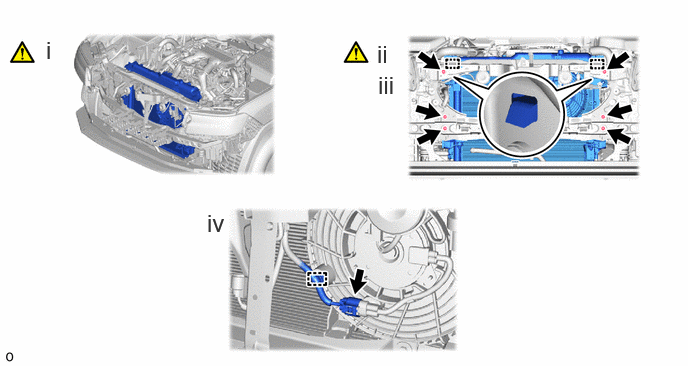
Install the radiator with cooler condenser assembly to the vehicle.
- NOTICE:
-
·
Perform the following procedure with 2 or more people to prevent damage to the radiator with cooler condenser assembly.
·When removing the radiator with cooler condenser assembly from the vehicle, do not apply excessive force to the cooler pipe or cooling hoses.
Set the radiator bracket hooks into the radiator support holes.
Install the radiator with cooler condenser assembly with the 6 bolts.
- Torque:
- 24 N*m (245 kgf*cm, 18 ft.*lbf)
Attach the clamp and connect the connector.
w/o Condenser Fan
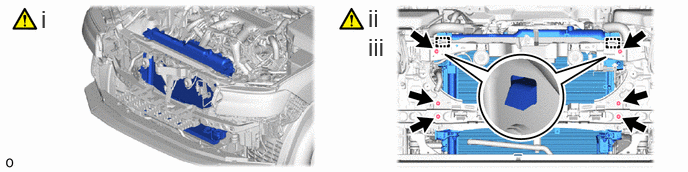
Install the radiator with cooler condenser assembly to the vehicle.
- NOTICE:
-
·
Perform the following procedure with 2 or more people to prevent damage to the radiator with cooler condenser assembly.
·When removing the radiator with cooler condenser assembly from the vehicle, do not apply excessive force to the cooler pipe or cooling hoses.
Set the radiator bracket hooks into the radiator support holes.
Install the radiator with cooler condenser assembly with the 6 bolts.
- Torque:
- 24 N*m (245 kgf*cm, 18 ft.*lbf)
88711 9.CONNECT NO. 1 COOLER REFRIGERANT DISCHARGE HOSE
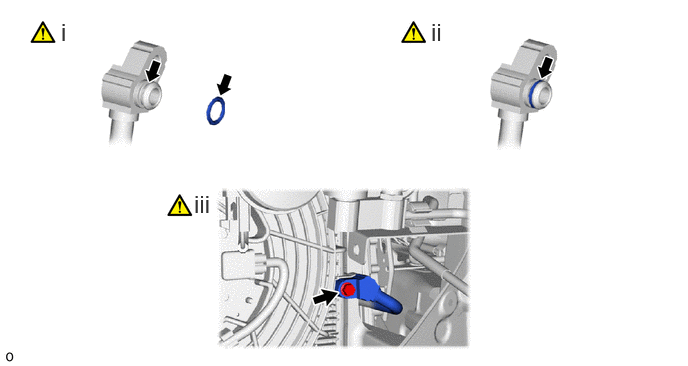
Remove the vinyl tape from the No. 1 cooler refrigerant discharge hose and connecting part of the cooler condenser assembly and then sufficiently apply compressor oil to a new O-ring and the fitting surface of the No. 1 cooler refrigerant discharge hose.
- Compressor Oil:
-
ND-OIL 8 or equivalent
Install a new O-ring to the No. 1 cooler refrigerant discharge hose.
- NOTICE:
-
Keep the O-ring and O-ring fitting surface free of foreign matter.
Connect the No. 1 cooler refrigerant discharge hose to the cooler condenser assembly with the bolt.
- Torque:
- 5.4 N*m (55 kgf*cm, 48 in.*lbf)
- NOTICE:
-
Make sure not to cut the O-ring while installing it. (Cut O-rings cannot be installed.)
88710E 10.CONNECT AIR CONDITIONING TUBE AND ACCESSORY ASSEMBLY
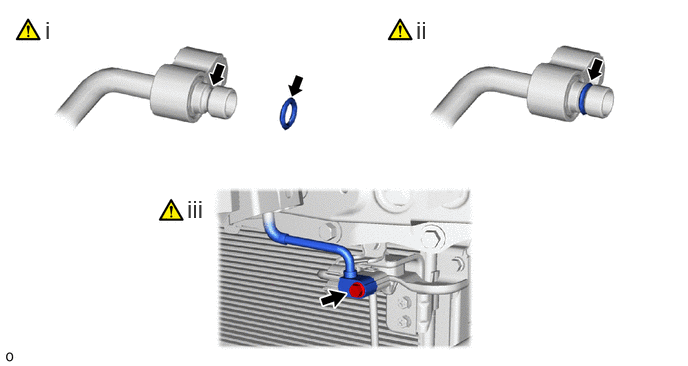
Remove the vinyl tape from the air conditioning tube and accessory assembly and connecting part of the No. 2 air conditioning tube and accessory assembly and then sufficiently apply compressor oil to a new O-ring and the fitting surface of the air conditioning tube and accessory assembly.
- Compressor Oil:
-
ND-OIL 8 or equivalent
Install a new O-ring to the air conditioning tube and accessory assembly.
- NOTICE:
-
Keep the O-ring and O-ring fitting surface free of foreign matter.
Connect the air conditioning tube and accessory assembly to the No. 2 air conditioning tube and accessory assembly with the bolt.
- Torque:
- 5.4 N*m (55 kgf*cm, 48 in.*lbf)
- NOTICE:
-
Make sure not to cut the O-ring while installing it. (Cut O-rings cannot be installed.)
44402 11.CONNECT NO. 1 POWER STEERING OIL COOLER SUB-ASSEMBLY
- Torque:
- 12 N*m (122 kgf*cm, 9 ft.*lbf)
16691A 12.INSTALL FRONT RADIATOR SIDE AIR GUIDE PLATE RH
16695A 13.INSTALL FRONT RADIATOR SIDE AIR GUIDE PLATE LH
16583 14.INSTALL NO. 2 RADIATOR BRACKET
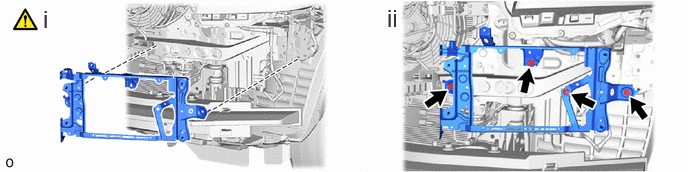
Hook the claw of the No. 2 radiator bracket as shown in the illustration.
Install the No. 2 radiator bracket with the 4 bolts.
- Torque:
- 20 N*m (204 kgf*cm, 15 ft.*lbf)
16695A 15.CONNECT FRONT RADIATOR SIDE AIR GUIDE PLATE LH
16296 16.CONNECT NO. 8 WATER BY-PASS HOSE
16297 17.CONNECT NO. 9 WATER BY-PASS HOSE
16582 18.INSTALL NO. 1 RADIATOR BRACKET
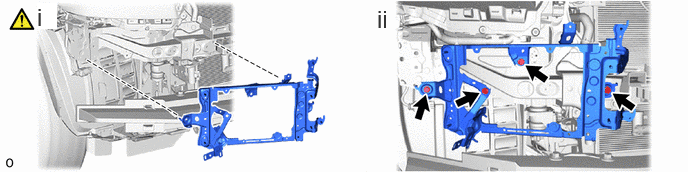
Hook the claw of the No. 1 radiator bracket as shown in the illustration.
Install the No. 1 radiator bracket with the 4 bolts.
- Torque:
- 20 N*m (204 kgf*cm, 15 ft.*lbf)
16035B 19.CONNECT FRONT WATER BY-PASS JOINT SUB-ASSEMBLY
- Torque:
- 5.0 N*m (51 kgf*cm, 44 in.*lbf)
16035 20.CONNECT WATER HOSE JOINT
- Torque:
- 5.0 N*m (51 kgf*cm, 44 in.*lbf)
16268 21.CONNECT NO. 1 WATER BY-PASS PIPE
- Torque:
- 5.0 N*m (51 kgf*cm, 44 in.*lbf)
161B0 22.CONNECT ELECTRIC WATER PUMP ASSEMBLY
- Torque:
- 8.0 N*m (82 kgf*cm, 71 in.*lbf)
82H21F 23.INSTALL CONNECTOR COVER
16561C 24.INSTALL NO. 1 RADIATOR TO SUPPORT SEAL
16550B 25.INSTALL NO. 2 INTERCOOLER COOLING RADIATOR ASSEMBLY
16711 26.INSTALL FAN SHROUD
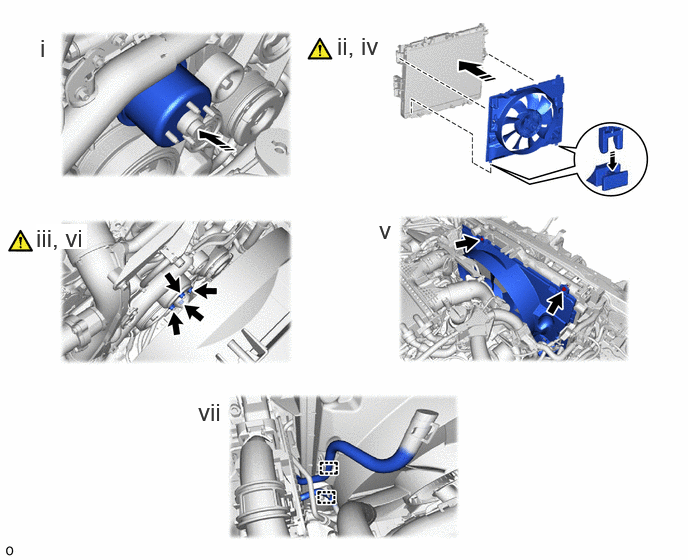
Install the fan pulley to the engine water pump assembly.
Place the fan shroud together with the fluid coupling assembly with fan between the radiator and engine.
- NOTICE:
-
Be careful not to damage the radiator core.
Temporarily install the fluid coupling assembly with fan to the engine water pump assembly with the 4 nuts. Tighten the nuts as much as possible by hand.
- NOTICE:
-
Align the paint marks on the head of the engine water pump stud bolt with the paint marks of the same color on the outer edge of the fluid coupling flange and set the fluid coupling to the engine water pump assembly.
Attach the claws of the fan shroud to the radiator as shown in the illustration.
Install the fan shroud with the 2 bolts.
- Torque:
- 7.0 N*m (71 kgf*cm, 62 in.*lbf)
Tighten the 4 nuts of the fluid coupling assembly with fan.
- Torque:
- 21 N*m (214 kgf*cm, 15 ft.*lbf)
Attach the 2 clamps.
16361A 27.INSTALL FAN AND GENERATOR V BELT
|
|
Click here() |
17368G 28.INSTALL NO. 1 AIR TUBE SUPPORT
82121 29.CONNECT ENGINE WIRE
88310A 30.INSTALL NO. 1 V BELT (COOLER COMPRESSOR TO CRANKSHAFT PULLEY)
|
|
Click here() |
16364A 31.INSTALL COOLING FAN WIRE
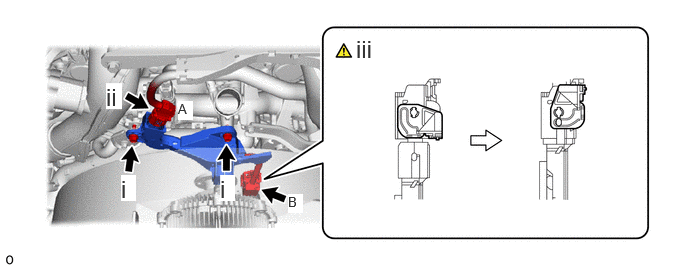
Install the cooling fan wire with the 2 bolts.
- Torque:
- 10 N*m (102 kgf*cm, 7 ft.*lbf)
Connect the connector A.
Connect the connector B and lock it with the lever.
- NOTICE:
-
·
When connecting the connectors, make sure that dirt, water or other foreign matter does not become stuck between the connectors and other parts.
·Make sure that the lever are securely locked.
32.CONNECT OIL COOLER TUBE SUB-ASSEMBLY
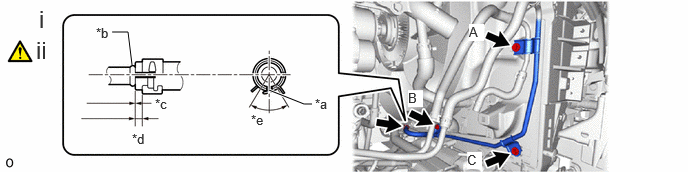
| *a | Paint Mark | *b | Stopper |
| *c | -1.5 to 1.5 mm (-0.0591 to 0.0591 in.) | *d | 2.0 to 7.0 mm (0.079 to 0.276 in.) |
| *e | 60° | - | - |
Connect the oil cooler tube sub-assembly to the fan shroud with the 3 bolts.
- Torque:
- 5.5 N*m (56 kgf*cm, 49 in.*lbf)
- NOTICE:
-
Tightening order: Temporarily install bolt A → Tighten bolt B → Tighten bolt C → Tighten bolt A
Connect the oil cooler tube sub-assembly to the radiator assembly and slide the hose clip to secure it as shown in the illustration.
- NOTICE:
-
Make sure the oil cooler tube sub-assembly is securely inserted to the stopper.
33.CONNECT OIL COOLER ASSEMBLY WITH OIL COOLER HOSE
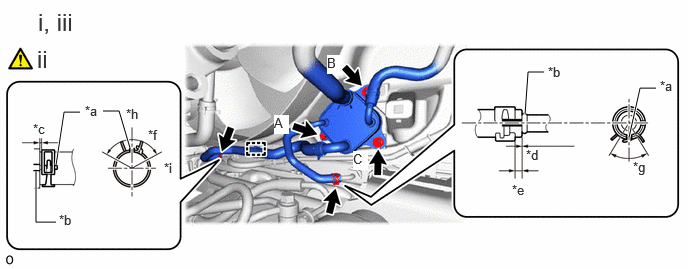
| *a | Paint Mark | *b | Stopper |
| *c | 2.0 to 5.0 mm (0.0787 to 0.1969 in.) | *d | -1.5 to 1.5 mm (-0.0591 to 0.0591 in.) |
| *e | 2.0 to 7.0 mm (0.079 to 0.276 in.) | *f | 120° |
| *g | 60° | *h | Upper Side |
| *i | RH Side | - | - |
Connect the oil cooler assembly with oil cooler hose to the fan shroud with the 3 bolts.
- Torque:
- 5.5 N*m (56 kgf*cm, 49 in.*lbf)
- NOTICE:
-
Tightening order: Tighten bolt A → Tighten bolt B → Tighten bolt C
Connect the oil cooler assembly with oil cooler hose to the radiator assembly and slide the 2 hose clips to secure it as shown in the illustration.
- NOTICE:
-
·
Install so that the paint mark and positioning stopper are securely overlapped.
·Make sure the oil cooler assembly with oil cooler hose is securely inserted to the stopper.
Attach the clamp.
16278 34.CONNECT NO. 2 WATER BY-PASS PIPE
- Torque:
- 5.0 N*m (51 kgf*cm, 44 in.*lbf)
16572D 35.CONNECT NO. 2 RADIATOR HOSE
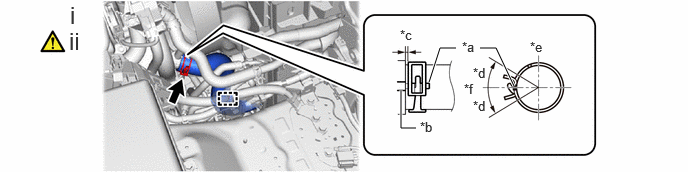
| *a | Paint Mark | *b | Stopper |
| *c | 2.0 to 7.0 mm (0.0787 to 0.276 in.) | *d | 30° |
| *e | Upper Side | *f | RH Side |
Attach the clamp.
Connect the No. 2 radiator hose to the water inlet pipe and slide the hose clip to secure it as shown in the illustration.
- NOTICE:
-
·
Install so that the paint mark and positioning stopper are securely overlapped.
·Make sure the No. 2 radiator hose is securely inserted to the stopper.
16571C 36.INSTALL NO. 1 RADIATOR HOSE
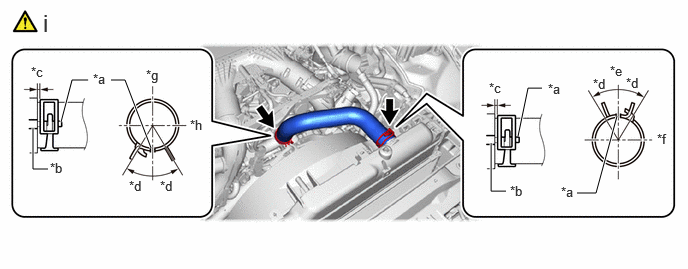
| *a | Paint Mark | *b | Stopper |
| *c | 2.0 to 7.0 mm (0.0787 to 0.276 in.) | *d | 30° |
| *e | Upper Side | *f | RH Side |
| *g | Rear Side | *h | LH Side |
Install the No. 1 radiator hose to the water outlet pipe and radiator assembly and slide the 2 hose clips to secure it as shown in the illustration.
- NOTICE:
-
·
Install so that the paint mark and positioning stopper are securely overlapped.
·Make sure the No. 1 radiator hose is securely inserted to the stopper.
44369A 37.INSTALL NO. 1 OIL RESERVOIR BRACKET
- Torque:
- 4.5 N*m (46 kgf*cm, 40 in.*lbf)
164A2 38.INSTALL RADIATOR RESERVE TANK ASSEMBLY
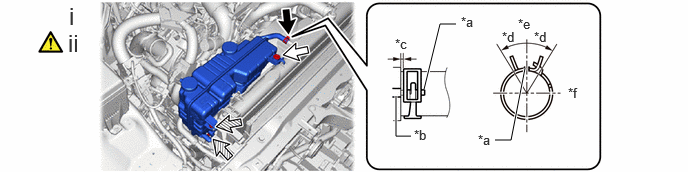
| *a | Paint Mark | *b | Stopper |
| *c | 2.0 to 5.0 mm (0.0787 to 0.197 in.) | *d | 30° |
| *e | Upper Side | *f | RH Side |

|
Bolt A |

|
Bolt B |
Install the radiator reserve tank assembly to the radiator assembly with the 3 bolts.
- Torque:
- 7.0 N*m (71 kgf*cm, 62 in.*lbf)
Connect the radiator reserve tank hose to the radiator assembly and slide the hose clip to secure it as shown in the illustration.
- NOTICE:
-
·
Install so that the paint mark and positioning stopper are securely overlapped.
·Make sure the radiator reserve tank hose is securely inserted to the stopper.
16264D 39.CONNECT NO. 2 WATER BY-PASS HOSE
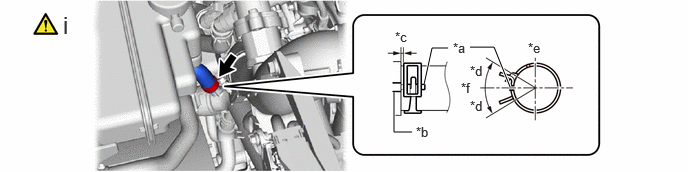
| *a | Paint Mark | *b | Stopper |
| *c | 2.0 to 5.0 mm (0.0787 to 0.197 in.) | *d | 25° |
| *e | Rear Side | *f | RH Side |
Connect the No. 2 water by-pass hose to the water inlet pipe and slide the hose clip to secure it as shown in the illustration.
- NOTICE:
-
·
Install so that the paint mark and positioning stopper are securely overlapped.
·Make sure the No. 2 water by-pass hose is securely inserted to the stopper.
16260 40.CONNECT WATER BY-PASS HOSE ASSEMBLY
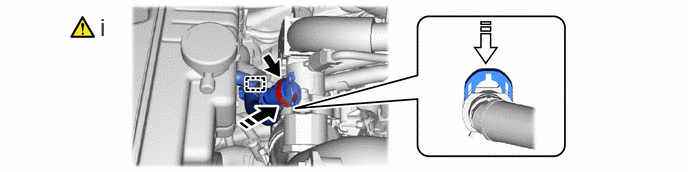

|
Connect the Water By-pass Hose Assembly |

|
Insert the Retainer in the Direction of the Arrow Shown in the Illustration. |
Connect the water by-pass hose assembly to the intercooler pipe and slide the retainer to secure it as shown in the illustration.
- NOTICE:
-
·
Push in the retainer until a click sound is heard.
·Pull on the water by-pass hose assembly to confirm that the hose is securely connected.
16261 41.CONNECT WATER BY-PASS HOSE
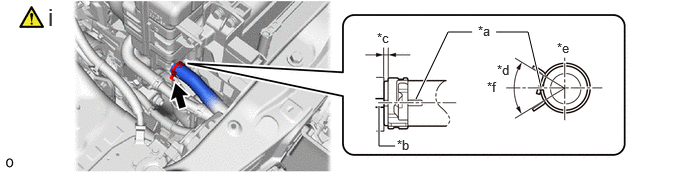
| *a | Paint Mark | *b | Stopper |
| *c | 2.0 to 5.0 mm (0.0787 to 0.1969 in.) | *d | 60° |
| *e | Upper Side | *f | RH Side |
Connect the water by-pass hose to the radiator reserve tank assembly and slide the hose clip to secure it as shown in the illustration.
- NOTICE:
-
·
Install so that the paint mark and positioning stopper are securely overlapped.
·Make sure the water by-pass hose is securely inserted to the stopper.
17800 42.INSTALL AIR CLEANER ASSEMBLY LH WITH AIR CLEANER HOSE ASSEMBLY LH
|
|
Click here() |
17700L 43.INSTALL AIR CLEANER ASSEMBLY RH WITH AIR CLEANER HOSE ASSEMBLY RH
|
|
Click here() |
44.INSTALL FRONT BUMPER ASSEMBLY
for Standard
Click hereVehicle Exterior>EXTERIOR PANELS / TRIM>FRONT BUMPER (for Standard)>INSTALLATION
for Aero Type
Click hereVehicle Exterior>EXTERIOR PANELS / TRIM>FRONT BUMPER (for Aero Type)>INSTALLATION
45.CHARGE AIR CONDITIONING SYSTEM WITH REFRIGERANT
46.ADD ENGINE COOLANT
47.ADD COOLANT (for Intercooler)
48.WARM UP ENGINE
49.INSPECT FOR REFRIGERANT LEAK
50.INSPECT FOR COOLANT LEAK
51.INSPECT FOR COOLANT LEAK (for Intercooler)
51410 52.INSTALL NO. 1 ENGINE UNDER COVER ASSEMBLY
53292A 53.INSTALL UPPER RADIATOR SUPPORT SEAL
11209 54.INSTALL V-BANK COVER SUB-ASSEMBLY