AUDIO / VIDEO NOISE FILTER REMOVAL
CAUTION / NOTICE / HINT
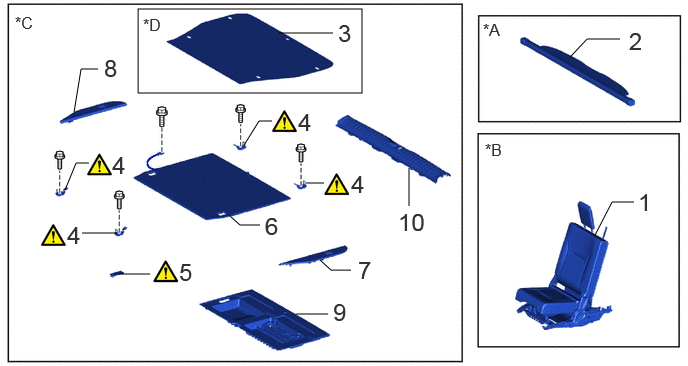
| Procedure | Part Name Code |

|

|

|
|
|---|---|---|---|---|---|
| 1 | REAR NO. 2 SEAT ASSEMBLY RH | - | - | - | - |
| 2 | TONNEAU COVER ASSEMBLY | 64910M | - | - | - |
| 3 | REAR FLOOR CARPET ASSEMBLY | 58570C | - | - | - |
| 4 | ROPE HOOK ASSEMBLY | 66310N | ( ) |
- | - |
| 5 | REAR DECK TRIM COVER | 64716P | () |
- | - |
| 6 | DECK BOARD ASSEMBLY | 58410B | - | - | - |
| 7 | REAR FLOOR BOARD REAR LH | 58418H | - | - | - |
| 8 | REAR FLOOR BOARD REAR RH | 58417B | - | - | - |
| 9 | REAR DECK FLOOR BOX | 64993 | - | - | - |
| 10 | REAR FLOOR MAT REAR SUPPORT PLATE | 58574G | - | - | - |
| *A | w/ Tonneau Cover | *B | w/ Rear No. 2 Seat |
| *C | w/o Rear No. 2 Seat | *D | w/ Carpet |
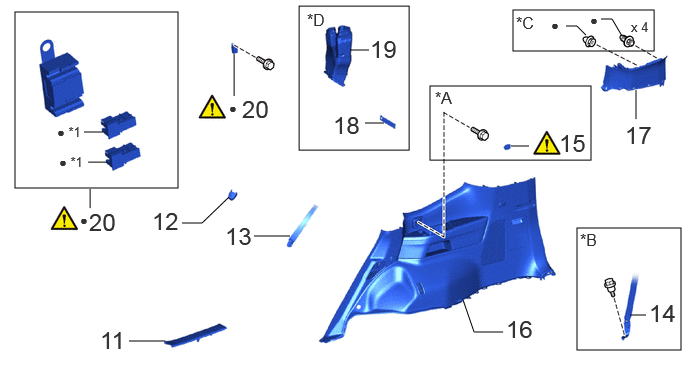
| Procedure | Part Name Code |
|
|
|
|
|---|---|---|---|---|---|
| 11 | REAR DOOR SCUFF PLATE RH | 67917C | - | - | - |
| 12 | OUTER LAP BELT ANCHOR COVER | 73233D | - | - | - |
| 13 | REAR NO. 1 SEAT OUTER BELT ASSEMBLY RH (FLOOR ANCHOR) | 73360C | - | - | - |
| 14 | REAR NO. 2 SEAT OUTER BELT ASSEMBLY RH (FLOOR ANCHOR) | 73560 | - | - | - |
| 15 | NO. 1 TONNEAU COVER HOLDER CAP | 64937A | () |
- | - |
| 16 | QUARTER TRIM PANEL ASSEMBLY RH | 62510M | - | - | - |
| 17 | INNER ROOF SIDE GARNISH RH | 62471A | - | - | - |
| 18 | COOLER PLATE | - | - | - | - |
| 19 | REAR NO. 9 SIDE AIR DUCT | 87217N | - | - | - |
| 20 | RADIO SETTING CONDENSER | 86011V | () |
- | - |
| *A | w/ Tonneau Cover | *B | w/ Rear No. 2 Seat |
| *C | w/ Curtain Shield Airbag | *D | w/ Air Duct |
| *1 | TERMINAL COVER | - | - |
| ● | Non-reusable part | - | - |
PROCEDURE

 1.REMOVE REAR NO. 2 SEAT ASSEMBLY RH (w/ Rear No. 2 Seat)
for Manual Seat:
Click hereVehicle Interior>SEAT>REAR NO. 2 SEAT ASSEMBLY (for Manual Seat)>REMOVAL
for Power Seat:
Click hereVehicle Interior>SEAT>REAR NO. 2 SEAT ASSEMBLY (for Power Seat)>REMOVAL
64910M 2.REMOVE TONNEAU COVER ASSEMBLY (w/ Tonneau Cover)
58570C 3.REMOVE REAR FLOOR CARPET ASSEMBLY (w/ Carpet)
66310N 4.REMOVE ROPE HOOK ASSEMBLY (w/o Rear No. 2 Seat)
|
|
Click here() |
64716P 5.REMOVE REAR DECK TRIM COVER (w/o Rear No. 2 Seat)
|
|
Click here() |
58410B 6.REMOVE DECK BOARD ASSEMBLY (w/o Rear No. 2 Seat)
58418H 7.REMOVE REAR FLOOR BOARD REAR LH (w/o Rear No. 2 Seat)
58417B 8.REMOVE REAR FLOOR BOARD REAR RH (w/o Rear No. 2 Seat)
Use the same procedure described for the LH side.
64993 9.REMOVE REAR DECK FLOOR BOX (w/o Rear No. 2 Seat)
58574G 10.REMOVE REAR FLOOR MAT REAR SUPPORT PLATE (w/o Rear No. 2 Seat)
67917C 11.REMOVE REAR DOOR SCUFF PLATE RH
Use the same procedure described for the LH side.
Click hereVehicle Interior>INTERIOR PANELS / TRIM>ROOF HEADLINING>REMOVAL
73233D 12.REMOVE OUTER LAP BELT ANCHOR COVER
73360C 13.REMOVE REAR NO. 1 SEAT OUTER BELT ASSEMBLY RH (FLOOR ANCHOR)
Use the same procedure described for the LH side.
Click hereVehicle Interior>SEAT BELT>REAR NO. 1 SEAT OUTER BELT ASSEMBLY>REMOVAL
73560 14.REMOVE REAR NO. 2 SEAT OUTER BELT ASSEMBLY RH (FLOOR ANCHOR) (w/ Rear No. 2 Seat)
Use the same procedure described for the LH side.
Click hereVehicle Interior>SEAT BELT>REAR NO. 1 SEAT OUTER BELT ASSEMBLY>REMOVAL
64937A 15.REMOVE NO. 1 TONNEAU COVER HOLDER CAP (w/ Tonneau Cover)
|
|
Click here() |
62510M 16.REMOVE QUARTER TRIM PANEL ASSEMBLY RH
Use the same procedure described for the LH side.
Click hereVehicle Interior>INTERIOR PANELS / TRIM>ROOF HEADLINING>REMOVAL
62471A 17.REMOVE INNER ROOF SIDE GARNISH RH
Use the same procedure described for the LH side.
Click hereVehicle Interior>INTERIOR PANELS / TRIM>ROOF HEADLINING>REMOVAL
18.REMOVE COOLER PLATE (w/ Air Duct)
87217N 19.REMOVE REAR NO. 9 SIDE AIR DUCT (w/ Air Duct)
86011V 20.REMOVE RADIO SETTING CONDENSER
|
|
|
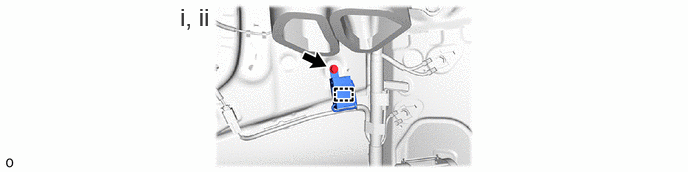
Remove the bolt.
Detach the clamp and disconnect the radio setting condenser with wire harness from the vehicle body.
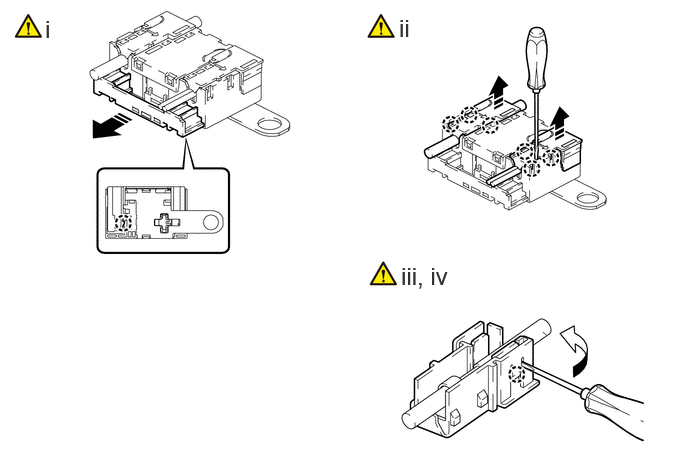

|
Remove in this Direction | - | - |
Detach the claw and pull out the cover as shown in the illustration.
Using a screwdriver, detach the claw and remove the 2 terminal covers with wire harness from the condenser.
Using a screwdriver, bend back and break off the claw as shown in the illustration.
Remove the terminal cover from the wire harness.
- NOTICE:
-
·
Make sure to hold the crimping side of the terminal when disconnecting the wire harness from the terminal cover.
·Make sure not to bend the exposed wire when disconnecting the wire harness from the terminal cover.
·Check for deformation of the terminal after the wire harness has been removed from the terminal cover.