HEATING / AIR CONDITIONING COMPRESSOR(for F33A-FTV) REMOVAL
CAUTION / NOTICE / HINT
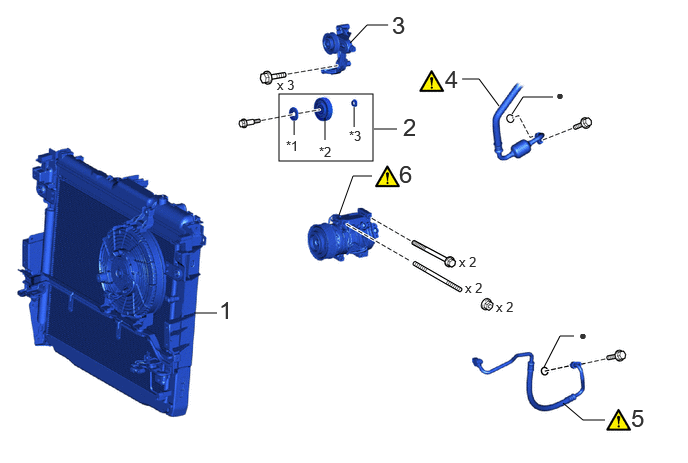
| Procedure | Part Name Code |

|

|

|
|
|---|---|---|---|---|---|
| 1 | RADIATOR WITH COOLER CONDENSER ASSEMBLY | - | - | - | - |
| 2 | NO. 2 IDLER PULLEY SUB-ASSEMBLY | 16604C | - | - | - |
| 3 | NO. 2 IDLER PULLEY ASSEMBLY | 16630J | - | - | - |
| 4 | SUCTION HOSE SUB-ASSEMBLY | 88704 | ( ) |
- | - |
| 5 | NO. 1 COOLER REFRIGERANT DISCHARGE HOSE | 88711 | () |
- | - |
| 6 | COMPRESSOR WITH MAGNET CLUTCH | - | () |
- | - |
| *1 | DUST COVER | *2 | IDLE PULLEY SUB-ASSEMBLY |
| *3 | IDLE PULLEY COLLAR | - | - |
| ● | Non-reusable part | - | - |
CAUTION / NOTICE / HINT
The necessary procedures (adjustment, calibration, initialization, or registration) that must be performed after parts are removed, installed, or replaced during the compressor with magnet clutch removal/installation are shown below.
| Replaced Part or Performed Procedures | Necessary procedures | Effect/Inoperative Function when Necessary Procedures are not Performed | Link |
|---|---|---|---|
| Front bumper assembly (Including removal and installation) | Front television camera view adjustment | Panoramic view monitor system | () |
- HINT:
-
·
Use the same procedure for RHD and LHD vehicles.
·The procedure listed below is for LHD vehicles.
PROCEDURE

 1.REMOVE RADIATOR WITH COOLER CONDENSER ASSEMBLY
16604C 2.REMOVE NO. 2 IDLER PULLEY SUB-ASSEMBLY
16630J 3.REMOVE NO. 2 IDLER PULLEY ASSEMBLY
88704 4.DISCONNECT SUCTION HOSE SUB-ASSEMBLY
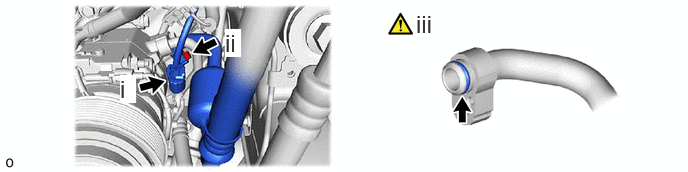
Disconnect the connector.
Remove the bolt and disconnect the suction hose sub-assembly.
Remove the O-ring from the suction hose sub-assembly.
- NOTICE:
-
Seal the openings of the disconnected parts using vinyl tape to prevent moisture and foreign matter from entering them.
88711 5.REMOVE NO. 1 COOLER REFRIGERANT DISCHARGE HOSE
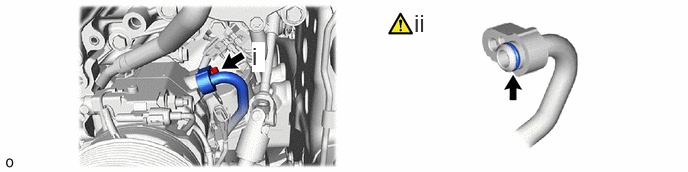
Remove the bolt and No. 1 cooler refrigerant discharge hose.
Remove the O-ring from the No. 1 cooler refrigerant discharge hose.
- NOTICE:
-
Seal the openings of the disconnected parts using vinyl tape to prevent moisture and foreign matter from entering them.
6.REMOVE COMPRESSOR WITH MAGNET CLUTCH
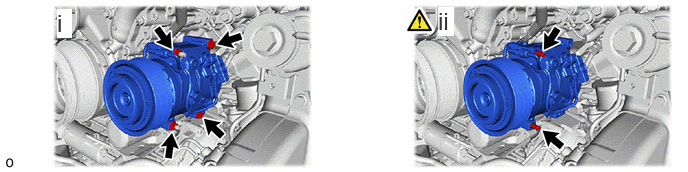
Remove the 2 bolts and 2 nuts.
Using an E8 "TORX" socket wrench, remove the 2 stud bolts and compressor with magnet clutch.