F33A-FTV FUEL COMMON RAIL INSTALLATION
CAUTION / NOTICE / HINT
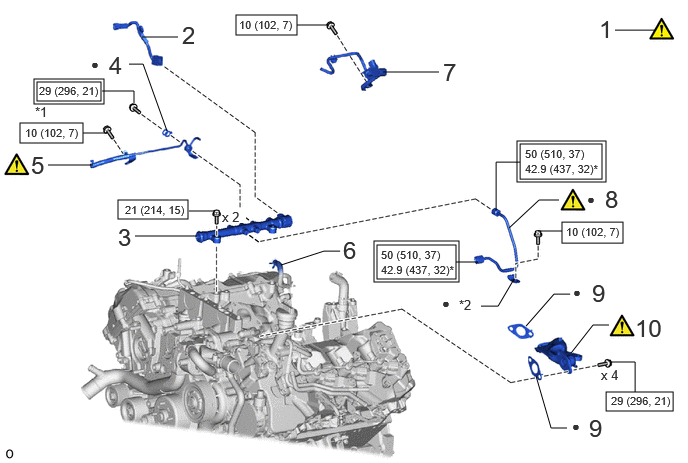
| Procedure | Part Name Code |

|

|

|
|
|---|---|---|---|---|---|
| 1 | PRECAUTION FOR WORK | - | ( ) |
- | - |
| 2 | NO. 3 CONNECTING WIRE | 27148F | - | - | - |
| 3 | COMMON RAIL ASSEMBLY (for Bank 1) | 23810A | - | - | - |
| 4 | FUEL PIPE GASKET | 23804H | - | - | - |
| 5 | NO. 5 FUEL PIPE SUB-ASSEMBLY | 23805B | () |
- | - |
| 6 | FUEL HOSE | 23802F | - | - | - |
| 7 | NO. 2 VACUUM SWITCHING VALVE ASSEMBLY | 25860D | - | - | - |
| 8 | NO. 4 INJECTION PIPE SUB-ASSEMBLY | 23704 | () |
- | - |
| 9 | WATER OUTLET GASKET | 16341 | - | - | - |
| 10 | NO. 1 WATER OUTLET PIPE | 16332 | () |
- | - |
| *1 | UNION BOLT | *2 | NO. 1 INJECTION PIPE CLAMP |

|
Tightening torque for "Major areas involving basic vehicle performance such as moving/turning/stopping": N*m (kgf*cm, ft.*lbf) |

|
N*m (kgf*cm, ft.*lbf): Specified torque |
| * | For use with union nut wrench | ● | Non-reusable part |
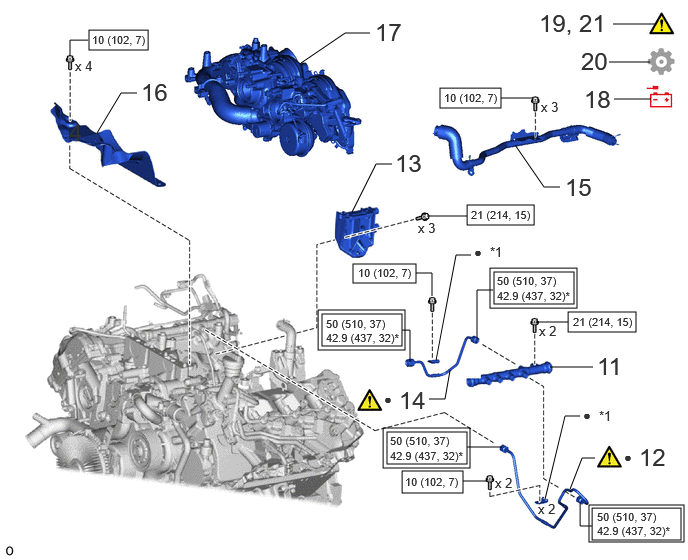
| Procedure | Part Name Code |
|
|
|
|
|---|---|---|---|---|---|
| 11 | COMMON RAIL ASSEMBLY (for Bank 2) | 23820A | - | - | - |
| 12 | NO. 6 INJECTION PIPE SUB-ASSEMBLY | 23706 | () |
- | - |
| 13 | INTERCOOLER SUPPORT BRACKET | 17945 | - | - | - |
| 14 | NO. 5 INJECTION PIPE SUB-ASSEMBLY | 23705 | () |
- | - |
| 15 | VENTILATION PIPE | 12229 | - | - | - |
| 16 | INJECTION PUMP INSULATOR | 22815A | - | - | - |
| 17 | TURBOCHARGER ASSEMBLY | - | - | - | - |
| 18 | CONNECT CABLE TO NEGATIVE BATTERY TERMINAL | - | - | - | - |
| 19 | BLEED AIR FROM FUEL SYSTEM | - | () |
- | - |
| 20 | INITIALIZATION AFTER RECONNECTING BATTERY TERMINAL | - | - | - | () |
| 21 | INSPECT FOR FUEL LEAK | - | () |
- | - |
| *1 | NO. 1 INJECTION PIPE CLAMP | - | - |
|
|
Tightening torque for "Major areas involving basic vehicle performance such as moving/turning/stopping": N*m (kgf*cm, ft.*lbf) |
|
N*m (kgf*cm, ft.*lbf): Specified torque |
| * | For use with union nut wrench | ● | Non-reusable part |
PROCEDURE

 1. PRECAUTION FOR WORK
|
|
|
27148F 2.INSTALL NO. 3 CONNECTING WIRE
23810A 3.INSTALL COMMON RAIL ASSEMBLY (for Bank 1)
- Torque:
- 21 N*m (214 kgf*cm, 15 ft.*lbf)
23804H 4.INSTALL FUEL PIPE GASKET
23805B 5.INSTALL NO. 5 FUEL PIPE SUB-ASSEMBLY
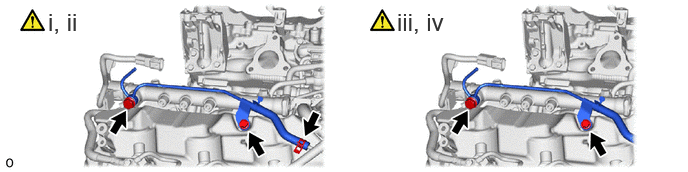
Connect the fuel hose to the No. 4 nozzle leakage pipe, and slide the clamp to secure the hose.
Temporarily install the No. 5 fuel pipe sub-assembly to the common rail assembly and cylinder head cover RH with the union bolt and bolt.
Tighten the union bolt.
- Torque:
- 29 N*m (296 kgf*cm, 21 ft.*lbf)
Tighten the bolt.
- Torque:
- 10 N*m (102 kgf*cm, 7 ft.*lbf)
23802F 6.CONNECT FUEL HOSE
25860D 7.INSTALL NO. 2 VACUUM SWITCHING VALVE ASSEMBLY
23704 8.INSTALL NO. 4 INJECTION PIPE SUB-ASSEMBLY
|
|
|
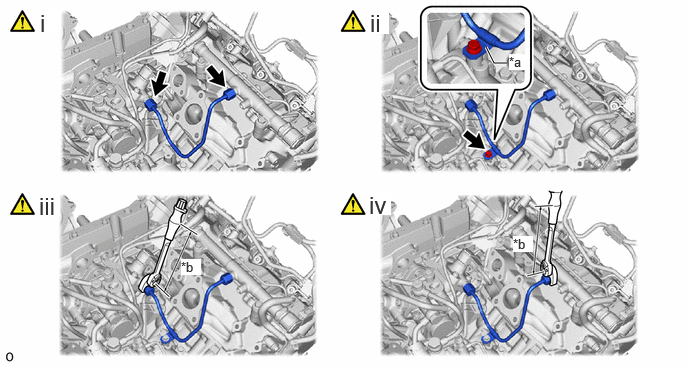
| *a | No. 1 injection pipe clamp | *b | Torque Wrench Fulcrum Length |
Temporarily install a new No. 4 injection pipe sub-assembly to the injection or supply pump assembly and common rail assembly with the 2 union nuts.
- HINT:
-
Install the union nut by hand until all of the threads make contact.
Temporarily install a new No. 1 injection pipe clamp and the No. 4 injection pipe sub-assembly to the diesel fuel filter assembly with the bolt.
- NOTICE:
-
Attach the No. 1 injection pipe clamp to the rubber part of the No. 4 injection pipe sub-assembly.
Using a 19 mm union nut wrench, tighten the union nut on the injection or supply pump assembly side of the No. 4 injection pipe sub-assembly.
- Torque:
- Specified tightening torque:
-
10 N*m (102 kgf*cm, 7 ft.*lbf)
- HINT:
-
·
Calculate the torque wrench reading when changing the fulcrum length of the torque wrench.
Click hereGeneral>INTRODUCTION>REPAIR INSTRUCTION>PRECAUTION
·When using a union nut wrench (fulcrum length of 30 mm (1.18 in.)) + torque wrench (fulcrum length of 162 mm (6.38 in.)): 8.4 N*m (86 kgf*cm, 74 in.*lbf)
Using a 17 mm union nut wrench, tighten the union nut on the common rail assembly side of the No. 4 injection pipe sub-assembly.
- Torque:
- Specified tightening torque:
-
10 N*m (102 kgf*cm, 7 ft.*lbf)
- HINT:
-
·
Calculate the torque wrench reading when changing the fulcrum length of the torque wrench.
Click hereGeneral>INTRODUCTION>REPAIR INSTRUCTION>PRECAUTION
·When using a union nut wrench (fulcrum length of 30 mm (1.18 in.)) + torque wrench (fulcrum length of 162 mm (6.38 in.)): 8.4 N*m (86 kgf*cm, 74 in.*lbf)
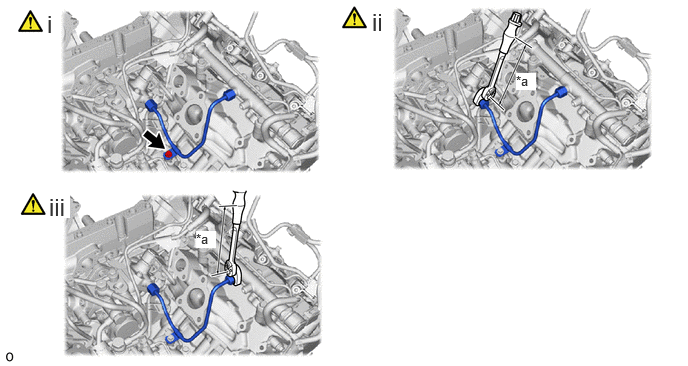
| *a | Torque Wrench Fulcrum Length | - | - |
Tighten the bolt.
- Torque:
- 10 N*m (102 kgf*cm, 7 ft.*lbf)
Using a 19 mm union nut wrench, tighten the union nut on the injection or supply pump assembly side of the No. 4 injection pipe sub-assembly.
- Torque:
- Specified tightening torque:
-
50 N*m (510 kgf*cm, 37 ft.*lbf)
- HINT:
-
·
Calculate the torque wrench reading when changing the fulcrum length of the torque wrench.
Click hereGeneral>INTRODUCTION>REPAIR INSTRUCTION>PRECAUTION
·When using a union nut wrench (fulcrum length of 30 mm (1.18 in.)) + torque wrench (fulcrum length of 180 mm (7.09 in.)): 42.9 N*m (437 kgf*cm, 32 ft.*lbf)
Using a 17 mm union nut wrench, tighten the union nut on the common rail assembly side of the No. 4 injection pipe sub-assembly.
- Torque:
- Specified tightening torque:
-
50 N*m (510 kgf*cm, 37 ft.*lbf)
- HINT:
-
·
Calculate the torque wrench reading when changing the fulcrum length of the torque wrench.
Click hereGeneral>INTRODUCTION>REPAIR INSTRUCTION>PRECAUTION
·When using a union nut wrench (fulcrum length of 30 mm (1.18 in.)) + torque wrench (fulcrum length of 180 mm (7.09 in.)): 42.9 N*m (437 kgf*cm, 32 ft.*lbf)
16341 9.INSTALL WATER OUTLET GASKET
16332 10.INSTALL NO. 1 WATER OUTLET PIPE
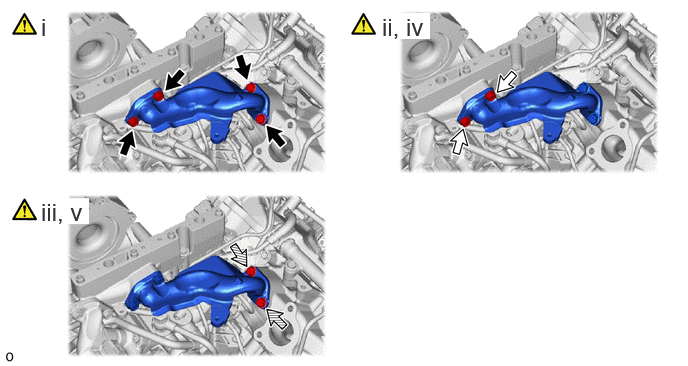

|
Bolt A |

|
Bolt B |
Temporarily install the No. 1 water outlet pipe to the turbocharger stay and cylinder head sub-assembly with the 4 bolts.
Tighten the bolt A until all of the threads make contact.
Tighten the bolt B until all of the threads make contact.
Tighten the bolt A.
- Torque:
- 29 N*m (296 kgf*cm, 21 ft.*lbf)
Tighten the bolt B.
- Torque:
- 29 N*m (296 kgf*cm, 21 ft.*lbf)
23820A 11.INSTALL COMMON RAIL ASSEMBLY (for Bank 2)
- Torque:
- 21 N*m (214 kgf*cm, 15 ft.*lbf)
23706 12.INSTALL NO. 6 INJECTION PIPE SUB-ASSEMBLY
|
|
|
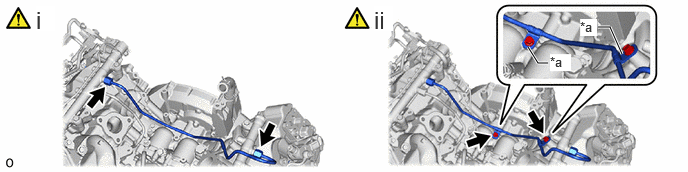
| *a | No. 1 injection pipe clamp | - | - |
Temporarily install a new No. 6 injection pipe sub-assembly to the common rail assembly with the 2 union nuts.
- HINT:
-
Install the union nut by hand until all of the threads make contact.
Temporarily install 2 new No. 1 injection pipe clamps and the No. 6 injection pipe sub-assembly to the diesel fuel filter assembly and cylinder head LH with the 2 bolts.
- NOTICE:
-
Attach the No. 1 injection pipe clamp to the rubber part of the No. 6 injection pipe sub-assembly.
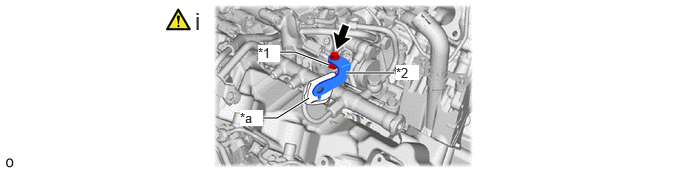
| *1 | Collar | *2 | Stay |
| *a | Cloth | - | - |
Using a cloth, install the stay and collar included with the No. 6 injection pipe sub-assembly with the bolt.
- Torque:
- 10 N*m (102 kgf*cm, 7 ft.*lbf)
- NOTICE:
-
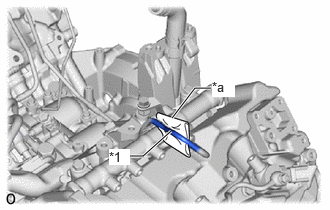 1.781,1.365 1.49,1.625 1.49,1.625 1.323,1.625 true 1.792,1.229 2.031,0.917 2.031,0.917 2.198,0.917 true 2.208,0.823 2.448,1.01 0.24,0.188 10 true *a 1.135,1.552 1.354,1.719 0.219,0.167 10 true *1
*1 No. 6 Injection Pipe Sub-assembly *a Cloth
-
Protect the stay and the contact area of the No. 6 injection pipe sub-assembly with a cloth to prevent damage to the No. 6 injection pipe sub-assembly.
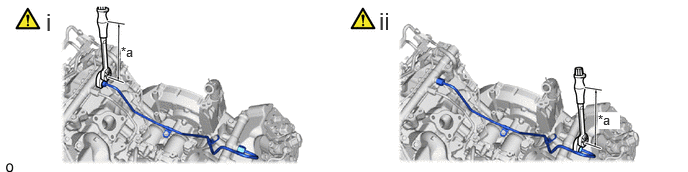
| *a | Torque Wrench Fulcrum Length | - | - |
Using a 17 mm union nut wrench, tighten the union nut on the common rail assembly (for Bank 1) side of the No. 6 injection pipe sub-assembly.
- Torque:
- Specified tightening torque:
-
10 N*m (102 kgf*cm, 7 ft.*lbf)
- HINT:
-
·
Calculate the torque wrench reading when changing the fulcrum length of the torque wrench.
Click hereGeneral>INTRODUCTION>REPAIR INSTRUCTION>PRECAUTION
·When using a union nut wrench (fulcrum length of 30 mm (1.18 in.)) + torque wrench (fulcrum length of 162 mm (6.38 in.)): 8.4 N*m (86 kgf*cm, 74 in.*lbf)
Using a 17 mm union nut wrench, tighten the union nut on the common rail assembly (for Bank 2) side of the No. 6 injection pipe sub-assembly.
- Torque:
- Specified tightening torque:
-
10 N*m (102 kgf*cm, 7 ft.*lbf)
- HINT:
-
·
Calculate the torque wrench reading when changing the fulcrum length of the torque wrench.
Click hereGeneral>INTRODUCTION>REPAIR INSTRUCTION>PRECAUTION
·When using a union nut wrench (fulcrum length of 30 mm (1.18 in.)) + torque wrench (fulcrum length of 162 mm (6.38 in.)): 8.4 N*m (86 kgf*cm, 74 in.*lbf)
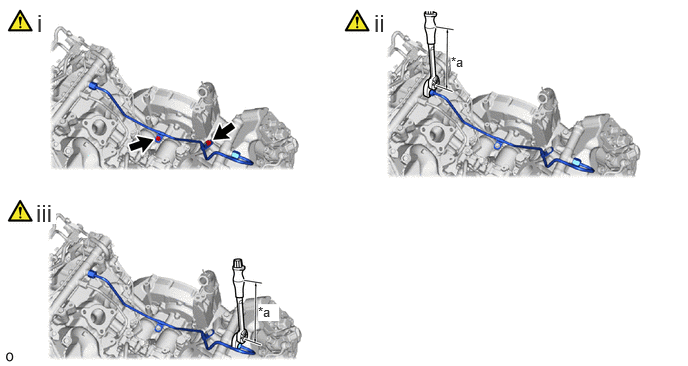
| *a | Torque Wrench Fulcrum Length | - | - |
Tighten the 2 bolts.
- Torque:
- 10 N*m (102 kgf*cm, 7 ft.*lbf)
Using a 17 mm union nut wrench, tighten the union nut on the common rail assembly (for Bank 1) side of the No. 6 injection pipe sub-assembly.
- Torque:
- Specified tightening torque:
-
50 N*m (510 kgf*cm, 37 ft.*lbf)
- HINT:
-
·
Calculate the torque wrench reading when changing the fulcrum length of the torque wrench.
Click hereGeneral>INTRODUCTION>REPAIR INSTRUCTION>PRECAUTION
·When using a union nut wrench (fulcrum length of 30 mm (1.18 in.)) + torque wrench (fulcrum length of 180 mm (7.09 in.)): 42.9 N*m (437 kgf*cm, 32 ft.*lbf)
Using a 17 mm union nut wrench, tighten the union nut on the common rail assembly (for Bank 2) side of the No. 6 injection pipe sub-assembly.
- Torque:
- Specified tightening torque:
-
50 N*m (510 kgf*cm, 37 ft.*lbf)
- HINT:
-
·
Calculate the torque wrench reading when changing the fulcrum length of the torque wrench.
Click hereGeneral>INTRODUCTION>REPAIR INSTRUCTION>PRECAUTION
·When using a union nut wrench (fulcrum length of 30 mm (1.18 in.)) + torque wrench (fulcrum length of 180 mm (7.09 in.)): 42.9 N*m (437 kgf*cm, 32 ft.*lbf)
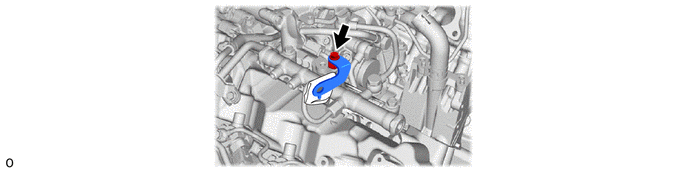
Remove the bolt, stay, collar and cloth.
17945 13.INSTALL INTERCOOLER SUPPORT BRACKET
- Torque:
- 21 N*m (214 kgf*cm, 15 ft.*lbf)
23705 14.INSTALL NO. 5 INJECTION PIPE SUB-ASSEMBLY
|
|
|
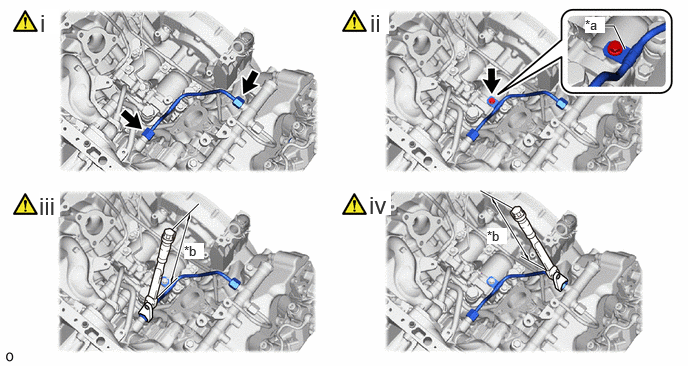
| *a | No. 1 injection pipe clamp | *b | Torque Wrench Fulcrum Length |
Temporarily install a new No. 5 injection pipe sub-assembly to the injection or supply pump assembly and common rail assembly with the 2 union nuts.
- HINT:
-
Install the union nut by hand until all of the threads make contact.
Temporarily install a new No. 1 injection pipe clamp and the No. 5 injection pipe sub-assembly to the diesel fuel filter assembly with the bolt.
- NOTICE:
-
Attach the No. 1 injection pipe clamp to the rubber part of the No. 5 injection pipe sub-assembly.
Using a 19 mm union nut wrench, tighten the union nut on the injection or supply pump assembly side of the No. 5 injection pipe sub-assembly.
- Torque:
- Specified tightening torque:
-
10 N*m (102 kgf*cm, 7 ft.*lbf)
- HINT:
-
·
Calculate the torque wrench reading when changing the fulcrum length of the torque wrench.
Click hereGeneral>INTRODUCTION>REPAIR INSTRUCTION>PRECAUTION
·When using a union nut wrench (fulcrum length of 30 mm (1.18 in.)) + torque wrench (fulcrum length of 162 mm (6.38 in.)): 8.4 N*m (86 kgf*cm, 74 in.*lbf)
Using a 17 mm union nut wrench, tighten the union nut on the common rail assembly side of the No. 5 injection pipe sub-assembly.
- Torque:
- Specified tightening torque:
-
10 N*m (102 kgf*cm, 7 ft.*lbf)
- HINT:
-
·
Calculate the torque wrench reading when changing the fulcrum length of the torque wrench.
Click hereGeneral>INTRODUCTION>REPAIR INSTRUCTION>PRECAUTION
·When using a union nut wrench (fulcrum length of 30 mm (1.18 in.)) + torque wrench (fulcrum length of 162 mm (6.38 in.)): 8.4 N*m (86 kgf*cm, 74 in.*lbf)
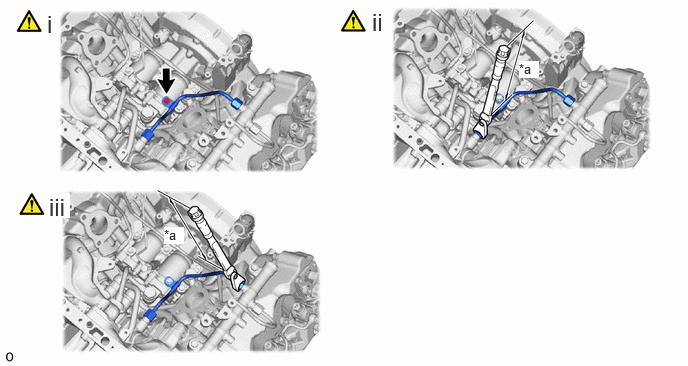
| *a | Torque Wrench Fulcrum Length | - | - |
Tighten the bolt.
- Torque:
- 10 N*m (102 kgf*cm, 7 ft.*lbf)
Using a 19 mm union nut wrench, tighten the union nut on the injection or supply pump assembly side of the No. 5 injection pipe sub-assembly.
- Torque:
- Specified tightening torque:
-
50 N*m (510 kgf*cm, 37 ft.*lbf)
- HINT:
-
·
Calculate the torque wrench reading when changing the fulcrum length of the torque wrench.
Click hereGeneral>INTRODUCTION>REPAIR INSTRUCTION>PRECAUTION
·When using a union nut wrench (fulcrum length of 30 mm (1.18 in.)) + torque wrench (fulcrum length of 180 mm (7.09 in.)): 42.9 N*m (437 kgf*cm, 32 ft.*lbf)
Using a 17 mm union nut wrench, tighten the union nut on the common rail assembly side of the No. 5 injection pipe sub-assembly.
- Torque:
- Specified tightening torque:
-
50 N*m (510 kgf*cm, 37 ft.*lbf)
- HINT:
-
·
Calculate the torque wrench reading when changing the fulcrum length of the torque wrench.
Click hereGeneral>INTRODUCTION>REPAIR INSTRUCTION>PRECAUTION
·When using a union nut wrench (fulcrum length of 30 mm (1.18 in.)) + torque wrench (fulcrum length of 180 mm (7.09 in.)): 42.9 N*m (437 kgf*cm, 32 ft.*lbf)
12229 15.INSTALL VENTILATION PIPE
- Torque:
- 10 N*m (102 kgf*cm, 7 ft.*lbf)
22815A 16.INSTALL INJECTION PUMP INSULATOR
- Torque:
- 10 N*m (102 kgf*cm, 7 ft.*lbf)
17.INSTALL TURBOCHARGER ASSEMBLY
18.CONNECT CABLE TO NEGATIVE BATTERY TERMINAL
19.BLEED AIR FROM FUEL SYSTEM
20. INITIALIZATION AFTER RECONNECTING BATTERY TERMINAL
Click hereGeneral>SETUP>WHEN DISCONNECTING OR RECONNECTING BATTERY TERMINAL>WORK PROCEDURE
- HINT:
-
When disconnecting and reconnecting the battery, there is an automatic learning function that completes learning when the respective system is used.
-
Click hereGeneral>SETUP>WHEN DISCONNECTING OR RECONNECTING BATTERY TERMINAL>AUTOMATIC LEARNING CHART
21.INSPECT FOR FUEL LEAK