1VD-FTV FUEL FUEL SUPPLY PUMP(w/ DPF) INSTALLATION
CAUTION / NOTICE / HINT
- NOTICE:
-
·
When replacing the injectors (including shuffling the injectors between the cylinders), common rail, cylinder head or intake manifold, it is necessary to replace the injection pipes with new ones.
·When fuel lines are disconnected, air may enter the fuel lines, leading to engine starting trouble. Therefore, perform forced regeneration and bleed the air from the fuel lines.
PROCEDURE

 22100 1.INSTALL FUEL SUPPLY PUMP
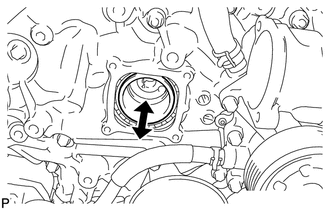
Check that the injection pump drive gear in the timing chain cover moves back and forth smoothly.
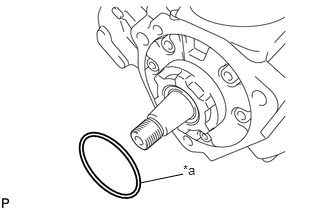
| *a | New O-Ring |
Install a new O-ring to the supply pump.
Apply a light coat of engine oil to the O-ring.
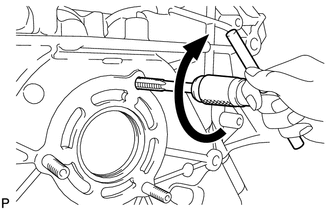
Using an 8 mm x 1.25 pitch tap, remove the adhesive from the timing gear case bolt hole.
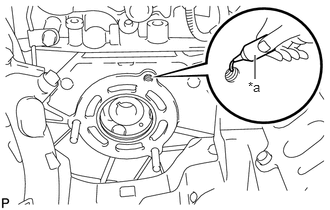
| *a | Adhesive |
Apply adhesive to 2 or more threads as shown in the illustration.
- Adhesive:
-
Toyota Genuine Adhesive 1344, Three Bond 1344 or equivalent
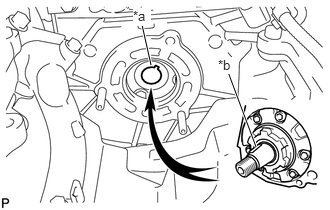
| *a | Groove |
| *b | Set Key |
Align the set key on the drive shaft with the groove of the supply pump drive gear.
- NOTICE:
-
Do not hold the supply pump by the parts indicated by the arrows in the illustration, as this may result in deformation, damage and fuel leakage.
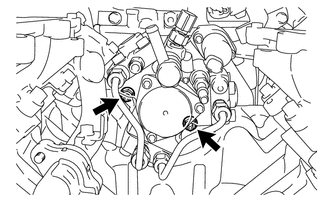
Temporarily install the fuel supply pump with the 2 nuts.
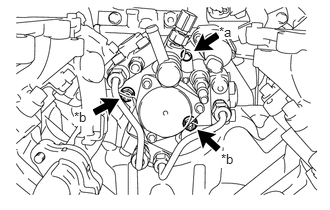
| *a | Bolt |
| *b | Nut |
Using a 6 mm hexagon wrench, install the bolt.
- Torque:
- 21 N*m (214 kgf*cm, 15 ft.*lbf)
Tighten the 2 nuts.
- Torque:
- 21 N*m (214 kgf*cm, 15 ft.*lbf)
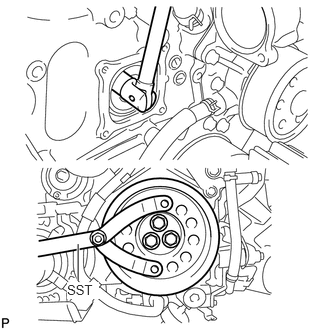
Using SST, hold the crankshaft pulley and install the set nut.
- SST
-
09960-10010 (09962-01000, 09963-01000)
- Torque:
- 68 N*m (693 kgf*cm, 50 ft.*lbf)
Turn the crankshaft 2 times, and check that there are no problems.
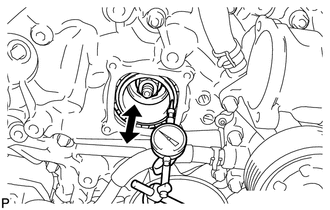
Using a dial indicator, check the thrust clearance of the supply pump drive shaft while moving the pump drive shaft gear back and forth.
- Standard thrust clearance:
-
0.05 to 0.30 mm (0.00197 to 0.0118 in.)
If the clearance is not within the specified range, disassemble and reassemble the supply pump and pump drive shaft gear. Then repeat the step above.
Connect the fuel temperature sensor connector.
23811G 2.INSTALL NO. 1 FUEL PIPE
Install 2 new gaskets and the No. 1 fuel pipe to the fuel supply pump with the union bolt.
- Torque:
- 17.2 N*m (175 kgf*cm, 13 ft.*lbf)
11324 3.INSTALL TIMING CHAIN COVER PLATE
Install a new gasket and the timing chain cover plate with the 4 bolts.
- Torque:
- 9.1 N*m (93 kgf*cm, 81 in.*lbf)
17112 4.INSTALL NO. 2 INTAKE MANIFOLD
17111 5.INSTALL INTAKE MANIFOLD
16331A 6.INSTALL THERMOSTAT
7.BLEED AIR FROM FUEL SYSTEM
8.ADD ENGINE COOLANT
9.CONNECT CABLE TO NEGATIVE BATTERY TERMINAL
10. FUEL SUPPLY PUMP INITIALIZATION
11.INSPECT FOR FUEL LEAK
12.INSPECT FOR OIL LEAK
13.INSPECT FOR COOLANT LEAK