1VD-FTV ENGINE CONTROL ECD SYSTEM Starter Signal Circuit
DESCRIPTION
When the engine is being cranked, the intake air flow is slow, so fuel vaporization is poor. A rich mixture is therefore necessary in order to achieve good startability. While the engine is being cranked, the battery positive voltage is applied to terminal STA of the ECM. The starter signal is mainly used to increase the fuel injection volume for starting injection control and after-start injection control.
WIRING DIAGRAM
Refer to DTC P0617
Click hereEngine / Hybrid System>1VD-FTV (ENGINE CONTROL)>ECD SYSTEM>P0617
CAUTION / NOTICE / HINT
- NOTICE:
-
·
Inspect the fuses for circuits related to this system before performing the following inspection procedure.
·After replacing the ECM, the new ECM needs registration (See page Engine / Hybrid System>1VD-FTV (ENGINE CONTROL)>ECD SYSTEM>REGISTRATION) and initialization (See page Engine / Hybrid System>1VD-FTV (ENGINE CONTROL)>ECD SYSTEM>INITIALIZATION).
PROCEDURE
Connect the GTS to the DLC3.
Turn the ignition switch to ON.
Turn the GTS on.
Enter the following menus: Powertrain / Engine and ECT / Data List / Starter Signal.
- Powertrain > Engine and ECT > Data List
-
Tester Display Starter Signal - 50003 61 193
Read the values.
Check the result when the ignition switch is turned to ON and when the engine is started.
- Standard:
-
Ignition Switch Position Display (Starter Signal) ON OFF START ON
- Result:
-
Proceed to OK NG
OK
NG
Inspect the starter relay (ST).
Click hereEngine / Hybrid System>1VD-FTV (STARTING)>RELAY>ON-VEHICLE INSPECTION
- Result:
-
Proceed to OK NG
OK
NG
Disconnect the ignition switch connector.
Disconnect the starter connector.
Remove the starter relay (ST) from the engine room R/B assembly.
Measure the resistance according to the value(s) in the table below.
- Standard resistance:
-
Tester Connection Condition Specified Condition L21-3 (ST1) - ST relay terminal 1 Always Below 1 Ω D6-1 - ST relay terminal 3 Always Below 1 Ω ST relay terminal 2 - Body ground Always Below 1 Ω L21-3 (ST1) or ST relay terminal 1 - Body ground Always 10 kΩ or higher D6-1 or ST relay terminal 3 - Body ground Always 10 kΩ or higher
- Result:
-
Proceed to OK NG
OK
NG
Remove the starter relay (ST) from the engine room R/B assembly.
Measure the voltage according to the value(s) in the table below.
- Standard voltage:
-
Tester Connection Condition Specified Condition ST relay terminal 5 - Body ground Always 11 to 14 V
Measure the resistance according to the value(s) in the table below.
- Standard resistance:
-
Tester Connection Condition Specified Condition ST relay terminal 5 - Body ground Always 10 kΩ or higher
- Result:
-
Proceed to OK NG
OK
NG
Inspect the starter.
Click hereEngine / Hybrid System>1VD-FTV (STARTING)>STARTER>INSPECTION
- Result:
-
Proceed to OK NG
OK
NG
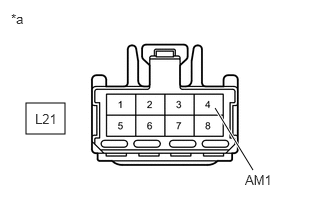
| *a | Component without harness connected (Ignition Switch) |
Disconnect the ignition switch connector.
Measure the voltage according to the value(s) in the table below.
- Standard voltage:
-
Tester Connection Condition Specified Condition L21-4 (AM1) - Body ground Always 11 to 14 V
- Result:
-
Proceed to OK NG
OK
NG
Inspect the ignition switch.
Click hereEngine / Hybrid System>1VD-FTV (STARTING)>IGNITION SWITCH>INSPECTION
- Result:
-
Proceed to OK NG
OK
NG
Disconnect the ignition switch connector.
Disconnect the ECM connector.
Measure the resistance according to the value(s) in the table below.
- Standard resistance:
-
for RHD Tester Connection Condition Specified Condition L21-3 (ST1) - A29-48 (STA) Always Below 1 Ω L21-3 (ST1) or A29-48 (STA) - Body ground Always 10 kΩ or higher
-
for LHD Tester Connection Condition Specified Condition L21-3 (ST1) - I84-48 (STA) Always Below 1 Ω L21-3 (ST1) or I84-48 (STA) - Body ground Always 10 kΩ or higher
- Result:
-
Proceed to OK NG
OK
NG