BRAKE CONTROL / DYNAMIC CONTROL SYSTEMS VEHICLE STABILITY CONTROL SYSTEM(w/ Pre-collision System) Brake Warning Light Remains ON
DESCRIPTION
The skid control ECU (brake actuator assembly) is connected to the combination meter assembly via CAN communication.
If any of the following is detected, the brake warning light remains on:
The skid control ECU (brake actuator assembly) connector is disconnected from the skid control ECU (brake actuator assembly).
The brake fluid level is insufficient.
EBD operation is not possible.
The vacuum inside the brake booster decreases.*
*: for 1GD-FTV and 2GD-FTV
WIRING DIAGRAM
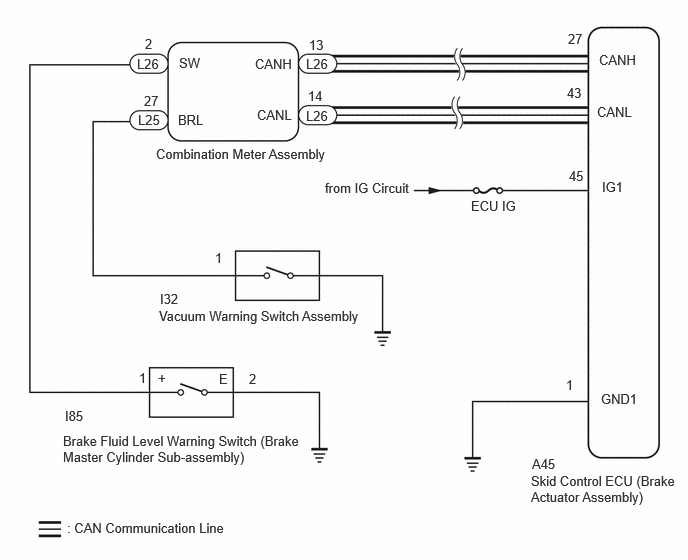
CAUTION / NOTICE / HINT
- NOTICE:
-
After replacing the skid control ECU (brake actuator assembly), perform "Calibration".
PROCEDURE
Check that all of the following conditions required for the brake warning light to turn off are met:
The ABS warning light are not illuminated.
- HINT:
-
If the ABS warning light remains illuminated, make sure that the conditions required for the ABS warning light to turn off are met.
There is sufficient brake booster vacuum in the vacuum warning switch assembly.
- HINT:
-
If the brake booster vacuum in the vacuum warning switch assembly is low, the brake warning light illuminates.
The brake fluid level in the brake master cylinder reservoir is not low.
- Result:
-
Proceed to NEXT
NEXT
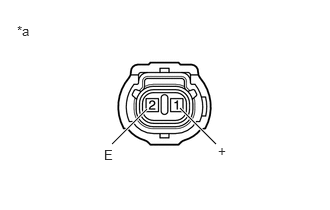
| *a | Component without harness connected (Brake Fluid Level Warning Switch [Brake Master Cylinder Sub-assembly]) |
Turn the ignition switch off.
Remove the reservoir filler cap and strainer.
Disconnect the I85 brake fluid level warning switch (brake master cylinder sub-assembly) connector.
Measure the resistance according to the value(s) in the table below.
- HINT:
-
A float is located inside the reservoir. Its position can be changed by increasing or decreasing the level of brake fluid.
- Standard Resistance:
-
Tester Connection Switch Condition Specified Condition 1 (+) - 2 (E) Switch off (Float up) 10 kΩ or higher Switch on (Float down) Below 1 Ω
- HINT:
-
If there is no problem after finishing the above check, adjust the brake fluid level to the MAX level.
- Result:
-
Proceed to OK NG
OK
NG
Disconnect the L26 combination meter assembly connector.
Measure the resistance according to the value(s) in the table below.
- Standard Resistance:
-
Tester Connection Condition Specified Condition L26-2 (SW) - I85-1 (+) Always Below 1 Ω I85-2 (E) - Body ground Always Below 1 Ω L26-2 (SW) or I85-1 (+) - Body ground Always 10 kΩ or higher
- Result:
-
Proceed to OK NG
OK
NG
Inspect the vacuum warning switch assembly.
Click hereBrake>BRAKE SYSTEM (OTHER)>VACUUM WARNING SWITCH(for 1HZ, 1VD-FTV)>ON-VEHICLE INSPECTION
- OK:
-
The vacuum warning switch assembly is normal.
- Result:
-
Proceed to OK NG
OK
NG
Disconnect the L25 combination meter assembly connector.
Measure the resistance according to the value(s) in the table below.
- Standard Resistance:
-
Tester Connection Condition Specified Condition L25-27 (BRL) - I32-1 Always Below 1 Ω L25-27 (BRL) or I32-1 - Body ground Always 10 kΩ or higher
- Result:
-
Proceed to OK NG
OK
NG
Reinstall the reservoir filler cap and strainer.
Reinstall the vacuum warning switch assembly.
Reconnect the L25 and L26 combination meter assembly connectors.
Reconnect the I85 brake fluid level warning switch (brake master cylinder sub-assembly) connector.
Reconnect the I32 vacuum warning switch assembly connector.
Perform Active Test of the combination meter assembly using the GTS.
- Body Electrical > Combination Meter > Active Test
-
Tester Display Indicat. Lamp Brake - 50004 122 21
Check the combination meter assembly.
- OK:
-
The brake warning light turns on or off in accordance with the GTS.
- Result:
-
Proceed to OK NG
OK
NG
Click hereVehicle Interior>METER / GAUGE / DISPLAY>METER / GAUGE SYSTEM>HOW TO PROCEED WITH TROUBLESHOOTING