MIRROR (EXT) OUTER REAR VIEW MIRROR COVER REMOVAL
CAUTION / NOTICE / HINT
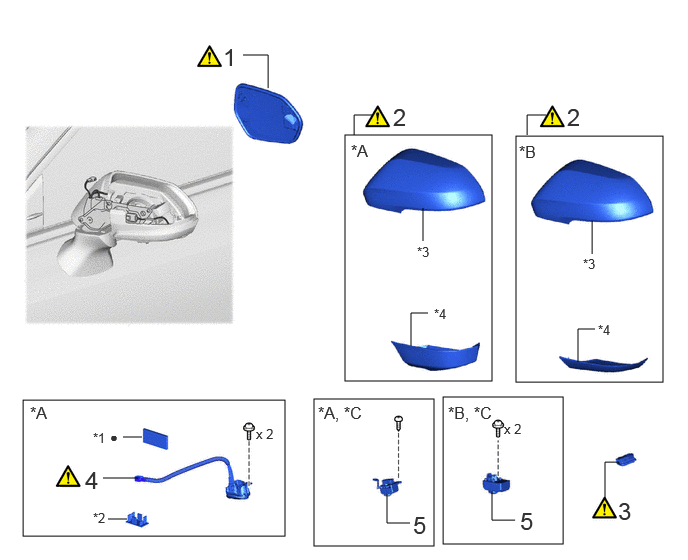
| Procedure | Part Name Code | 
|

|

|
|
|---|---|---|---|---|---|
| 1 | OUTER MIRROR LH | 87961 | ( ) |
- | - |
| 2 | NO. 2 OUTER MIRROR COVER LH | 8794A | ()
|
- | - |
| 3 | OUTER MIRROR LIGHT ASSEMBLY LH | 81890D | ()
|
- | - |
| 4 | PARKING ASSIST LIGHT LH | 867A2A | ()
|
- | - |
| 5 | SIDE TELEVISION CAMERA ASSEMBLY LH | 86790F | - | - | - |
| *A | w/ Advanced Park | *B | w/o Advanced Park |
| *C | w/ Panoramic View Monitor System | - | - |
| *1 | OUTER MIRROR TAPE | *2 | CONNECTOR CLAMP |
| *3 | VISOR COVER A | *4 | VISOR COVER B |
| ● | Non-reusable part | - | - |
CAUTION / NOTICE / HINT
The necessary procedures (adjustment, calibration, initialization or registration) that must be performed after parts are removed, installed or replaced during the No. 2 outer mirror cover removal/installation are shown below.
| Replaced Part or Performed Procedure | Necessary Procedure | Effect/Inoperative Function When Necessary Procedures are not Performed | Link |
|---|---|---|---|
·
Side television camera assembly LH (Including removal and installation) ·
Side television camera assembly RH (Including removal and installation) ·
Outer rear view mirror assembly with cover LH (Including removal and installation) ·
Outer rear view mirror assembly with cover RH (Including removal and installation) |
Side television camera view adjustment | Panoramic view monitor system | ()
|
·
Side television camera assembly LH or outer rear view mirror assembly LH ·
Side television camera assembly RH or outer rear view mirror assembly RH |
·
Television camera view adjustment
·
Rear television camera view adjustment (for Rear camera detection system) |
- HINT:
- ·
Use the same procedure for the RH and LH sides.
·The procedure listed below is for the LH side.
PROCEDURE

 87961
1.REMOVE OUTER MIRROR LH
|
|
Click here()
|
8794A
2.REMOVE NO. 2 OUTER MIRROR COVER LH
w/o Advanced Park:
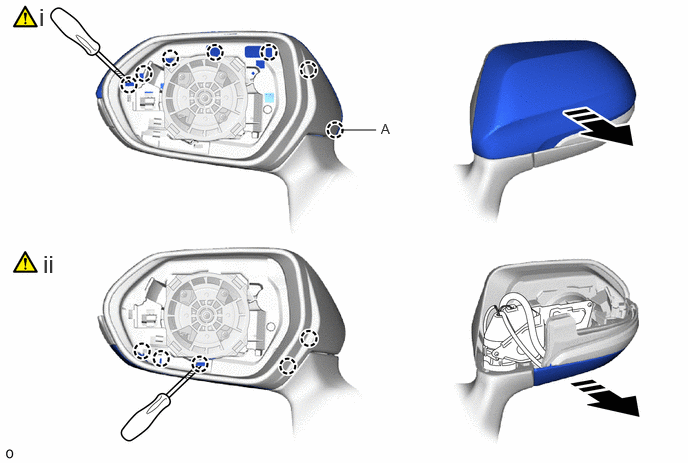

|
Remove in this Direction | - | - |
Using a thin-bladed screwdriver with its tip wrapped with protective tape, detach the claw and remove the No. 2 outer mirror cover LH (visor cover A).
- NOTICE:
-
When detach the claw (A), move the outer rear view mirror assembly LH to the retracted position.
Using a thin-bladed screwdriver, detach the claw and remove the No. 2 outer mirror cover LH (visor cover B).
- HINT:
-
Tape the thin-bladed screwdriver tip before use.
w/ Advanced Park:
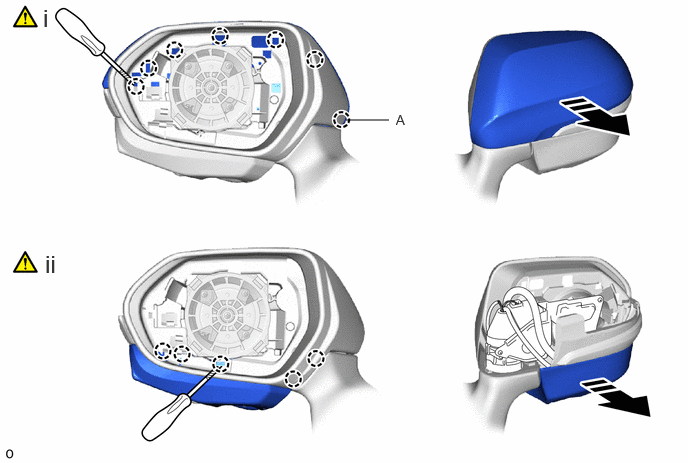
|
|
Remove in this Direction | - | - |
Using a thin-bladed screwdriver with its tip wrapped with protective tape, detach the claw and remove the No. 2 outer mirror cover LH (visor cover A).
- NOTICE:
-
When detach the claw (A), move the outer rear view mirror assembly LH to the retracted position.
Using a thin-bladed screwdriver, detach the claw and remove the No. 2 outer mirror cover LH (visor cover B).
- HINT:
-
Tape the thin-bladed screwdriver tip before use.
81890D
3.REMOVE OUTER MIRROR LIGHT ASSEMBLY LH
|
|
Click here()
|
867A2A
4.REMOVE PARKING ASSIST LIGHT LH (w/ Advanced Park)
|
|
Click here()
|
86790F
5.REMOVE SIDE TELEVISION CAMERA ASSEMBLY LH (w/ Panoramic View Monitor System)