LIGHTING (EXT) LIGHTING SYSTEM Taillight Circuit
DESCRIPTION
The main body ECU (multiplex network body ECU) controls the taillight and license plate light.
WIRING DIAGRAM
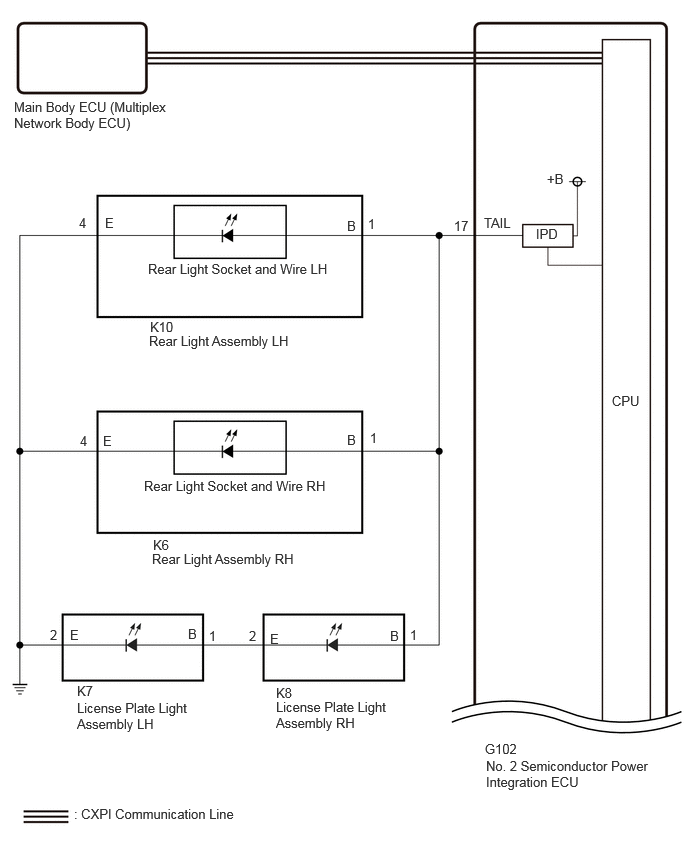
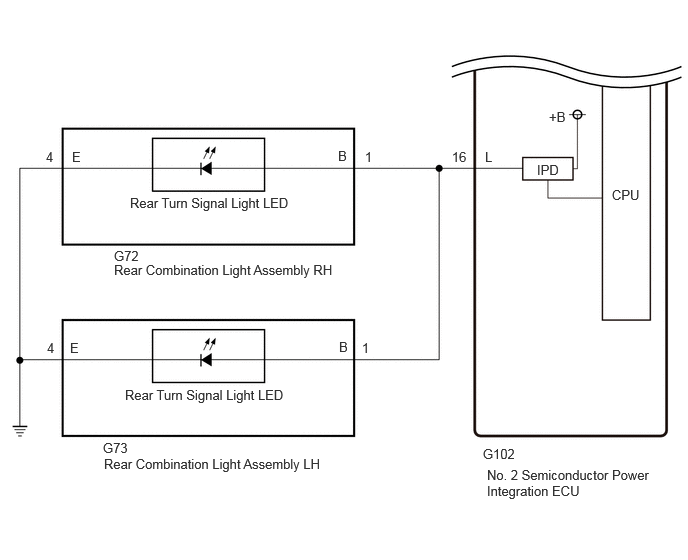
CAUTION / NOTICE / HINT
- NOTICE:
- ·
Before replacing the main body ECU (multiplex network body ECU), refer to Service Bulletin.
·First perform the communication function inspections in How to Proceed with Troubleshooting to confirm that there are no CXPI communication malfunctions before troubleshooting this symptom
Click hereVehicle Exterior>LIGHTING (EXT)>LIGHTING SYSTEM>HOW TO PROCEED WITH TROUBLESHOOTING
·First, confirm that there is no malfunction in the power integration system. Refer to the How to Proceed with Troubleshooting procedure.
·After the ignition switch is turned off, there may be a waiting time before disconnecting the negative (-) auxiliary battery terminal.
Click hereGeneral>SETUP>WHEN DISCONNECTING OR RECONNECTING BATTERY TERMINAL>BEFORE DISCONNECTING BATTERY
·When disconnecting and reconnecting the auxiliary battery.
Click hereGeneral>SETUP>WHEN DISCONNECTING OR RECONNECTING BATTERY TERMINAL>WORK PROCEDURE
- HINT:
-
When disconnecting and reconnecting the auxiliary battery, there is an automatic learning function that completes learning when the respective system is used.
-
Click hereGeneral>SETUP>WHEN DISCONNECTING OR RECONNECTING BATTERY TERMINAL>AUTOMATIC LEARNING CHART
PROCEDURE
Check the problem symptoms.
- Result:
Result Proceed to All taillights and the license plate light do not illuminate A The rear combination light assembly (taillight) does not illuminate B The rear light assembly (taillight) and license plate light do not illuminate C
A
B
C
Using the GTS, read the Data List.
- Body Electrical > Power Integration No.3 > Data List
-
Tester Display Measurement Item Range Normal Condition Diagnostic Note Tail Input Signal Light control switch tail position input signal OFF or ON OFF: Light control switch in neither tail nor head position
ON: Light control switch in tail or head position-
- Body Electrical > Power Integration No.3 > Data List
-
Tester Display Tail Input Signal - 50003 412 3
- OK:
Display changes according to the taillight illumination condition.
- Result:
Proceed to OK NG
OK
NG
Turn the taillights on.
Using the GTS, read the Data List.
- Body Electrical > Power Integration No.3 > Data List
-
Tester Display Measurement Item Range Normal Condition Diagnostic Note Tail Light No.1 Output Signal Taillight output OFF or ON OFF: Taillight not illuminated
ON: Taillight illuminatedTaillights blink while welcome light is operating
- Body Electrical > Power Integration No.3 > Data List
-
Tester Display Tail Light No.1 Output Signal - 50003 412 80
- OK:
Display changes according to the taillight illumination condition.
- Result:
Proceed to OK NG
OK
NG
Turn the taillights on.
Using the GTS, read the Data List.
- Body Electrical > Power Integration No.3 > Data List
-
Tester Display Measurement Item Range Normal Condition Diagnostic Note Status of Tail Light No.1 Fuse Taillight fuse Connect or Disconnect Connect: Fuse not shut off
Disconnect: Fuse shut off-
- Body Electrical > Power Integration No.3 > Data List
-
Tester Display Status of Tail Light No.1 Fuse - 50003 412 94
- OK:
The Data List value displays "Connect".
- Result:
Proceed to OK NG
OK
NG
Turn the taillights off.
Disconnect the G73 rear combination light assembly LH connector.
Turn the taillights on.
Using the GTS, read the Data List.
- Body Electrical > Power Integration No.3 > Data List
-
Tester Display Measurement Item Range Normal Condition Diagnostic Note Status of Tail Light No.1 Fuse Taillight fuse Connect or Disconnect Connect: Fuse not shut off
Disconnect: Fuse shut off-
- Body Electrical > Power Integration No.3 > Data List
-
Tester Display Status of Tail Light No.1 Fuse - 50003 412 94
- OK:
The Data List value displays "Connect".
- Result:
Proceed to OK NG
OK
NG
Turn the taillights off.
Remove the rear turn signal light LED.
Click hereVehicle Exterior>LIGHTING (EXT)>REAR COMBINATION LIGHT ASSEMBLY>DISASSEMBLY
Reconnect the G73 rear combination light assembly LH connector.
Turn the taillights on.
Using the GTS, read the Data List.
- Body Electrical > Power Integration No.3 > Data List
-
Tester Display Measurement Item Range Normal Condition Diagnostic Note Status of Tail Light No.1 Fuse Taillight fuse Connect or Disconnect Connect: Fuse not shut off
Disconnect: Fuse shut off-
- Body Electrical > Power Integration No.3 > Data List
-
Tester Display Status of Tail Light No.1 Fuse - 50003 412 94
- OK:
The Data List value displays "Connect".
- Result:
Proceed to OK NG
OK
NG
Disconnect the G73 rear combination light assembly RH connector.
Turn the taillights off.
Turn the taillights on.
Using the GTS, read the Data List.
- Body Electrical > Power Integration No.3 > Data List
-
Tester Display Measurement Item Range Normal Condition Diagnostic Note Status of Tail Light No.1 Fuse Taillight fuse Connect or Disconnect Connect: Fuse not shut off
Disconnect: Fuse shut off-
- Body Electrical > Power Integration No.3 > Data List
-
Tester Display Status of Tail Light No.1 Fuse - 50003 412 94
- OK:
The Data List value displays "Connect".
- Result:
Proceed to OK NG
OK
NG
Remove the rear turn signal light LED.
Click hereVehicle Exterior>LIGHTING (EXT)>REAR COMBINATION LIGHT ASSEMBLY>DISASSEMBLY
Reconnect the G72 rear combination light assembly RH connector.
Turn the taillights off.
Turn the taillights on.
Using the GTS, read the Data List.
- Body Electrical > Power Integration No.3 > Data List
-
Tester Display Measurement Item Range Normal Condition Diagnostic Note Status of Tail Light No.1 Fuse Taillight fuse Connect or Disconnect Connect: Fuse not shut off
Disconnect: Fuse shut off-
- Body Electrical > Power Integration No.3 > Data List
-
Tester Display Status of Tail Light No.1 Fuse - 50003 412 94
- OK:
The Data List value displays "Connect".
- Result:
Proceed to OK NG
OK
NG
Disconnect the cable from the negative (-) auxiliary battery terminal.
Disconnect the G73 rear combination light assembly LH connector.
Disconnect the G72 rear combination light assembly RH connector.
Disconnect the G102 No. 2 semiconductor power integration ECU connector.
Measure the resistance according to the value(s) in the table below.
- Standard Resistance:
Tester Connection Condition Specified Condition Click Location & Routing(G72,G102)Location & Routingewd_type=routing;type=c,c;code=G72,G102
Click Connector(G72)Body>Floor Wire / No. 3 Floor Wire>Rear Combination Light RHewd_type=component;type=c;code=G72;pinno=1
Click Connector(G102)Body>Floor Wire / No. 3 Floor Wire>No. 2 Semiconductor Power Integration ECUewd_type=component;type=c;code=G102;pinno=16
G72-1 (B) or G102-16 (L) - Body ground Always 10 kΩ or higher
- Result:
Proceed to OK NG
OK
NG
Using the GTS, read the Data List.
- Body Electrical > Power Integration No.3 > Data List
-
Tester Display Measurement Item Range Normal Condition Diagnostic Note Tail Light No.2 Output Signal Taillight output OFF or ON OFF: Taillight not illuminated
ON: Taillight illuminatedTaillights blink while welcome light is operating
- Body Electrical > Power Integration No.3 > Data List
-
Tester Display Tail Light No.2 Output Signal - 50003 412 81
- OK:
Display changes according to the light control switch operation.
- Result:
Proceed to OK NG
OK
NG
Turn the taillights on.
Using the GTS, read the Data List.
- Body Electrical > Power Integration No.3 > Data List
-
Tester Display Measurement Item Range Normal Condition Diagnostic Note Status of Tail Light No.2 Fuse Taillight fuse Connect or Disconnect Connect: Fuse not shut off
Disconnect: Fuse shut off-
- Body Electrical > Power Integration No.3 > Data List
-
Tester Display Status of Tail Light No.2 Fuse - 50003 412 95
- OK:
The Data List value displays "Connect".
- Result:
Proceed to OK NG
OK
NG
Disconnect the K10 rear light assembly connector.
Turn the taillights off.
Turn the taillights on.
Using the GTS, read the Data List.
- Body Electrical > Power Integration No.3 > Data List
-
Tester Display Measurement Item Range Normal Condition Diagnostic Note Status of Tail Light No.2 Fuse Taillight fuse Connect or Disconnect Connect: Fuse not shut off
Disconnect: Fuse shut off-
- Body Electrical > Power Integration No.3 > Data List
-
Tester Display Status of Tail Light No.2 Fuse - 50003 412 95
- OK:
The Data List value displays "Connect".
- Result:
Proceed to OK NG
OK
NG
Turn the taillights off.
Remove the rear light lens and body LH.
Click hereVehicle Exterior>LIGHTING (EXT)>REAR LIGHT ASSEMBLY>DISASSEMBLY
Reconnect the K10 rear light assembly LH connector.
Turn the taillights on.
Using the GTS, read the Data List.
- Body Electrical > Power Integration No.3 > Data List
-
Tester Display Measurement Item Range Normal Condition Diagnostic Note Status of Tail Light No.2 Fuse Taillight fuse Connect or Disconnect Connect: Fuse not shut off
Disconnect: Fuse shut off-
- Body Electrical > Power Integration No.3 > Data List
-
Tester Display Status of Tail Light No.2 Fuse - 50003 412 95
- OK:
The Data List value displays "Connect".
- Result:
Proceed to OK NG
OK
NG
Turn the taillights off.
Disconnect the K6 rear light assembly RH connector.
Turn the taillights on.
Using the GTS, read the Data List.
- Body Electrical > Power Integration No.3 > Data List
-
Tester Display Measurement Item Range Normal Condition Diagnostic Note Status of Tail Light No.2 Fuse Taillight fuse Connect or Disconnect Connect: Fuse not shut off
Disconnect: Fuse shut off-
- Body Electrical > Power Integration No.3 > Data List
-
Tester Display Status of Tail Light No.2 Fuse - 50003 412 95
- OK:
The Data List value displays "Connect".
- Result:
Proceed to OK NG
OK
NG
Turn the taillights off.
Remove the rear light socket and wire RH.
Click hereVehicle Exterior>LIGHTING (EXT)>REAR LIGHT ASSEMBLY>DISASSEMBLY
Reconnect the K6 rear light assembly RH connector.
Turn the taillights on.
Using the GTS, read the Data List.
- Body Electrical > Power Integration No.3 > Data List
-
Tester Display Measurement Item Range Normal Condition Diagnostic Note Status of Tail Light No.2 Fuse Taillight fuse Connect or Disconnect Connect: Fuse not shut off
Disconnect: Fuse shut off-
- Body Electrical > Power Integration No.3 > Data List
-
Tester Display Status of Tail Light No.2 Fuse - 50003 412 95
- OK:
The Data List value displays "Connect".
- Result:
Proceed to OK NG
OK
NG
Disconnect the K8 license plate light assembly RH connector.
Turn the taillights off.
Turn the taillights on.
Using the GTS, read the Data List.
- Body Electrical > Power Integration No.3 > Data List
-
Tester Display Measurement Item Range Normal Condition Diagnostic Note Status of Tail Light No.2 Fuse Taillight fuse Connect or Disconnect Connect: Fuse not shut off
Disconnect: Fuse shut off-
- Body Electrical > Power Integration No.3 > Data List
-
Tester Display Status of Tail Light No.2 Fuse - 50003 412 95
- OK:
The Data List value displays "Connect".
- Result:
Proceed to OK NG
OK
NG
Turn the taillights off.
Disconnect the K7 license plate light assembly LH connector.
Reconnect the K8 license plate light assembly RH connector.
Turn the taillights on.
Using the GTS, read the Data List.
- Body Electrical > Power Integration No.3 > Data List
-
Tester Display Measurement Item Range Normal Condition Diagnostic Note Status of Tail Light No.2 Fuse Taillight fuse Connect or Disconnect Connect: Fuse not shut off
Disconnect: Fuse shut off-
- Body Electrical > Power Integration No.3 > Data List
-
Tester Display Status of Tail Light No.2 Fuse - 50003 412 95
- OK:
The Data List value displays "Connect".
- Result:
Proceed to OK NG
OK
NG
Disconnect the K7 license plate light assembly LH connector.
Disconnect the K8 license plate light assembly RH connector.
Measure the resistance according to the value(s) in the table below.
- Standard Resistance:
Tester Connection Condition Specified Condition Click Location & Routing(K8,K7)Location & Routingewd_type=routing;type=c,c;code=K8,K7
Click Connector(K8)Body>No. 1 Back Door Wire>License Plate Light Assembly RHewd_type=component;type=c;code=K8;pinno=2
Click Connector(K7)Body>No. 1 Back Door Wire>License Plate Light Assembly LHewd_type=component;type=c;code=K7;pinno=1
K8-2 (E) or K7-1(B) - Body ground Always 10 kΩ or higher
- Result:
Proceed to OK NG
OK
NG
Disconnect the cable from the negative (-) auxiliary battery terminal.
Disconnect the G102 No. 2 semiconductor power integration ECU connector.
Disconnect the K10 rear light socket and wire LH connector.
Disconnect the K6 rear light socket and wire RH connector.
Disconnect the K8 license plate light assembly RH connector.
Measure the resistance according to the value(s) in the table below.
- Standard Resistance:
Tester Connection Condition Specified Condition Click Location & Routing(K8,G102)Location & Routingewd_type=routing;type=c,c;code=K8,G102
Click Connector(K8)Body>No. 1 Back Door Wire>License Plate Light Assembly RHewd_type=component;type=c;code=K8;pinno=1
Click Connector(G102)Body>Floor Wire / No. 3 Floor Wire>No. 2 Semiconductor Power Integration ECUewd_type=component;type=c;code=G102;pinno=17
K8-1 (B) or G102-17 (TAIL) - Body ground Always 10 kΩ or higher
- Result:
Proceed to OK NG
OK
NG