INTERIOR PANELS / TRIM ROOF SUNSHADE INSTALLATION
CAUTION / NOTICE / HINT
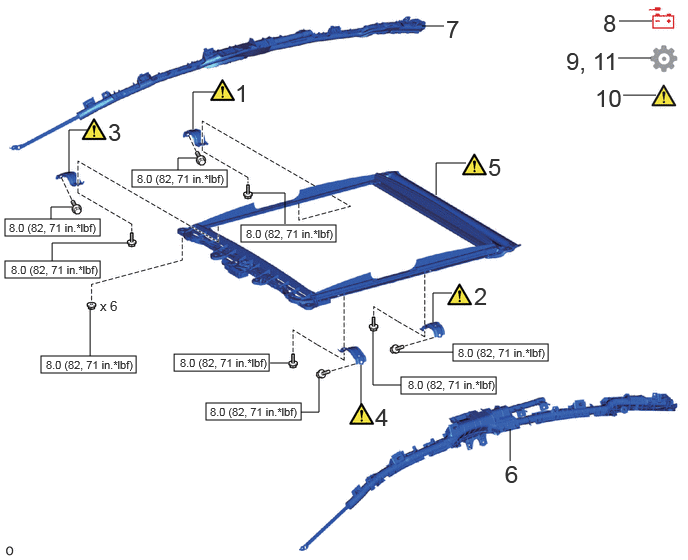
| Procedure | Part Name Code | 
|

|

|
|
|---|---|---|---|---|---|
| 1 | SLIDING ROOF HOUSING REAR BRACKET RH | - | ( ) |
- | - |
| 2 | SLIDING ROOF HOUSING REAR BRACKET LH | - | ()
|
- | - |
| 3 | SLIDING ROOF HOUSING FRONT BRACKET RH | - | ()
|
- | - |
| 4 | SLIDING ROOF HOUSING FRONT BRACKET LH | - | ()
|
- | - |
| 5 | SLIDING ROOF OR REMOVABLE ROOF HOUSING SUB-ASSEMBLY | 63203A | ()
|
- | - |
| 6 | CURTAIN SHIELD AIRBAG ASSEMBLY LH | 62180A | - | - | - |
| 7 | CURTAIN SHIELD AIRBAG ASSEMBLY RH | 62170A | - | - | - |
| 8 | CONNECT CABLE TO NEGATIVE AUXILIARY BATTERY TERMINAL | - | ()
|
- | - |
| 9 | INITIALIZE ROOF SUNSHADE SYSTEM | - | - | - | ()
|
| 10 | INSPECT ROOF SUNSHADE OPERATION | - | ()
|
- | - |
| 11 | INITIALIZATION AFTER RECONNECTING AUXILIARY BATTERY TERMINAL | - | - | - | ()
|

|
N*m (kgf*cm, ft.*lbf): Specified torque | - | - |
PROCEDURE

 1.INSTALL SLIDING ROOF HOUSING REAR BRACKET RH
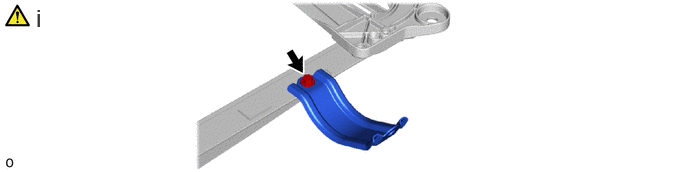
Temporarily install the sliding roof housing rear bracket RH for the sliding roof or removable roof housing sub-assembly with the bolt.
2.INSTALL SLIDING ROOF HOUSING REAR BRACKET LH
Use the same procedure described for the RH side.
3.INSTALL SLIDING ROOF HOUSING FRONT BRACKET RH
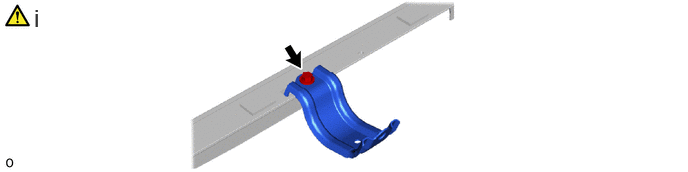
Temporarily install the sliding roof housing front bracket RH for the sliding roof or removable roof housing sub-assembly with the bolt.
4.INSTALL SLIDING ROOF HOUSING FRONT BRACKET LH
Use the same procedure described for the RH side.
63203A
5.INSTALL SLIDING ROOF OR REMOVABLE ROOF HOUSING SUB-ASSEMBLY
|
|
|
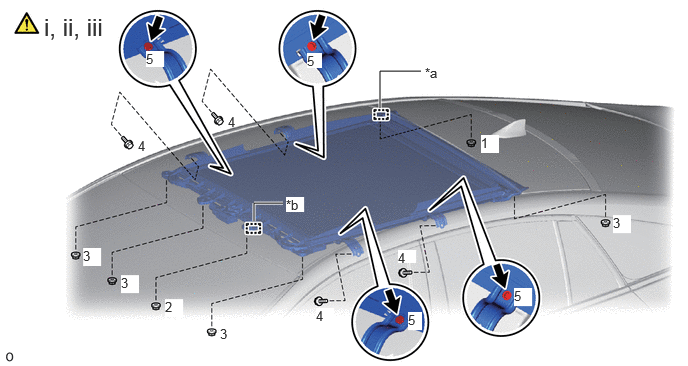
| *a | Standard Hole A | *b | Standard Boss B |
Insert the body stud bolt into the standard hole A, insert the standard boss B into the body hole and hold the sliding roof or removable roof housing sub-assembly in place.
Temporarily install the sliding roof housing assembly with the 6 nuts and 4 bolts.
Tighten the 6 nuts and 8 bolts to install the sliding roof housing assembly.
- HINT:
-
Tighten the nuts and bolts in the order shown in the illustration.
- Torque:
- 8.0 N*m (82 kgf*cm, 71 in.*lbf)
62180A
6.INSTALL CURTAIN SHIELD AIRBAG ASSEMBLY LH
62170A
7.INSTALL CURTAIN SHIELD AIRBAG ASSEMBLY RH
Use the same procedure described for the LH side.
8.CONNECT CABLE TO NEGATIVE AUXILIARY BATTERY TERMINAL
9.INITIALIZE ROOF SUNSHADE SYSTEM
10.INSPECT ROOF SUNSHADE OPERATION
11. INITIALIZATION AFTER RECONNECTING AUXILIARY BATTERY TERMINAL
Click hereGeneral>SETUP>WHEN DISCONNECTING OR RECONNECTING BATTERY TERMINAL>WORK PROCEDURE
- HINT:
-
When disconnecting and reconnecting the auxiliary battery, there is an automatic learning function that completes learning when the respective system is used.
-
Click hereGeneral>SETUP>WHEN DISCONNECTING OR RECONNECTING BATTERY TERMINAL>AUTOMATIC LEARNING CHART