TIRE PRESSURE MONITORING TIRE PRESSURE WARNING SYSTEM C2198 Initialization Switch (for Test Mode DTC)
DESCRIPTION
The switch circuit inside the combination meter assembly turns on and off according to the steering pad switch assembly operation.
During test mode, when the steering pad switch assembly is operated, "Change tire pressure" is selected on the multi-information display and the "OK" switch (steering pad switch assembly) is pressed, the tire pressure warning light illuminates, and when the "OK" switch (steering pad switch assembly) is not pressed, the tire pressure warning light blinks at 0.125 second intervals.
| DTC No. | Detection Item | DTC Detection Condition | Trouble Area | DTC Output from | Priority |
|---|---|---|---|---|---|
| C2198 | Initialization Switch (for Test Mode DTC) | Test mode procedure is performed. | ·
Steering pad switch assembly ·
Spiral cable sub-assembly ·
Wire harness or connector ·
Tire pressure warning ECU and receiver |
Tire Pressure Monitor | A |
WIRING DIAGRAM
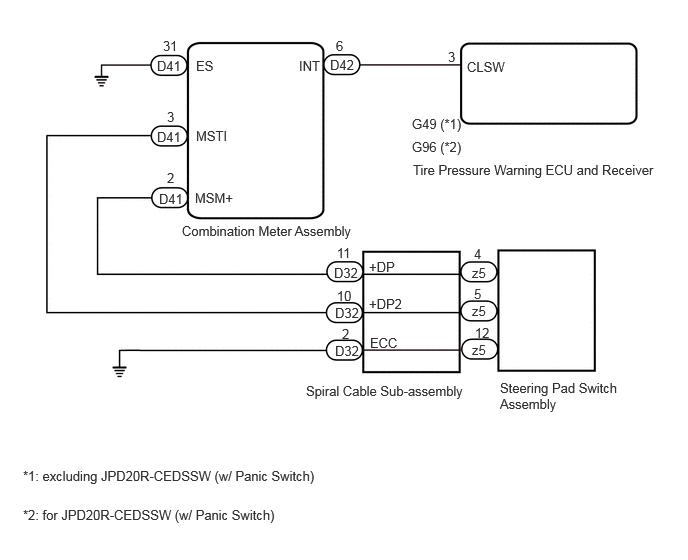
CAUTION / NOTICE / HINT
- NOTICE:
- ·
When replacing the tire pressure warning ECU and receiver, first use the GTS to record all of the current IDs and registered tires with transmitters (4 or 5 tires) of the tire pressure warning valve and transmitter registered to the tire pressure warning ECU and receiver.
·It is necessary to perform initializationSuspension>TIRE PRESSURE MONITORING>TIRE PRESSURE WARNING SYSTEM>INITIALIZATION after registrationSuspension>TIRE PRESSURE MONITORING>TIRE PRESSURE WARNING SYSTEM>REGISTRATION of the transmitter IDs into the tire pressure warning ECU and receiver if the ECU has been replaced.
PROCEDURE
Pre-procedure1
Remove the steering pad switch assembly.
- HINT:
-
Click hereSteering>STEERING COLUMN>STEERING PAD SWITCH>REMOVAL
Procedure1
Inspect the steering pad switch assembly.
- HINT:
-
Click hereSteering>STEERING COLUMN>STEERING PAD SWITCH>INSPECTION
- Result:
Proceed to OK NG
Post-procedure1
None
OK
NG
Pre-procedure1
Remove the spiral cable sub-assembly.
Procedure1
Inspect the spiral cable sub-assembly.
- Result:
Proceed to OK NG
Post-procedure1
None
OK
NG
Pre-procedure1
Disconnect the D32 spiral cable sub-assembly connector.
Disconnect the D41 combination meter assembly connector.
Procedure1
Measure the resistance according to the value(s) in the table below.
- Standard Resistance:
Tester Connection Condition Specified Condition Click Location & Routing(D32,D41)Location & Routingewd_type=routing;type=c,c;code=D32,D41
Click Connector(D32)Instrument Panel>Instrument Panel Wire>Spiral Cable Sub-Assemblyewd_type=component;type=c;code=D32;pinno=11,10
Click Connector(D41)Instrument Panel>Instrument Panel Wire>Combination Meter Assemblyewd_type=component;type=c;code=D41;pinno=2,3
D32-11 (+DP) - D41-2 (MSM+) Always Below 1 Ω D32-11 (+DP) or D41-2 (MSM+) - Body ground Always 10 kΩ or higher D32-10 (+DP2) - D41-3 (MSTI) Always Below 1 Ω D32-10 (+DP2) or D41-3 (MSTI) - Body ground Always 10 kΩ or higher
- Result:
Proceed to OK NG
Post-procedure1
None
OK
NG
- Result:
Result Proceed to excluding JPD20R-CEDSSW (w/ Panic Switch) A for JPD20R-CEDSSW (w/ Panic Switch) B
A
B
Pre-procedure1
Disconnect the G49 tire pressure warning ECU and receiver connector.
Disconnect the D41 and D42 combination meter assembly connectors.
Procedure1
Measure the resistance according to the value(s) in the table below.
- Standard Resistance:
Tester Connection Condition Specified Condition Click Location & Routing(G49,D42,D41)Location & Routingewd_type=routing;type=c,c,c;code=G49,D42,D41
Click Connector(D42)Instrument Panel>Instrument Panel Wire>Combination Meter Assemblyewd_type=component;type=c;code=D42;pinno=6
Click Connector(D41)Instrument Panel>Instrument Panel Wire>Combination Meter Assemblyewd_type=component;type=c;code=D41;pinno=31
G49-3 (CLSW) - D42-6 (INT) Always Below 1 Ω G49-3 (CLSW) or D42-6 (INT) - Body ground Always 10 kΩ or higher D41-31 (ES) - Body ground Always Below 1 Ω
- Result:
Proceed to OK NG
Post-procedure1
None
OK
NG
Measure the voltage according to the value(s) in the table below.
- Standard Voltage:
Tester Connection Condition Specified Condition Click Location & Routing(D42)Location & Routingewd_type=routing;type=c;code=D42
Click Connector(D42)Instrument Panel>Instrument Panel Wire>Combination Meter Assemblyewd_type=component;type=c;code=D42;pinno=6
D42-6 (INT) - Body ground Ignition switch ON 8 to 15 V
- Result:
Proceed to OK NG
OK
Click hereVehicle Interior>METER / GAUGE / DISPLAY>METER / GAUGE SYSTEM>HOW TO PROCEED WITH TROUBLESHOOTING
NG
Click hereSuspension>TIRE PRESSURE MONITORING>TIRE PRESSURE WARNING RECEIVER (for Quarter Pillar)>REMOVAL
Pre-procedure1
Disconnect the G96 tire pressure warning ECU and receiver connector.
Disconnect the D41 and D42 combination meter assembly connectors.
Procedure1
Measure the resistance according to the value(s) in the table below.
- Standard Resistance:
Tester Connection Condition Specified Condition Click Location & Routing(G96,D42,D41)Location & Routingewd_type=routing;type=c,c,c;code=G96,D42,D41
Click Connector(G96)Body>Floor Wire / No. 3 Floor Wire>Tire Pressure Warning Receiver Assemblyewd_type=component;type=c;code=G96;pinno=3
Click Connector(D42)Instrument Panel>Instrument Panel Wire>Combination Meter Assemblyewd_type=component;type=c;code=D42;pinno=6
Click Connector(D41)Instrument Panel>Instrument Panel Wire>Combination Meter Assemblyewd_type=component;type=c;code=D41;pinno=31
G96-3 (CLSW) - D42-6 (INT) Always Below 1 Ω G96-3 (CLSW) or D42-6 (INT) - Body ground Always 10 kΩ or higher D41-31 (ES) - Body ground Always Below 1 Ω
- Result:
Proceed to OK NG
Post-procedure1
None
OK
NG
Measure the voltage according to the value(s) in the table below.
- Standard Voltage:
Tester Connection Condition Specified Condition Click Location & Routing(D42)Location & Routingewd_type=routing;type=c;code=D42
Click Connector(D42)Instrument Panel>Instrument Panel Wire>Combination Meter Assemblyewd_type=component;type=c;code=D42;pinno=6
D42-6 (INT) - Body ground Ignition switch ON 8 to 15 V
- Result:
Proceed to OK NG
OK
Click hereVehicle Interior>METER / GAUGE / DISPLAY>METER / GAUGE SYSTEM>HOW TO PROCEED WITH TROUBLESHOOTING
NG
Click hereSuspension>TIRE PRESSURE MONITORING>TIRE PRESSURE WARNING RECEIVER (for Luggage Compartment)>REMOVAL