NETWORKING LIN COMMUNICATION SYSTEM B1206 P/W Master Switch Communication Stop B2321 D-Door Motor ECU Communication Stop B2322 P-Door Motor ECU Communication Stop B2323 RR-Door Motor ECU Communication Stop B2324 RL-Door Motor ECU Communication Stop B2329 Lost Communication with Sliding Sunshade ECU
DESCRIPTION
This DTC is stored when LIN communication between the main body ECU (multiplex network body ECU) and multiplex network master switch assembly,front power window regulator motor assembly LH, front power window regulator motor assembly RH, rear power window regulator motor assembly LH or rear power window regulator motor assembly RH, front multiplex network door ECU LH*1, front multiplex network door ECU RH*1, rear window regulator sub-assembly LH*2, rear window regulator sub-assembly RH*2, sliding roof drive gear sub-assembly*3 stops for 10 seconds or more.
*1: w/ Reverse Shift-linked Mirror
*2: w/ Double Locking System
*3: w/ Roof Sunshade System
| DTC No. | Detection Item | DTC Detection Condition | Trouble Area | DTC Output from | Priority |
|---|---|---|---|---|---|
| B1206 | P/W Master Switch Communication Stop | No communication between multiplex network master switch assembly and main body ECU (multiplex network body ECU) for 10 seconds or more. | ·
Main body ECU (multiplex network body ECU) ·
Driver side junction block assembly ·
Multiplex network master switch assembly ·
Front multiplex network door ECU LH (w/ Reverse Shift-linked Mirror) ·
Front multiplex network door ECU RH (w/ Reverse Shift-linked Mirror) ·
Harness or connector |
Main Body | A |
| B2321 | D-Door Motor ECU Communication Stop | ·
No communication between front power window regulator motor assembly LH and main body ECU (multiplex network body ECU) for 10 seconds or more. ·
No communication between front power window regulator motor assembly RH and main body ECU (multiplex network body ECU) for 10 seconds or more. |
·
Main body ECU (multiplex network body ECU) ·
Driver side junction block assembly ·
Front power window regulator motor assembly LH ·
Front power window regulator motor assembly RH ·
Front multiplex network door ECU LH ·
Front multiplex network door ECU RH ·
Harness or connector |
Main Body | A |
| B2322 | P-Door Motor ECU Communication Stop | ·
No communication between front power window regulator motor assembly LH and main body ECU (multiplex network body ECU) for 10 seconds or more. ·
No communication between front power window regulator motor assembly RH and main body ECU (multiplex network body ECU) for 10 seconds or more. |
·
Main body ECU (multiplex network body ECU) ·
Driver side junction block assembly ·
Front power window regulator motor assembly LH ·
Front power window regulator motor assembly RH ·
Front multiplex network door ECU LH ·
Front multiplex network door ECU RH ·
Harness or connector |
Main Body | A |
| B2323 | RR-Door Motor ECU Communication Stop | No communication between rear power window regulator motor assembly RH and main body ECU (multiplex network body ECU) for 10 seconds or more. | ·
Main body ECU (multiplex network body ECU) ·
Driver side junction block assembly ·
Rear power window regulator motor assembly RH ·
Rear window regulator sub-assembly RH (w/ Double Locking System) ·
Harness or connector |
Main Body | A |
| B2324 | RL-Door Motor ECU Communication Stop | No communication between rear power window regulator motor assembly LH and main body ECU (multiplex network body ECU) for 10 seconds or more. | ·
Main body ECU (multiplex network body ECU) ·
Driver side junction block assembly ·
Rear power window regulator motor assembly LH ·
Rear window regulator sub-assembly LH (w/ Double Locking System) ·
Harness or connector |
Main Body | A |
| B2329 | Lost Communication with Sliding Sunshade ECU | No communication between sliding roof ECU (sliding roof drive gear sub-assembly) and main body ECU (multiplex network body ECU) for 10 seconds or more. | ·
Main body ECU (multiplex network body ECU) ·
Driver side junction block assembly ·
Sliding roof ECU (sliding roof drive gear sub-assembly) (w/ Sliding Roof System) ·
Sliding roof ECU (sliding roof drive gear assembly) (w/ Panoramic Moon Roof System) ·
Harness or connector |
Main Body | A |
WIRING DIAGRAM
for LHD
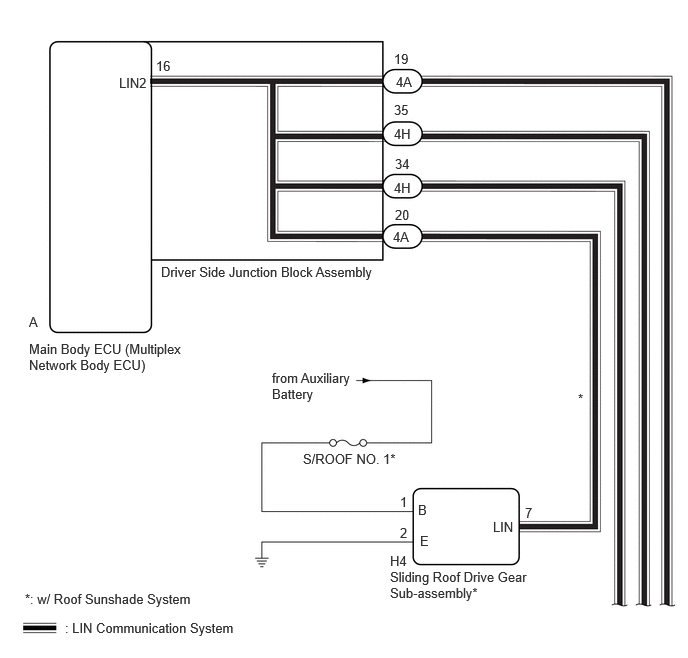
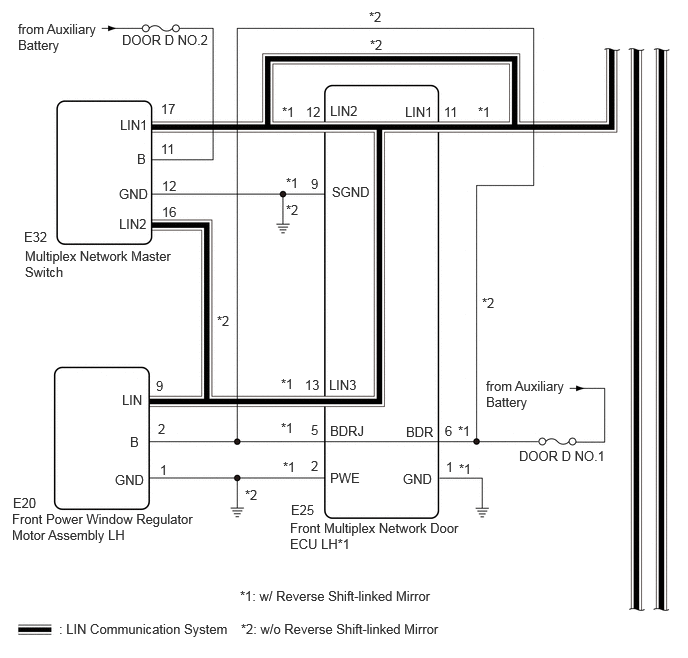
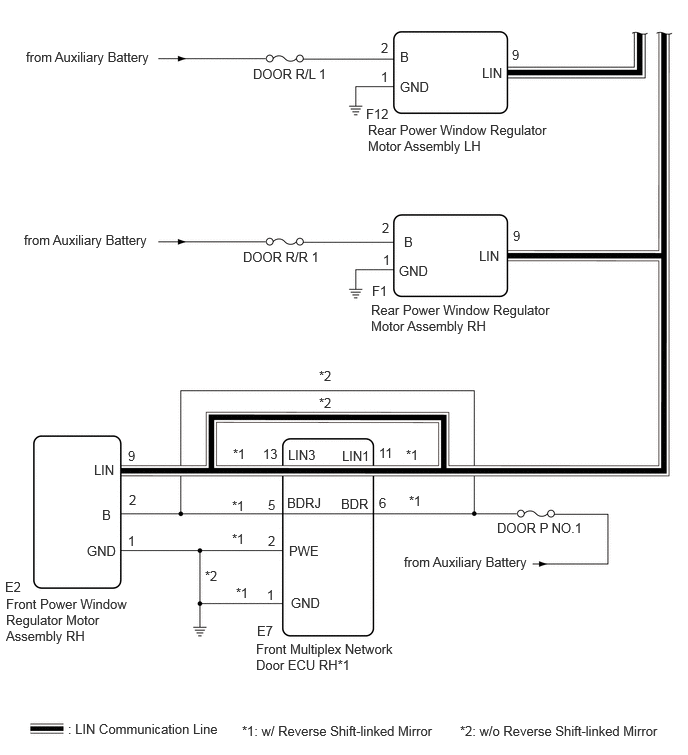
for RHD
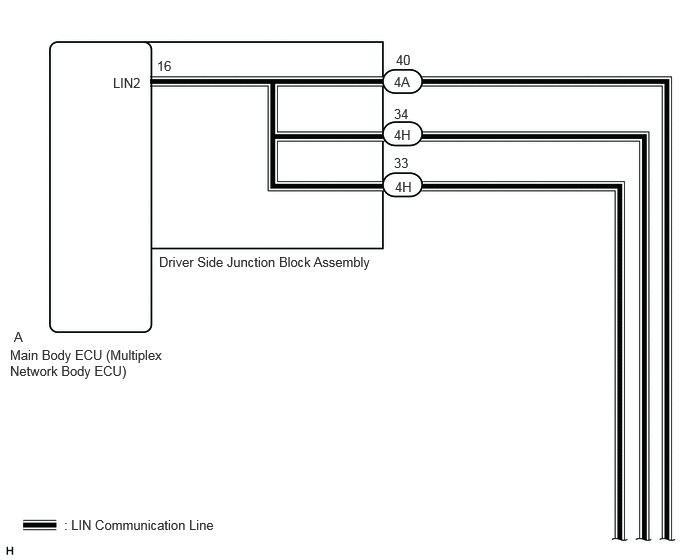
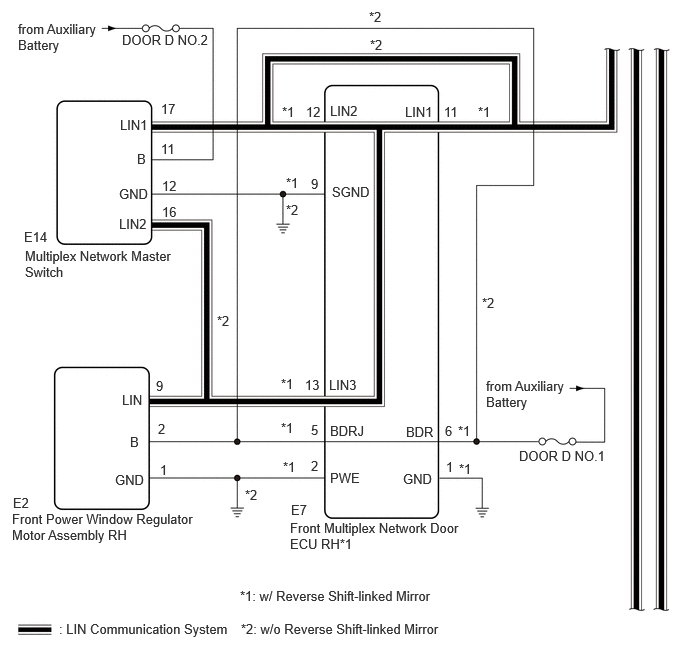
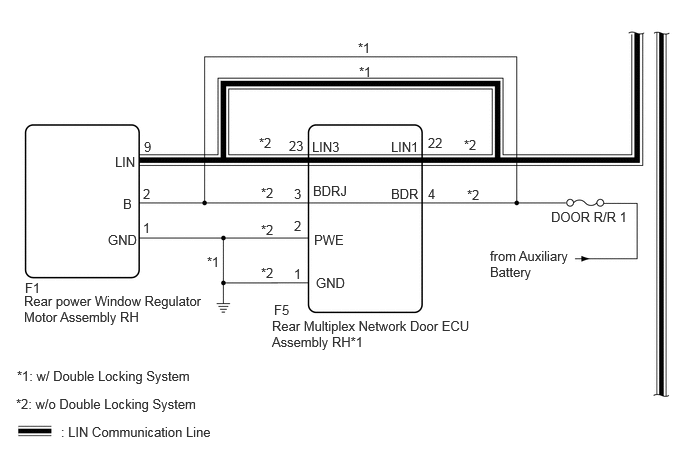
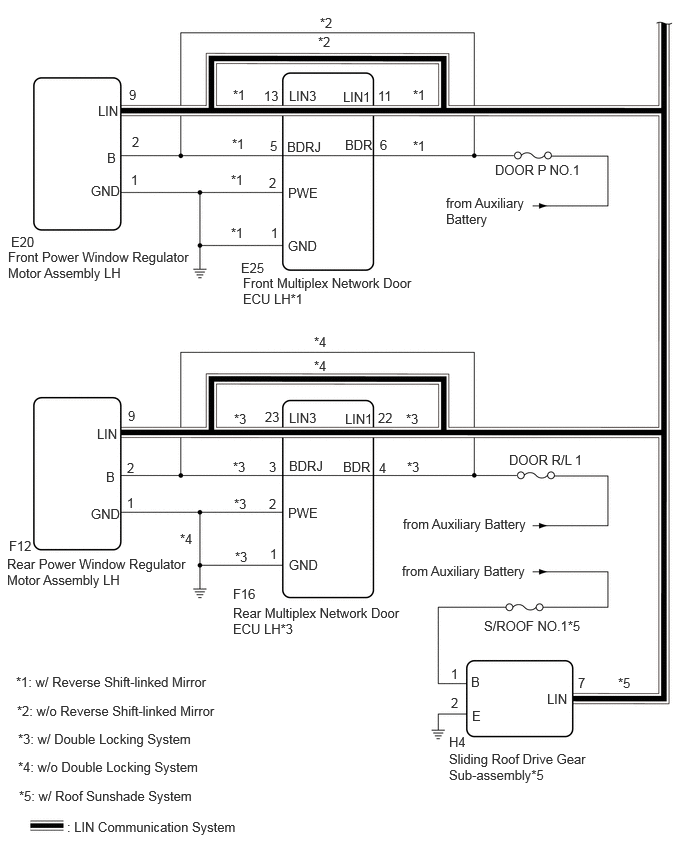
CAUTION / NOTICE / HINT
- NOTICE:
- ·
Inspect the fuses for circuits related to this system before performing the following procedure.
·When a power window regulator motor assembly is replaced or removed and reinstalled, it is necessary to perform initialization.
Click hereVehicle Exterior>WINDOW / GLASS>POWER WINDOW CONTROL SYSTEM>INITIALIZATION
PROCEDURE
Pre-procedure1
Clear the DTCs.
- Body Electrical > Main Body > Clear DTCs
- 50002 123
Procedure1
Check for DTCs.
- Body Electrical > Main Body > Trouble Codes
- 50001 123
- Result:
Result Proceed to *: w/ Roof Sunshade System
DTC is not output A DTC B1206, B2321, B2322, B2323 or B2324, B2329* are output B
Post-procedure1
None
A
Click hereGeneral>INTRODUCTION>HOW TO TROUBLESHOOT ECU CONTROLLED SYSTEMS>HOW TO PROCEED WITH TROUBLESHOOTING
B
Check the vehicle type.
- Result:
Result Proceed to for LHD A for RHD B
A
B
Check for DTCs.
- Body Electrical > Main Body > Trouble Codes
- 50001 123
- Result:
Result Proceed to *: w/ Roof Sunshade System
DTC B1206, B2321, B2322, B2323 and B2324, B2329* are output A DTCs B1206 and B2321 are output B Only DTC B1206 is output C Only DTC B2329 is output D Only DTC B2321 is output E DTCs B2322 and B2323 are output F Only DTC B2322 is output G Only DTC B2323 is output H Only DTC B2324 is output I
A
B
C
D
E
F
G
H
I
Pre-procedure1
Remove the driver side junction block assembly.
- HINT:
-
Click herePower Source / Network>POWER DISTRIBUTION>MAIN BODY ECU>REMOVAL
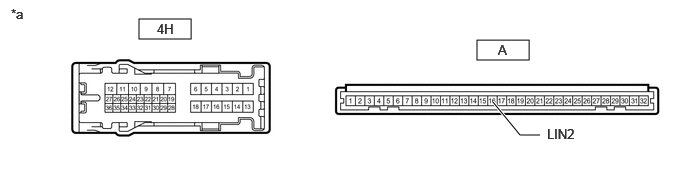
| *a | Component without harness connected
(Driver Side Junction Block Assembly) |
- | - |
Remove the main body ECU (multiplex network body ECU) from the driver side junction block assembly.
Procedure1
Measure the resistance according to the value(s) in the table below.
- Standard Resistance:
Tester Connection Condition Specified Condition 4H-34 - A-16 (LIN2) Always Below 1 Ω
- Result:
Proceed to OK NG
Post-procedure1
None
OK
NG
Check the vehicle type.
- Result:
Result Proceed to w/ Reverse Shift-linked Mirror A w/o Reverse Shift-linked Mirror B
A
B
Pre-procedure1
Disconnect the 4H driver side junction block assembly connector.
Disconnect the E25 front multiplex network door ECU LH connector.
Procedure1
Measure the resistance according to the value(s) in the table below.
- Standard Resistance:
Tester Connection Condition Specified Condition Click Location & Routing(E25)Location & Routingewd_type=routing;type=c;code=E25
Click Connector(E25)Body>Front Door Wire LH / Front Door Wire RH>Front Multiplex Network Door ECU LHewd_type=component;type=c;code=E25;pinno=11
4H-34 - E25-11 (LIN1) Always Below 1 Ω
- Result:
Proceed to OK NG
Post-procedure1
None
OK
NG
Pre-procedure1
Remove the driver side junction block assembly.
- HINT:
-
Click herePower Source / Network>POWER DISTRIBUTION>MAIN BODY ECU>REMOVAL
| *a | Component without harness connected
(Driver Side Junction Block Assembly) |
- | - |
Remove the main body ECU (multiplex network body ECU) from the driver side junction block assembly.
Procedure1
Measure the resistance according to the value(s) in the table below.
- Standard Resistance:
Tester Connection Condition Specified Condition 4H-34 - A-16 (LIN2) Always Below 1 Ω
- Result:
Proceed to OK NG
Post-procedure1
None
OK
NG
Pre-procedure1
Disconnect the E25 front multiplex network door ECU LH connector.
Procedure1
Measure the voltage according to the value(s) in the table below.
- Standard Voltage:
Tester Connection Switch Condition Specified Condition Click Location & Routing(E25)Location & Routingewd_type=routing;type=c;code=E25
Click Connector(E25)Body>Front Door Wire LH / Front Door Wire RH>Front Multiplex Network Door ECU LHewd_type=component;type=c;code=E25;pinno=6
E25-6 (BDR) - Body ground Ignition switch off 11 to 14 V
Measure the resistance according to the value(s) in the table below.
- Standard Resistance:
Tester Connection Condition Specified Condition Click Location & Routing(E25)Location & Routingewd_type=routing;type=c;code=E25
Click Connector(E25)Body>Front Door Wire LH / Front Door Wire RH>Front Multiplex Network Door ECU LHewd_type=component;type=c;code=E25;pinno=1
E25-1 (GND) - Body ground Always Below 1 Ω
- Result:
Proceed to OK NG
Post-procedure1
None
OK
NG
Pre-procedure1
Disconnect the 4H driver side junction block assembly connector.
Disconnect the E32 multiplex netwaork master switch assembly connector.
Procedure1
Measure the resistance according to the value(s) in the table below.
- Standard Resistance:
Tester Connection Condition Specified Condition Click Location & Routing(E32)Location & Routingewd_type=routing;type=c;code=E32
Click Connector(E32)Body>Front Door Wire LH / Front Door Wire RH>Multiplex Network Master Switch Assemblyewd_type=component;type=c;code=E32;pinno=17
4H-34 - E32-17 (LIN1) Always Below 1 Ω
- Result:
Proceed to OK NG
Post-procedure1
None
OK
NG
Pre-procedure1
Disconnect the 4H driver side junction block assembly connector.
Disconnect the E20 front power window regulator motor assembly LH connector.
Procedure1
Measure the resistance according to the value(s) in the table below.
- Standard Resistance:
Tester Connection Condition Specified Condition Click Location & Routing(E20)Location & Routingewd_type=routing;type=c;code=E20
Click Connector(E20)Body>Front Door Wire LH / Front Door Wire RH>Front Power Window Regulator Motor Assembly LHewd_type=component;type=c;code=E20;pinno=9
4H-34 - E20-9 (LIN) Always Below 1 Ω
- Result:
Proceed to OK NG
Post-procedure1
None
OK
NG
Pre-procedure1
Remove the driver side junction block assembly.
- HINT:
-
Click herePower Source / Network>POWER DISTRIBUTION>MAIN BODY ECU>REMOVAL
| *a | Component without harness connected
(Driver Side Junction Block Assembly) |
- | - |
Remove the main body ECU (multiplex network body ECU) from the driver side junction block assembly.
Procedure1
Measure the resistance according to the value(s) in the table below.
- Standard Resistance:
Tester Connection Condition Specified Condition 4H-34 - A-16 (LIN2) Always Below 1 Ω
- Result:
Proceed to OK NG
Post-procedure1
None
OK
NG
Check the vehicle type.
- Result:
Result Proceed to w/ Reverse Shift-linked Mirror A w/o Reverse Shift-linked Mirror B
A
B
Pre-procedure1
Disconnect the 4H driver side junction block assembly connector.
Disconnect the E32 multiplex network master switch assembly connector.
Procedure1
Measure the resistance according to the value(s) in the table below.
- Standard Resistance:
Tester Connection Condition Specified Condition Click Location & Routing(E32)Location & Routingewd_type=routing;type=c;code=E32
Click Connector(E32)Body>Front Door Wire LH / Front Door Wire RH>Multiplex Network Master Switch Assemblyewd_type=component;type=c;code=E32;pinno=17
4H-34 - E32-17 (LIN1) Always Below 1 Ω
- Result:
Proceed to OK NG
Post-procedure1
None
OK
NG
Pre-procedure1
Disconnect the E32 multiplex network master switch assembly connector.
Procedure1
Measure the voltage according to the value(s) in the table below.
- Standard Voltage:
Tester Connection Switch Condition Specified Condition Click Location & Routing(E32)Location & Routingewd_type=routing;type=c;code=E32
Click Connector(E32)Body>Front Door Wire LH / Front Door Wire RH>Multiplex Network Master Switch Assemblyewd_type=component;type=c;code=E32;pinno=11
E32-11 (B) - Body ground Ignition switch off 11 to 14 V
Measure the resistance according to the value(s) in the table below.
- Standard Resistance:
Tester Connection Condition Specified Condition Click Location & Routing(E32)Location & Routingewd_type=routing;type=c;code=E32
Click Connector(E32)Body>Front Door Wire LH / Front Door Wire RH>Multiplex Network Master Switch Assemblyewd_type=component;type=c;code=E32;pinno=12
E32-12 (GND) - Body ground Always Below 1 Ω
- Result:
Proceed to OK NG
Post-procedure1
None
OK
NG
Pre-procedure1
Disconnect the E32 multiplex network master switch assembly connector.
Disconnect the E25 front multiplex network door ECU LH connector.
Procedure1
Measure the resistance according to the value(s) in the table below.
- Standard Resistance:
Tester Connection Condition Specified Condition Click Location & Routing(E32,E25)Location & Routingewd_type=routing;type=c,c;code=E32,E25
Click Connector(E32)Body>Front Door Wire LH / Front Door Wire RH>Multiplex Network Master Switch Assemblyewd_type=component;type=c;code=E32;pinno=12
Click Connector(E25)Body>Front Door Wire LH / Front Door Wire RH>Front Multiplex Network Door ECU LHewd_type=component;type=c;code=E25;pinno=9
E32-12 (GND) - E25-9 (SGND) Always Below 1 Ω
- Result:
Proceed to OK NG
Post-procedure1
None
OK
NG
Pre-procedure1
Disconnect the E32 multiplex network master switch assembly connector.
Disconnect the E25 front multiplex network door ECU LH connector.
Procedure1
Measure the resistance according to the value(s) in the table below.
- Standard Resistance:
Tester Connection Condition Specified Condition Click Location & Routing(E32,E25)Location & Routingewd_type=routing;type=c,c;code=E32,E25
Click Connector(E32)Body>Front Door Wire LH / Front Door Wire RH>Multiplex Network Master Switch Assemblyewd_type=component;type=c;code=E32;pinno=17
Click Connector(E25)Body>Front Door Wire LH / Front Door Wire RH>Front Multiplex Network Door ECU LHewd_type=component;type=c;code=E25;pinno=12
E32-17 (LIN1) - E25-12 (LIN2) Always Below 1 Ω
- Result:
Proceed to OK NG
Post-procedure1
None
OK
NG
Pre-procedure1
Disconnect the E32 multiplex network master switch assembly connector.
Procedure1
Measure the voltage according to the value(s) in the table below.
- Standard Voltage:
Tester Connection Switch Condition Specified Condition Click Location & Routing(E32)Location & Routingewd_type=routing;type=c;code=E32
Click Connector(E32)Body>Front Door Wire LH / Front Door Wire RH>Multiplex Network Master Switch Assemblyewd_type=component;type=c;code=E32;pinno=11
E32-11 (B) - Body ground Ignition switch off 11 to 14 V
Measure the resistance according to the value(s) in the table below.
- Standard Resistance:
Tester Connection Condition Specified Condition Click Location & Routing(E32)Location & Routingewd_type=routing;type=c;code=E32
Click Connector(E32)Body>Front Door Wire LH / Front Door Wire RH>Multiplex Network Master Switch Assemblyewd_type=component;type=c;code=E32;pinno=12
E32-12 (GND) - Body ground Always Below 1 Ω
- Result:
Proceed to OK NG
Post-procedure1
None
OK
NG
Pre-procedure1
Remove the main body ECU (multiplex network body ECU).
Reinstall the driver side junction block assembly.
Procedure1
Disconnect the H4 sliding roof drive gear sub-assembly connector.
Measure the resistance according to the value(s) in the table below.
- Standard Resistance:
Tester Connection Condition Specified Condition Click Location & Routing(H4)Location & Routingewd_type=routing;type=c;code=H4
Click Connector(H4)Body>No. 1 Roof Wire>Sliding Roof Control ECU (Sliding Roof Drive Gear Sub-Assembly)ewd_type=component;type=c;code=H4;pinno=7
A-16 - H4-7 (MPX1) Always Below 1 Ω
- Result:
Proceed to OK NG
Post-procedure1
None
OK
NG
Pre-procedure1
Disconnect the H4 sliding roof drive gear sub-assembly connector.
Procedure1
Measure the voltage according to the value(s) in the table below.
- Standard Voltage:
Tester Connection Switch Condition Specified Condition Click Location & Routing(H4)Location & Routingewd_type=routing;type=c;code=H4
Click Connector(H4)Body>No. 1 Roof Wire>Sliding Roof Control ECU (Sliding Roof Drive Gear Sub-Assembly)ewd_type=component;type=c;code=H4;pinno=1
H4-1 (B) - Body ground Ignition switch off 11 to 14 V
Measure the resistance according to the value(s) in the table below.
- Standard Resistance:
Tester Connection Condition Specified Condition Click Location & Routing(H4)Location & Routingewd_type=routing;type=c;code=H4
Click Connector(H4)Body>No. 1 Roof Wire>Sliding Roof Control ECU (Sliding Roof Drive Gear Sub-Assembly)ewd_type=component;type=c;code=H4;pinno=2
H4-2 (E) - Body ground Always Below 1 Ω
- Result:
Proceed to OK NG
Post-procedure1
None
OK
NG
Pre-procedure1
Disconnect the 4A driver side junction block assembly connector.
Disconnect the H4 sliding roof drive gear sub-assembly connector.
Procedure1
Measure the resistance according to the value(s) in the table below.
- Standard Resistance:
Tester Connection Condition Specified Condition Click Location & Routing(H4)Location & Routingewd_type=routing;type=c;code=H4
Click Connector(H4)Body>No. 1 Roof Wire>Sliding Roof Control ECU (Sliding Roof Drive Gear Sub-Assembly)ewd_type=component;type=c;code=H4;pinno=7
4A-20 - H4-7 (LIN) Always Below 1 Ω
- Result:
Proceed to OK NG
Post-procedure1
None
OK
NG
Pre-procedure1
Remove the main body ECU (multiplex network body ECU).
Reinstall the driver side junction block assembly.
Disconnect the E20 front power window regulator motor assembly LH connector.
Procedure1
Measure the resistance according to the value(s) in the table below.
- Standard Resistance:
Tester Connection Condition Specified Condition Click Location & Routing(E20)Location & Routingewd_type=routing;type=c;code=E20
Click Connector(E20)Body>Front Door Wire LH / Front Door Wire RH>Front Power Window Regulator Motor Assembly LHewd_type=component;type=c;code=E20;pinno=9
A-16 (LIN2) - E20-9 (LIN1) Always Below 1 Ω
- Result:
Proceed to OK NG
Post-procedure1
None
OK
NG
Pre-procedure1
Disconnect the E20 front power window regulator motor assembly LH connector.
Procedure1
Measure the voltage according to the value(s) in the table below.
- Standard Voltage:
Tester Connection Switch Condition Specified Condition Click Location & Routing(E20)Location & Routingewd_type=routing;type=c;code=E20
Click Connector(E20)Body>Front Door Wire LH / Front Door Wire RH>Front Power Window Regulator Motor Assembly LHewd_type=component;type=c;code=E20;pinno=2
E20-2 (B) - Body ground Ignition switch off 11 to 14 V
Measure the resistance according to the value(s) in the table below.
- Standard Resistance:
Tester Connection Condition Specified Condition Click Location & Routing(E20)Location & Routingewd_type=routing;type=c;code=E20
Click Connector(E20)Body>Front Door Wire LH / Front Door Wire RH>Front Power Window Regulator Motor Assembly LHewd_type=component;type=c;code=E20;pinno=1
E20-1 (GND) - Body ground Always Below 1 Ω
- Result:
Proceed to OK NG
Post-procedure1
None
OK
NG
Check the vehicle type.
- Result:
Result Proceed to w/ Reverse Shift-linked Mirror A w/o Reverse Shift-linked Mirror B
A
B
Pre-procedure1
Disconnect the E20 front power window regulator motor assembly LH connector.
Disconnect the E25 front multiplex network door ECU LH connector.
Procedure1
Measure the resistance according to the value(s) in the table below.
- Standard Resistance:
Tester Connection Condition Specified Condition Click Location & Routing(E20,E25)Location & Routingewd_type=routing;type=c,c;code=E20,E25
Click Connector(E20)Body>Front Door Wire LH / Front Door Wire RH>Front Power Window Regulator Motor Assembly LHewd_type=component;type=c;code=E20;pinno=2,1
Click Connector(E25)Body>Front Door Wire LH / Front Door Wire RH>Front Multiplex Network Door ECU LHewd_type=component;type=c;code=E25;pinno=5,2
E20-2 (B) - E25-5 (BDRJ) Always Below 1 Ω E20-1 (GND) - E25-2 (PWE) Always Below 1 Ω
- Result:
Proceed to OK NG
Post-procedure1
None
OK
NG
Check the vehicle type.
- Result:
Result Proceed to w/ Reverse Shift-linked Mirror A w/o Reverse Shift-linked Mirror B
A
B
Pre-procedure1
Disconnect the E25 front multiplex network door ECU LH connector.
Disconnect the E20 front power window regulator motor assembly LH connector.
Procedure1
Measure the resistance according to the value(s) in the table below.
- Standard Resistance:
Tester Connection Condition Specified Condition Click Location & Routing(E25,E20)Location & Routingewd_type=routing;type=c,c;code=E25,E20
Click Connector(E25)Body>Front Door Wire LH / Front Door Wire RH>Front Multiplex Network Door ECU LHewd_type=component;type=c;code=E25;pinno=13
Click Connector(E20)Body>Front Door Wire LH / Front Door Wire RH>Front Power Window Regulator Motor Assembly LHewd_type=component;type=c;code=E20;pinno=9
E25-13 (LIN3) - E20-9 (LIN1) Always Below 1 Ω
- Result:
Proceed to OK NG
Post-procedure1
None
OK
NG
Pre-procedure1
Disconnect the E32 multiplex network master switch assembly connector.
Disconnect the E20 front power window regulator motor assembly LH connector.
Procedure1
Measure the resistance according to the value(s) in the table below.
- Standard Resistance:
Tester Connection Condition Specified Condition Click Location & Routing(E32,E20)Location & Routingewd_type=routing;type=c,c;code=E32,E20
Click Connector(E32)Body>Front Door Wire LH / Front Door Wire RH>Multiplex Network Master Switch Assemblyewd_type=component;type=c;code=E32;pinno=16
Click Connector(E20)Body>Front Door Wire LH / Front Door Wire RH>Front Power Window Regulator Motor Assembly LHewd_type=component;type=c;code=E20;pinno=9
E32-16 (LIN2) - E20-9 (LIN1) Always Below 1 Ω
- Result:
Proceed to OK NG
Post-procedure1
None
OK
NG
Pre-procedure1
Disconnect the 4A driver side junction block assembly connector.
Disconnect the E2 front window regulator motor assembly RH connector.
Procedure1
Measure the resistance according to the value(s) in the table below.
- Standard Resistance:
Tester Connection Condition Specified Condition Click Location & Routing(E2)Location & Routingewd_type=routing;type=c;code=E2
Click Connector(E2)Body>Front Door Wire LH / Front Door Wire RH>Front Power Window Regulator Motor Assembly RHewd_type=component;type=c;code=E2;pinno=9
4A-19 - E2-9 (LIN1) Always Below 1 Ω
- Result:
Proceed to OK NG
Post-procedure1
None
OK
NG
Check the vehicle type.
- Result:
Result Proceed to w/ Reverse Shift-linked Mirror A w/o Reverse Shift-linked Mirror B
A
B
Pre-procedure1
Disconnect the 4A driver side junction block assembly connector.
Disconnect the E2 front power window regulator motor assembly RH connector.
Procedure1
Measure the resistance according to the value(s) in the table below.
- Standard Resistance:
Tester Connection Condition Specified Condition Click Location & Routing(E2)Location & Routingewd_type=routing;type=c;code=E2
Click Connector(E2)Body>Front Door Wire LH / Front Door Wire RH>Front Power Window Regulator Motor Assembly RHewd_type=component;type=c;code=E2;pinno=9
4A-19 - E2-9 (LIN1) Always Below 1 Ω
- Result:
Proceed to OK NG
Post-procedure1
None
OK
NG
Pre-procedure1
Disconnect the E2 front power window regulator motor assembly RH connector.
Procedure1
Measure the voltage according to the value(s) in the table below.
- Standard Voltage:
Tester Connection Condition Specified Condition Click Location & Routing(E2)Location & Routingewd_type=routing;type=c;code=E2
Click Connector(E2)Body>Front Door Wire LH / Front Door Wire RH>Front Power Window Regulator Motor Assembly RHewd_type=component;type=c;code=E2;pinno=2
E2-2 (B) - Body ground Always 11 to 14 V
Measure the resistance according to the value(s) in the table below.
- Standard Resistance:
Tester Connection Condition Specified Condition Click Location & Routing(E2)Location & Routingewd_type=routing;type=c;code=E2
Click Connector(E2)Body>Front Door Wire LH / Front Door Wire RH>Front Power Window Regulator Motor Assembly RHewd_type=component;type=c;code=E2;pinno=1
E2-1 (GND) - Body ground Always Below 1 Ω
- Result:
Proceed to OK NG
Post-procedure1
None
OK
NG
Pre-procedure1
Disconnect the E2 front power window regulator motor assembly RH connector.
Disconnect the E7 front multiplex network door ECU RH connector.
Procedure1
Measure the resistance according to the value(s) in the table below.
- Standard Resistance:
Tester Connection Condition Specified Condition Click Location & Routing(E2,E7)Location & Routingewd_type=routing;type=c,c;code=E2,E7
Click Connector(E2)Body>Front Door Wire LH / Front Door Wire RH>Front Power Window Regulator Motor Assembly RHewd_type=component;type=c;code=E2;pinno=9
Click Connector(E7)Body>Front Door Wire LH / Front Door Wire RH>Front Multiplex Network Door ECU RHewd_type=component;type=c;code=E7;pinno=13
E2-9 (LIN1) - E7-13 (LIN3) Always Below 1 Ω
- Result:
Proceed to OK NG
Post-procedure1
None
OK
NG
Pre-procedure1
Disconnect the E7 front multiplex network door ECU RH connector.
Procedure1
Measure the resistance according to the value(s) in the table below.
- Standard Resistance:
Tester Connection Condition Specified Condition Click Location & Routing(E7)Location & Routingewd_type=routing;type=c;code=E7
Click Connector(E7)Body>Front Door Wire LH / Front Door Wire RH>Front Multiplex Network Door ECU RHewd_type=component;type=c;code=E7;pinno=1
E7-1 (GND) - Body ground Always Below 1 Ω
Measure the voltage according to the value(s) in the table below.
- Standard Voltage:
Tester Connection Switch Condition Specified Condition Click Location & Routing(E7)Location & Routingewd_type=routing;type=c;code=E7
Click Connector(E7)Body>Front Door Wire LH / Front Door Wire RH>Front Multiplex Network Door ECU RHewd_type=component;type=c;code=E7;pinno=6
E7-6 (BDR) - Body ground Ignition swith off 11 to 14 V
- Result:
Proceed to OK NG
Post-procedure1
None
OK
NG
Pre-procedure1
Disconnect the 4H driver side junction block assembly connector.
Disconnect the E2 front power window regulator motor assembly RH connector.
Procedure1
Measure the resistance according to the value(s) in the table below.
- Standard Resistance:
Tester Connection Condition Specified Condition Click Location & Routing(E2)Location & Routingewd_type=routing;type=c;code=E2
Click Connector(E2)Body>Front Door Wire LH / Front Door Wire RH>Front Power Window Regulator Motor Assembly RHewd_type=component;type=c;code=E2;pinno=9
4H-35 - E2-9 (LIN1) Always Below 1 Ω
- Result:
Proceed to OK NG
Post-procedure1
None
OK
NG
Pre-procedure1
Disconnect the E2 front power window regulator motor assembly RH connector.
Procedure1
Measure the voltage according to the value(s) in the table below.
- Standard Voltage:
Tester Connection Condition Specified Condition Click Location & Routing(E2)Location & Routingewd_type=routing;type=c;code=E2
Click Connector(E2)Body>Front Door Wire LH / Front Door Wire RH>Front Power Window Regulator Motor Assembly RHewd_type=component;type=c;code=E2;pinno=2
E2-2 (B) - Body ground Always 11 to 14 V
Measure the resistance according to the value(s) in the table below.
- Standard Resistance:
Tester Connection Condition Specified Condition Click Location & Routing(E2)Location & Routingewd_type=routing;type=c;code=E2
Click Connector(E2)Body>Front Door Wire LH / Front Door Wire RH>Front Power Window Regulator Motor Assembly RHewd_type=component;type=c;code=E2;pinno=1
E2-1 (GND) - Body ground Always Below 1 Ω
- Result:
Proceed to OK NG
Post-procedure1
None
OK
NG
Pre-procedure1
Disconnect the 4A driver side junction block assembly connector.
Disconnect the F1 rear power window regulator motor assembly RH connector.
Procedure1
Measure the resistance according to the value(s) in the table below.
- Standard Resistance:
Tester Connection Condition Specified Condition Click Location & Routing(F1)Location & Routingewd_type=routing;type=c;code=F1
Click Connector(F1)Body>No. 1 Rear Door Wire / No. 2 Rear Door Wire>Rear Power Window Regulator Motor Assembly RHewd_type=component;type=c;code=F1;pinno=9
4A-19 - F1-9 (LIN) Always Below 1 Ω
- Result:
Proceed to OK NG
Post-procedure1
None
OK
NG
Pre-procedure1
Disconnect the F1 rear power window regulator motor assembly RH connector.
Procedure1
Measure the voltage according to the value(s) in the table below.
- Standard Voltage:
Tester Connection Condition Specified Condition Click Location & Routing(F1)Location & Routingewd_type=routing;type=c;code=F1
Click Connector(F1)Body>No. 1 Rear Door Wire / No. 2 Rear Door Wire>Rear Power Window Regulator Motor Assembly RHewd_type=component;type=c;code=F1;pinno=2
F1-2 (B) - Body ground Always 11 to 14 V
Measure the resistance according to the value(s) in the table below.
- Standard Resistance:
Tester Connection Condition Specified Condition Click Location & Routing(F1)Location & Routingewd_type=routing;type=c;code=F1
Click Connector(F1)Body>No. 1 Rear Door Wire / No. 2 Rear Door Wire>Rear Power Window Regulator Motor Assembly RHewd_type=component;type=c;code=F1;pinno=1
F1-1 (GND) - Body ground Always Below 1 Ω
- Result:
Proceed to OK NG
Post-procedure1
None
OK
NG
Pre-procedure1
Disconnect the 4H driver side junction block assembly connector.
Disconnect the F12 rear power window regulator motor assembly LH connector.
Procedure1
Measure the resistance according to the value(s) in the table below.
- Standard Resistance:
Tester Connection Condition Specified Condition Click Location & Routing(F12)Location & Routingewd_type=routing;type=c;code=F12
Click Connector(F12)Body>No. 1 Rear Door Wire / No. 2 Rear Door Wire>Rear Power Window Regulator Motor Assembly LHewd_type=component;type=c;code=F12;pinno=9
4H-34 - F12-9 (LIN) Always Below 1 Ω
- Result:
Proceed to OK NG
Post-procedure1
None
OK
NG
Pre-procedure1
Disconnect the F12 rear power window regulator motor assembly LH connector.
Procedure1
Measure the voltage according to the value(s) in the table below.
- Standard Voltage:
Tester Connection Condition Specified Condition Click Location & Routing(F12)Location & Routingewd_type=routing;type=c;code=F12
Click Connector(F12)Body>No. 1 Rear Door Wire / No. 2 Rear Door Wire>Rear Power Window Regulator Motor Assembly LHewd_type=component;type=c;code=F12;pinno=2
F12-2 (B) - Body ground Always 11 to 14 V
Measure the resistance according to the value(s) in the table below.
- Standard Resistance:
Tester Connection Condition Specified Condition Click Location & Routing(F12)Location & Routingewd_type=routing;type=c;code=F12
Click Connector(F12)Body>No. 1 Rear Door Wire / No. 2 Rear Door Wire>Rear Power Window Regulator Motor Assembly LHewd_type=component;type=c;code=F12;pinno=1
F12-1 (GND) - Body ground Always Below 1 Ω
- Result:
Proceed to OK NG
Post-procedure1
None
OK
NG
Pre-procedure1
Remove the driver side junction block assembly.
- HINT:
-
Click herePower Source / Network>POWER DISTRIBUTION>MAIN BODY ECU>REMOVAL
| *a | Component without harness connected
(Driver Side Junction Block Assembly) |
- | - |
Remove the main body ECU (multiplex network body ECU) from the driver side junction block assembly.
Procedure1
Measure the resistance according to the value(s) in the table below.
- Standard Resistance:
Tester Connection Condition Specified Condition 4H-35 - A-16 (LIN2) Always Below 1 Ω
- Result:
Proceed to OK NG
Post-procedure1
None
OK
NG
Check for DTCs.
- Body Electrical > Main Body > Trouble Codes
- 50001 123
- Result:
Result Proceed to *: w/ Roof Sunshade System
DTC B1206, B2321, B2322, B2323 and B2324, B2329* are output A DTCs B1206 and B2321 are output B Only DTC B1206 is output C Only DTC B1273 is output D Only DTC B2321 is output E DTCs B2322 and B2324, B2329* are output F Only DTC B2322 is output G Only DTC B2323 is output H Only DTC B2324 is output I
A
B
C
D
E
F
G
H
I
Pre-procedure1
Remove the driver side junction block assembly.
- HINT:
-
Click herePower Source / Network>POWER DISTRIBUTION>MAIN BODY ECU>REMOVAL
| *a | Component without harness connected
(Driver Side Junction Block Assembly) |
- | - |
Remove the main body ECU (multiplex network body ECU) from the driver side junction block assembly.
Procedure1
Measure the resistance according to the value(s) in the table below.
- Standard Resistance:
Tester Connection Condition Specified Condition 4H-33 - A-16 (LIN2) Always Below 1 Ω
- Result:
Proceed to OK NG
Post-procedure1
None
OK
NG
Check the vehicle type.
- Result:
Result Proceed to w/ Reverse Shift-linked Mirror A w/o Reverse Shift-linked Mirror B
A
B
Pre-procedure1
Disconnect the 4H driver side junction block assembly connector.
Disconnect the E7 front multiplex network door ECU RH connector.
Procedure1
Measure the resistance according to the value(s) in the table below.
- Standard Resistance:
Tester Connection Condition Specified Condition Click Location & Routing(E25)Location & Routingewd_type=routing;type=c;code=E25
Click Connector(E25)Body>Front Door Wire LH / Front Door Wire RH>Front Multiplex Network Door ECU LHewd_type=component;type=c;code=E25;pinno=11
4H-33 - E25-11 (LIN1) Always Below 1 Ω
- Result:
Proceed to OK NG
Post-procedure1
None
OK
NG
Pre-procedure1
Remove the driver side junction block assembly.
- HINT:
-
Click herePower Source / Network>POWER DISTRIBUTION>MAIN BODY ECU>REMOVAL
| *a | Component without harness connected
(Driver Side Junction Block Assembly) |
- | - |
Remove the main body ECU (multiplex network body ECU) from the driver side junction block assembly.
Procedure1
Measure the resistance according to the value(s) in the table below.
- Standard Resistance:
Tester Connection Condition Specified Condition 4H-33 - A-16 (LIN2) Always Below 1 Ω
- Result:
Proceed to OK NG
Post-procedure1
None
OK
NG
Pre-procedure1
Disconnect the E7 front multiplex network door ECU RH connector.
Procedure1
Measure the voltage according to the value(s) in the table below.
- Standard Voltage:
Tester Connection Condition Specified Condition Click Location & Routing(E7)Location & Routingewd_type=routing;type=c;code=E7
Click Connector(E7)Body>Front Door Wire LH / Front Door Wire RH>Front Multiplex Network Door ECU RHewd_type=component;type=c;code=E7;pinno=6
E7-6 (BDR) - Body ground Always 11 to 14 V
Measure the resistance according to the value(s) in the table below.
- Standard Resistance:
Tester Connection Condition Specified Condition Click Location & Routing(E7)Location & Routingewd_type=routing;type=c;code=E7
Click Connector(E7)Body>Front Door Wire LH / Front Door Wire RH>Front Multiplex Network Door ECU RHewd_type=component;type=c;code=E7;pinno=1
E7-1 (GND) - Body ground Always Below 1 Ω
- Result:
Proceed to OK NG
Post-procedure1
None
OK
NG
Pre-procedure1
Disconnect the 4H driver side junction block assembly connector.
Disconnect the E14 multiplex netwaork master switch assembly connector.
Procedure1
Measure the resistance according to the value(s) in the table below.
- Standard Resistance:
Tester Connection Condition Specified Condition Click Location & Routing(E14)Location & Routingewd_type=routing;type=c;code=E14
Click Connector(E14)Body>Front Door Wire LH / Front Door Wire RH>Multiplex Network Master Switch Assemblyewd_type=component;type=c;code=E14;pinno=17
4H-33 - E14-17 (LIN1) Always Below 1 Ω
- Result:
Proceed to OK NG
Post-procedure1
None
OK
NG
Pre-procedure1
Disconnect the 4H driver side junction block assembly connector.
Disconnect the E2 front power window regulator motor assembly RH connector.
Procedure1
Measure the resistance according to the value(s) in the table below.
- Standard Resistance:
Tester Connection Condition Specified Condition Click Location & Routing(E2)Location & Routingewd_type=routing;type=c;code=E2
Click Connector(E2)Body>Front Door Wire LH / Front Door Wire RH>Front Power Window Regulator Motor Assembly RHewd_type=component;type=c;code=E2;pinno=9
4H-33 - E2-9 (LIN) Always Below 1 Ω
- Result:
Proceed to OK NG
Post-procedure1
None
OK
NG
Pre-procedure1
Remove the driver side junction block assembly.
- HINT:
-
Click herePower Source / Network>POWER DISTRIBUTION>MAIN BODY ECU>REMOVAL
| *a | Component without harness connected
(Driver Side Junction Block Assembly) |
- | - |
Remove the main body ECU (multiplex network body ECU) from the driver side junction block assembly.
Procedure1
Measure the resistance according to the value(s) in the table below.
- Standard Resistance:
Tester Connection Condition Specified Condition 4H-33 - A-16 (LIN2) Always Below 1 Ω
- Result:
Proceed to OK NG
Post-procedure1
None
OK
NG
Check the vehicle type.
- Result:
Result Proceed to w/ Reverse Shift-linked Mirror A w/o Reverse Shift-linked Mirror B
A
B
Pre-procedure1
Disconnect the 4H driver side junction block assembly connector.
Disconnect the E14 multiplex network master switch assembly connector.
Procedure1
Measure the resistance according to the value(s) in the table below.
- Standard Resistance:
Tester Connection Condition Specified Condition Click Location & Routing(E14)Location & Routingewd_type=routing;type=c;code=E14
Click Connector(E14)Body>Front Door Wire LH / Front Door Wire RH>Multiplex Network Master Switch Assemblyewd_type=component;type=c;code=E14;pinno=17
4H-33 - E14-17 (LIN1) Always Below 1 Ω
- Result:
Proceed to OK NG
Post-procedure1
None
OK
NG
Pre-procedure1
Disconnect the E14 multiplex network master switch assembly connector.
Procedure1
Measure the resistance according to the value(s) in the table below.
- Standard Resistance:
Tester Connection Condition Specified Condition Click Location & Routing(E14)Location & Routingewd_type=routing;type=c;code=E14
Click Connector(E14)Body>Front Door Wire LH / Front Door Wire RH>Multiplex Network Master Switch Assemblyewd_type=component;type=c;code=E14;pinno=12
E14-12 (GND) - Body ground Always Below 1 Ω
Measure the voltage according to the value(s) in the table below.
- Standard Voltage:
Tester Connection Switch Condition Specified Condition Click Location & Routing(E14)Location & Routingewd_type=routing;type=c;code=E14
Click Connector(E14)Body>Front Door Wire LH / Front Door Wire RH>Multiplex Network Master Switch Assemblyewd_type=component;type=c;code=E14;pinno=11
E14-11 (B) - Body ground Ignition switch off 11 to 14 V
- Result:
Proceed to OK NG
Post-procedure1
None
OK
NG
Pre-procedure1
Disconnect the E14 multiplex network master switch assembly connector.
Disconnect the E7 front multiplex network door ECU RH connector.
Procedure1
Measure the resistance according to the value(s) in the table below.
- Standard Resistance:
Tester Connection Condition Specified Condition Click Location & Routing(E14,E7)Location & Routingewd_type=routing;type=c,c;code=E14,E7
Click Connector(E14)Body>Front Door Wire LH / Front Door Wire RH>Multiplex Network Master Switch Assemblyewd_type=component;type=c;code=E14;pinno=11,12
Click Connector(E7)Body>Front Door Wire LH / Front Door Wire RH>Front Multiplex Network Door ECU RHewd_type=component;type=c;code=E7;pinno=5,9
E14-11 (B) - E7-5 (BDRJ) Always Below 1 Ω E14-12 (GND) - E7-9 (SGND) Always Below 1 Ω
- Result:
Proceed to OK NG
Post-procedure1
None
OK
NG
Pre-procedure1
Disconnect the E14 multiplex network master switch assembly connector.
Disconnect the E7 front multiplex network door ECU RH connector.
Procedure1
Measure the resistance according to the value(s) in the table below.
- Standard Resistance:
Tester Connection Condition Specified Condition Click Location & Routing(E14,E7)Location & Routingewd_type=routing;type=c,c;code=E14,E7
Click Connector(E14)Body>Front Door Wire LH / Front Door Wire RH>Multiplex Network Master Switch Assemblyewd_type=component;type=c;code=E14;pinno=17
Click Connector(E7)Body>Front Door Wire LH / Front Door Wire RH>Front Multiplex Network Door ECU RHewd_type=component;type=c;code=E7;pinno=12
E14-17 (LIN1) - E7-12 (LIN2) Always Below 1 Ω
- Result:
Proceed to OK NG
Post-procedure1
None
OK
NG
Pre-procedure1
Disconnect the E14 multiplex network master switch assembly connector.
Procedure1
Measure the voltage according to the value(s) in the table below.
- Standard Voltage:
Tester Connection Switch Condition Specified Condition Click Location & Routing(E14)Location & Routingewd_type=routing;type=c;code=E14
Click Connector(E14)Body>Front Door Wire LH / Front Door Wire RH>Multiplex Network Master Switch Assemblyewd_type=component;type=c;code=E14;pinno=11
E14-11 (B) - Body ground Ignition switch off 11 to 14 V
Measure the resistance according to the value(s) in the table below.
- Standard Resistance:
Tester Connection Condition Specified Condition Click Location & Routing(E14)Location & Routingewd_type=routing;type=c;code=E14
Click Connector(E14)Body>Front Door Wire LH / Front Door Wire RH>Multiplex Network Master Switch Assemblyewd_type=component;type=c;code=E14;pinno=12
E14-12 (GND) - Body ground Always Below 1 Ω
- Result:
Proceed to OK NG
Post-procedure1
None
OK
NG
Pre-procedure1
Remove the main body ECU (multiplex network body ECU) from the driver side junction block assembly.
Disconnect the H4 sliding roof drive gear sub-assembly connector.
Procedure1
Measure the resistance according to the value(s) in the table below.
- Standard Resistance:
Tester Connection Condition Specified Condition Click Location & Routing(H4)Location & Routingewd_type=routing;type=c;code=H4
Click Connector(H4)Body>No. 1 Roof Wire>Sliding Roof Control ECU (Sliding Roof Drive Gear Sub-Assembly)ewd_type=component;type=c;code=H4;pinno=7
A-16 - H4-7 (MPX1) Always Below 1 Ω
- Result:
Proceed to OK NG
Post-procedure1
None
OK
NG
Pre-procedure1
Disconnect the H4 sliding roof drive gear sub-assembly connector.
Procedure1
Measure the voltage according to the value(s) in the table below.
- Standard Voltage:
Tester Connection Switch Condition Specified Condition Click Location & Routing(H4)Location & Routingewd_type=routing;type=c;code=H4
Click Connector(H4)Body>No. 1 Roof Wire>Sliding Roof Control ECU (Sliding Roof Drive Gear Sub-Assembly)ewd_type=component;type=c;code=H4;pinno=1
H4-1 (B) - Body ground Ignition switch off 11 to 14 V
Measure the resistance according to the value(s) in the table below.
- Standard Resistance:
Tester Connection Condition Specified Condition Click Location & Routing(H4)Location & Routingewd_type=routing;type=c;code=H4
Click Connector(H4)Body>No. 1 Roof Wire>Sliding Roof Control ECU (Sliding Roof Drive Gear Sub-Assembly)ewd_type=component;type=c;code=H4;pinno=2
H4-2 (E) - Body ground Always Below 1 Ω
- Result:
Proceed to OK NG
Post-procedure1
None
OK
NG
Pre-procedure1
Remove the main body ECU (multiplex network body ECU).
Disconnect the E2 front power window regulator motor assembly RH connector.
Procedure1
Measure the resistance according to the value(s) in the table below.
- Standard Resistance:
Tester Connection Condition Specified Condition Click Location & Routing(E2)Location & Routingewd_type=routing;type=c;code=E2
Click Connector(E2)Body>Front Door Wire LH / Front Door Wire RH>Front Power Window Regulator Motor Assembly RHewd_type=component;type=c;code=E2;pinno=9
A-16 (LIN2) - E2-9 (LIN1) Always Below 1 Ω
- Result:
Proceed to OK NG
Post-procedure1
None
OK
NG
Pre-procedure1
Disconnect the E2 front power window regulator motor assembly RH connector.
Procedure1
Measure the voltage according to the value(s) in the table below.
- Standard Voltage:
Tester Connection Switch Condition Specified Condition Click Location & Routing(E2)Location & Routingewd_type=routing;type=c;code=E2
Click Connector(E2)Body>Front Door Wire LH / Front Door Wire RH>Front Power Window Regulator Motor Assembly RHewd_type=component;type=c;code=E2;pinno=2
E2-2 (B) - Body ground Ignition switch off 11 to 14 V
Measure the resistance according to the value(s) in the table below.
- Standard Resistance:
Tester Connection Condition Specified Condition Click Location & Routing(E2)Location & Routingewd_type=routing;type=c;code=E2
Click Connector(E2)Body>Front Door Wire LH / Front Door Wire RH>Front Power Window Regulator Motor Assembly RHewd_type=component;type=c;code=E2;pinno=1
E2-1 (GND) - Body ground Always Below 1 Ω
- Result:
Proceed to OK NG
Post-procedure1
None
OK
NG
Check the vehicle type.
- Result:
Result Proceed to w/ Reverse Shift-linked Mirror A w/o Reverse Shift-linked Mirror B
A
B
Pre-procedure1
Disconnect the E2 front power window regulator motor assembly RH connector.
Procedure1
Disconnect the E7 front multiplex network door ECU RH connector.
Measure the resistance according to the value(s) in the table below.
- Standard Resistance:
Tester Connection Condition Specified Condition Click Location & Routing(E2,E7)Location & Routingewd_type=routing;type=c,c;code=E2,E7
Click Connector(E2)Body>Front Door Wire LH / Front Door Wire RH>Front Power Window Regulator Motor Assembly RHewd_type=component;type=c;code=E2;pinno=2,1
Click Connector(E7)Body>Front Door Wire LH / Front Door Wire RH>Front Multiplex Network Door ECU RHewd_type=component;type=c;code=E7;pinno=5,2
E2-2 (B) - E7-5 (BDRJ) Always Below 1 Ω E2-1 (GND) - E7-2 (PWE) Always Below 1 Ω
- Result:
Proceed to OK NG
Post-procedure1
None
OK
NG
Check the vehicle type.
- Result:
Result Proceed to w/ Reverse Shift-linked Mirror A w/o Reverse Shift-linked Mirror B
A
B
Pre-procedure1
Disconnect the E7 front multiplex network door ECU RH connector.
Disconnect the E2 front power window regulator motor assembly RH connector.
Procedure1
Measure the resistance according to the value(s) in the table below.
- Standard Resistance:
Tester Connection Condition Specified Condition Click Location & Routing(E7,E2)Location & Routingewd_type=routing;type=c,c;code=E7,E2
Click Connector(E7)Body>Front Door Wire LH / Front Door Wire RH>Front Multiplex Network Door ECU RHewd_type=component;type=c;code=E7;pinno=13
Click Connector(E2)Body>Front Door Wire LH / Front Door Wire RH>Front Power Window Regulator Motor Assembly RHewd_type=component;type=c;code=E2;pinno=9
E7-13 (LIN3) - E2-9 (LIN1) Always Below 1 Ω
- Result:
Proceed to OK NG
Post-procedure1
None
OK
NG
Pre-procedure1
Disconnect the E14 multiplex network master switch assembly connector.
Disconnect the E2 front power window regulator motor assembly RH connector.
Procedure1
Measure the resistance according to the value(s) in the table below.
- Standard Resistance:
Tester Connection Condition Specified Condition Click Location & Routing(E14,E7)Location & Routingewd_type=routing;type=c,c;code=E14,E7
Click Connector(E14)Body>Front Door Wire LH / Front Door Wire RH>Multiplex Network Master Switch Assemblyewd_type=component;type=c;code=E14;pinno=16
Click Connector(E7)Body>Front Door Wire LH / Front Door Wire RH>Front Multiplex Network Door ECU RHewd_type=component;type=c;code=E7;pinno=9
E14-16 (LIN2) - E7-9 (LIN1) Always Below 1 Ω
- Result:
Proceed to OK NG
Post-procedure1
None
OK
NG
Pre-procedure1
Disconnect the 4A driver side junction block assembly connector.
Disconnect the F1 front power window regulator motor assembly LH connector.
Procedure1
Measure the resistance according to the value(s) in the table below.
- Standard Resistance:
Tester Connection Condition Specified Condition Click Location & Routing(F1)Location & Routingewd_type=routing;type=c;code=F1
Click Connector(F1)Body>No. 1 Rear Door Wire / No. 2 Rear Door Wire>Rear Power Window Regulator Motor Assembly RHewd_type=component;type=c;code=F1;pinno=9
4A-40 - F1-9 (LIN1) Always Below 1 Ω
- Result:
Proceed to OK NG
Post-procedure1
None
OK
NG
Check the vehicle type.
- Result:
Result Proceed to w/ Reverse Shift-linked Mirror A w/o Reverse Shift-linked Mirror B
A
B
Pre-procedure1
Disconnect the 4A driver side junction block assembly connector.
Disconnect the E20 front power window regulator motor assembly LH connector.
Procedure1
Measure the resistance according to the value(s) in the table below.
- Standard Resistance:
Tester Connection Condition Specified Condition Click Location & Routing(E20)Location & Routingewd_type=routing;type=c;code=E20
Click Connector(E20)Body>Front Door Wire LH / Front Door Wire RH>Front Power Window Regulator Motor Assembly LHewd_type=component;type=c;code=E20;pinno=9
4A-40 - E20-9 (LIN1) Always Below 1 Ω
- Result:
Proceed to OK NG
Post-procedure1
None
OK
NG
Pre-procedure1
Disconnect the E20 front power window regulator motor assembly LH connector.
Procedure1
Measure the voltage according to the value(s) in the table below.
- Standard Voltage:
Tester Connection Switch Condition Specified Condition Click Location & Routing(E20)Location & Routingewd_type=routing;type=c;code=E20
Click Connector(E20)Body>Front Door Wire LH / Front Door Wire RH>Front Power Window Regulator Motor Assembly LHewd_type=component;type=c;code=E20;pinno=2
E20-2 (B) - Body ground Ignition switch off 11 to 14 V
Measure the resistance according to the value(s) in the table below.
- Standard Resistance:
Tester Connection Condition Specified Condition Click Location & Routing(E20)Location & Routingewd_type=routing;type=c;code=E20
Click Connector(E20)Body>Front Door Wire LH / Front Door Wire RH>Front Power Window Regulator Motor Assembly LHewd_type=component;type=c;code=E20;pinno=1
E20-1 (GND) - Body ground Always Below 1 Ω
- Result:
Proceed to OK NG
Post-procedure1
None
OK
NG
Pre-procedure1
Disconnect the E20 front power window regulator motor assembly LH connector.
Disconnect the E25 front multiplex network door ECU LH connector.
Procedure1
Measure the resistance according to the value(s) in the table below.
- Standard Resistance:
Tester Connection Condition Specified Condition Click Location & Routing(E20,E25)Location & Routingewd_type=routing;type=c,c;code=E20,E25
Click Connector(E20)Body>Front Door Wire LH / Front Door Wire RH>Front Power Window Regulator Motor Assembly LHewd_type=component;type=c;code=E20;pinno=9
Click Connector(E25)Body>Front Door Wire LH / Front Door Wire RH>Front Multiplex Network Door ECU LHewd_type=component;type=c;code=E25;pinno=13
E20-9 (LIN1) - E25-13 (LIN3) Always Below 1 Ω
- Result:
Proceed to OK NG
Post-procedure1
None
OK
NG
Pre-procedure1
Disconnect the E25 front multiplex network door ECU LH connector.
Procedure1
Measure the resistance according to the value(s) in the table below.
- Standard Resistance:
Tester Connection Condition Specified Condition Click Location & Routing(E25)Location & Routingewd_type=routing;type=c;code=E25
Click Connector(E25)Body>Front Door Wire LH / Front Door Wire RH>Front Multiplex Network Door ECU LHewd_type=component;type=c;code=E25;pinno=1
E25-1 (GND) - Body ground Always Below 1 Ω
Measure the voltage according to the value(s) in the table below.
- Standard Voltage:
Tester Connection Switch Condition Specified Condition Click Location & Routing(E25)Location & Routingewd_type=routing;type=c;code=E25
Click Connector(E25)Body>Front Door Wire LH / Front Door Wire RH>Front Multiplex Network Door ECU LHewd_type=component;type=c;code=E25;pinno=6
E25-6 (BDR) - Body ground Ignition swith off 11 to 14 V
- Result:
Proceed to OK NG
Post-procedure1
None
OK
NG
Pre-procedure1
Disconnect the 4A driver side junction block assembly connector.
Disconnect the E20 front power window regulator motor assembly LH connector.
Procedure1
Measure the resistance according to the value(s) in the table below.
- Standard Resistance:
Tester Connection Condition Specified Condition Click Location & Routing(E20)Location & Routingewd_type=routing;type=c;code=E20
Click Connector(E20)Body>Front Door Wire LH / Front Door Wire RH>Front Power Window Regulator Motor Assembly LHewd_type=component;type=c;code=E20;pinno=9
4A-40 - E20-9 (LIN1) Always Below 1 Ω
- Result:
Proceed to OK NG
Post-procedure1
None
OK
NG
Pre-procedure1
Disconnect the E20 front power window regulator motor assembly LH connector.
Procedure1
Measure the voltage according to the value(s) in the table below.
- Standard Voltage:
Tester Connection Switch Condition Specified Condition Click Location & Routing(E20)Location & Routingewd_type=routing;type=c;code=E20
Click Connector(E20)Body>Front Door Wire LH / Front Door Wire RH>Front Power Window Regulator Motor Assembly LHewd_type=component;type=c;code=E20;pinno=2
E20-2 (B) - Body ground Ignistion switch off 11 to 14 V
Measure the resistance according to the value(s) in the table below.
- Standard Resistance:
Tester Connection Condition Specified Condition Click Location & Routing(E20)Location & Routingewd_type=routing;type=c;code=E20
Click Connector(E20)Body>Front Door Wire LH / Front Door Wire RH>Front Power Window Regulator Motor Assembly LHewd_type=component;type=c;code=E20;pinno=1
E20-1 (GND) - Body ground Always Below 1 Ω
- Result:
Proceed to OK NG
Post-procedure1
None
OK
NG
Pre-procedure1
Remove the main body ECU (multiplex network body ECU).
Disconnect the F1 rear power window regulator motor assembly RH connector.
Procedure1
Measure the resistance according to the value(s) in the table below.
- Standard Resistance:
Tester Connection Condition Specified Condition Click Location & Routing(F1)Location & Routingewd_type=routing;type=c;code=F1
Click Connector(F1)Body>No. 1 Rear Door Wire / No. 2 Rear Door Wire>Rear Power Window Regulator Motor Assembly RHewd_type=component;type=c;code=F1;pinno=9
4H-34 - F1-9 (LIN) Always Below 1 Ω
- Result:
Proceed to OK NG
Post-procedure1
None
OK
NG
Pre-procedure1
Disconnect the F1 rear power window regulator motor assembly RH connector.
Procedure1
Measure the voltage according to the value(s) in the table below.
- Standard Voltage:
Tester Connection Switch Condition Specified Condition Click Location & Routing(F1)Location & Routingewd_type=routing;type=c;code=F1
Click Connector(F1)Body>No. 1 Rear Door Wire / No. 2 Rear Door Wire>Rear Power Window Regulator Motor Assembly RHewd_type=component;type=c;code=F1;pinno=2
F1-2 (B) - Body ground Ignition switch off 11 to 14 V
Measure the resistance according to the value(s) in the table below.
- Standard Resistance:
Tester Connection Condition Specified Condition Click Location & Routing(F1)Location & Routingewd_type=routing;type=c;code=F1
Click Connector(F1)Body>No. 1 Rear Door Wire / No. 2 Rear Door Wire>Rear Power Window Regulator Motor Assembly RHewd_type=component;type=c;code=F1;pinno=1
F1-1 (GND) - Body ground Always Below 1 Ω
- Result:
Proceed to OK NG
Post-procedure1
None
OK
NG
Check the vehicle type.
- Result:
Result Proceed to w/ Double Lockiing System A w/o Double Lockiing System B
A
B
Pre-procedure1
Disconnect the F5 rear multiplex network door ECU RH connector.
Disconnect the F1 rear power window regulator motor assembly RH connector.
Procedure1
Measure the resistance according to the value(s) in the table below.
- Standard Resistance:
Tester Connection Condition Specified Condition Click Location & Routing(F5,F1)Location & Routingewd_type=routing;type=c,c;code=F5,F1
Click Connector(F5)Body>No. 1 Rear Door Wire / No. 2 Rear Door Wire>Rear Multiplex Network Door ECU RHewd_type=component;type=c;code=F5;pinno=3,2
Click Connector(F1)Body>No. 1 Rear Door Wire / No. 2 Rear Door Wire>Rear Power Window Regulator Motor Assembly RHewd_type=component;type=c;code=F1;pinno=2,1
F5-3 (BDRJ) - F1-2 (B) Always Below 1 Ω F5-2 (PWE) - F1-1 (GND) Always Below 1 Ω
- Result:
Proceed to OK NG
Post-procedure1
None
OK
NG
Pre-procedure1
Disconnect the F5 rear multiplex network door ECU RH connector.
Procedure1
Measure the voltage according to the value(s) in the table below.
- Standard Voltage:
Tester Connection Switch Condition Specified Condition Click Location & Routing(F5)Location & Routingewd_type=routing;type=c;code=F5
Click Connector(F5)Body>No. 1 Rear Door Wire / No. 2 Rear Door Wire>Rear Multiplex Network Door ECU RHewd_type=component;type=c;code=F5;pinno=4
F5-4 (BDR) - Body ground Ignition switch off 11 to 14 V
Measure the resistance according to the value(s) in the table below.
- Standard Resistance:
Tester Connection Condition Specified Condition Click Location & Routing(F5)Location & Routingewd_type=routing;type=c;code=F5
Click Connector(F5)Body>No. 1 Rear Door Wire / No. 2 Rear Door Wire>Rear Multiplex Network Door ECU RHewd_type=component;type=c;code=F5;pinno=1
F5-1 (GND) - Body ground Always Below 1 Ω
- Result:
Proceed to OK NG
Post-procedure1
None
OK
NG
Pre-procedure1
Remove the driver side junction block assembly.
- HINT:
-
Click herePower Source / Network>POWER DISTRIBUTION>MAIN BODY ECU>REMOVAL
| *a | Component without harness connected
(Driver Side Junction Block Assembly) |
- | - |
Remove the main body ECU (multiplex network body ECU) from the driver side junction block assembly.
Procedure1
Measure the resistance according to the value(s) in the table below.
- Standard Resistance:
Tester Connection Condition Specified Condition 4H-34 - A-16 (LIN2) Always Below 1 Ω
- Result:
Proceed to OK NG
Post-procedure1
None
OK
NG
Check the vehicle type.
- Result:
Result Proceed to w/ Double Lockiing System A w/o Double Lockiing System B
A
B
Pre-procedure1
Disconnect the F5 rear multiplex network door ECU RH connector.
Disconnect the F1 rear power window regulator motor assembly RH connector.
Procedure1
Measure the resistance according to the value(s) in the table below.
- Standard Resistance:
Tester Connection Condition Specified Condition Click Location & Routing(F16,F12)Location & Routingewd_type=routing;type=c,c;code=F16,F12
Click Connector(F16)Body>No. 1 Rear Door Wire / No. 2 Rear Door Wire>Rear Multiplex Network Door ECU LHewd_type=component;type=c;code=F16;pinno=23
Click Connector(F12)Body>No. 1 Rear Door Wire / No. 2 Rear Door Wire>Rear Power Window Regulator Motor Assembly LHewd_type=component;type=c;code=F12;pinno=9
F16-23 (LIN3) - F12-9 (LIN) Always Below 1 Ω
- Result:
Proceed to OK NG
Post-procedure1
None
OK
NG
Pre-procedure1
Disconnect the 4H driver side junction block assembly connector.
Disconnect the F5 rear multiplex network door ECU RH connector.
Procedure1
Measure the resistance according to the value(s) in the table below.
- Standard Resistance:
Tester Connection Condition Specified Condition Click Location & Routing(F5)Location & Routingewd_type=routing;type=c;code=F5
Click Connector(F5)Body>No. 1 Rear Door Wire / No. 2 Rear Door Wire>Rear Multiplex Network Door ECU RHewd_type=component;type=c;code=F5;pinno=22
4H-34 - F5-22 (LIN1) Always Below 1 Ω
- Result:
Proceed to OK NG
Post-procedure1
None
OK
NG
Pre-procedure1
Disconnect the 4H driver side junction block assembly connector.
Disconnect the F12 rear power window regulator motor assembly LH connector.
Procedure1
Measure the resistance according to the value(s) in the table below.
- Standard Resistance:
Tester Connection Condition Specified Condition Click Location & Routing(F12)Location & Routingewd_type=routing;type=c;code=F12
Click Connector(F12)Body>No. 1 Rear Door Wire / No. 2 Rear Door Wire>Rear Power Window Regulator Motor Assembly LHewd_type=component;type=c;code=F12;pinno=9
4H-34 - F12-9 (LIN) Always Below 1 Ω
- Result:
Proceed to OK NG
Post-procedure1
None
OK
NG
Pre-procedure1
Disconnect the F12 rear power window regulator motor assembly LH connector.
Procedure1
Measure the voltage according to the value(s) in the table below.
- Standard Voltage:
Tester Connection Condition Specified Condition Click Location & Routing(F12)Location & Routingewd_type=routing;type=c;code=F12
Click Connector(F12)Body>No. 1 Rear Door Wire / No. 2 Rear Door Wire>Rear Power Window Regulator Motor Assembly LHewd_type=component;type=c;code=F12;pinno=2
F12-2 (B) - Body ground Always 11 to 14 V
Measure the resistance according to the value(s) in the table below.
- Standard Resistance:
Tester Connection Condition Specified Condition Click Location & Routing(F12)Location & Routingewd_type=routing;type=c;code=F12
Click Connector(F12)Body>No. 1 Rear Door Wire / No. 2 Rear Door Wire>Rear Power Window Regulator Motor Assembly LHewd_type=component;type=c;code=F12;pinno=1
F12-1 (GND) - Body ground Always Below 1 Ω
- Result:
Proceed to OK NG
Post-procedure1
None
OK
NG
Check the vehicle type.
- Result:
Result Proceed to w/ Double Lockiing System A w/o Double Lockiing System B
A
B
Pre-procedure1
Disconnect the F16 rear multiplex network door ECU LH connector.
Disconnect the F12 rear power window regulator motor assembly LH connector.
Procedure1
Measure the resistance according to the value(s) in the table below.
- Standard Resistance:
Tester Connection Condition Specified Condition Click Location & Routing(F16,F12)Location & Routingewd_type=routing;type=c,c;code=F16,F12
Click Connector(F16)Body>No. 1 Rear Door Wire / No. 2 Rear Door Wire>Rear Multiplex Network Door ECU LHewd_type=component;type=c;code=F16;pinno=3,2
Click Connector(F12)Body>No. 1 Rear Door Wire / No. 2 Rear Door Wire>Rear Power Window Regulator Motor Assembly LHewd_type=component;type=c;code=F12;pinno=2,1
F16-3 (BDRJ) - F12-2 (B) Always Below 1 Ω F16-2 (PWE) - F12-1 (GND) Always Below 1 Ω
- Result:
Proceed to OK NG
Post-procedure1
None
OK
NG
Pre-procedure1
Disconnect the F16 rear multiplex network door ECU LH connector.
Procedure1
Measure the voltage according to the value(s) in the table below.
- Standard Voltage:
Tester Connection Switch Condition Specified Condition Click Location & Routing(F16)Location & Routingewd_type=routing;type=c;code=F16
Click Connector(F16)Body>No. 1 Rear Door Wire / No. 2 Rear Door Wire>Rear Multiplex Network Door ECU LHewd_type=component;type=c;code=F16;pinno=4
F16-4 (BDR) - Body ground Ignition switch off 11 to 14 V
Measure the resistance according to the value(s) in the table below.
- Standard Resistance:
Tester Connection Condition Specified Condition Click Location & Routing(F16)Location & Routingewd_type=routing;type=c;code=F16
Click Connector(F16)Body>No. 1 Rear Door Wire / No. 2 Rear Door Wire>Rear Multiplex Network Door ECU LHewd_type=component;type=c;code=F16;pinno=1
F16-1 (GND) - Body ground Always Below 1 Ω
- Result:
Proceed to OK NG
Post-procedure1
None
OK
NG
Check the vehicle type.
- Result:
Result Proceed to w/ Double Lockiing System A w/o Double Lockiing System B
A
B
Pre-procedure1
Disconnect the F16 rear multiplex network door ECU LH connector.
Disconnect the F12 rear power window regulator motor assembly LH connector.
Procedure1
Measure the resistance according to the value(s) in the table below.
- Standard Resistance:
Tester Connection Condition Specified Condition Click Location & Routing(F16,F12)Location & Routingewd_type=routing;type=c,c;code=F16,F12
Click Connector(F16)Body>No. 1 Rear Door Wire / No. 2 Rear Door Wire>Rear Multiplex Network Door ECU LHewd_type=component;type=c;code=F16;pinno=23
Click Connector(F12)Body>No. 1 Rear Door Wire / No. 2 Rear Door Wire>Rear Power Window Regulator Motor Assembly LHewd_type=component;type=c;code=F12;pinno=9
F16-23 (LIN3) - F12-9 (LIN) Always Below 1 Ω
- Result:
Proceed to OK NG
Post-procedure1
None
OK
NG
Pre-procedure1
Disconnect the 4A driver side junction block assembly connector.
Disconnect the F16 rear multiplex network door ECU LH connector.
Procedure1
Measure the resistance according to the value(s) in the table below.
- Standard Resistance:
Tester Connection Condition Specified Condition Click Location & Routing(F16)Location & Routingewd_type=routing;type=c;code=F16
Click Connector(F16)Body>No. 1 Rear Door Wire / No. 2 Rear Door Wire>Rear Multiplex Network Door ECU LHewd_type=component;type=c;code=F16;pinno=22
4A-40 - F16-22 (LIN1) Always Below 1 Ω
- Result:
Proceed to OK NG
Post-procedure1
None
OK
NG