FC CONTROL FC CONTROL SYSTEM P1E0014 Tank Shut Valve 1 Circuit Short to Ground or Open P1E1014 Tank Shut Valve 2 Circuit Short to Ground or Open P1E5A14 Tank Shut Valve 3 Circuit Short to Ground or Open
DESCRIPTION
Refer to DTC P1E0012.
Click hereEngine / Hybrid System>FC CONTROL>FC CONTROL SYSTEM>P1E0012
| DTC No. | Detection Item | DTC Detection Condition | Trouble Area | Warning Indicate | DTC Output from | Priority |
|---|---|---|---|---|---|---|
| P1E0014 | Tank Shut Valve 1 Circuit Short to Ground or Open | H2 SHUT VLV relay has been requested to turn ON, the tank shut valve 1 is driven to ON, and the TNV1 voltage has remained at less than 0.2 V for more than 3 seconds.
(1 trip detection logic) |
·
No. 1 hydrogen tank assembly (tank shut valve 1) ·
Hydrogen fuel control ECU assembly ·
Wire harness or connector ·
EV control ECU ·
H2 SHUT VLV relay |
Master Warning: Comes on | Hydrogen Filling Control | A |
| P1E1014 | Tank Shut Valve 2 Circuit Short to Ground or Open | H2 SHUT VLV relay has been requested to turn ON, the tank shut valve 2 is driven to ON, and the TNV2 voltage has remained at less than 0.2 V for more than 3 seconds.
(1 trip detection logic) |
·
No. 2 hydrogen tank assembly (tank shut valve 2) ·
Hydrogen fuel control ECU assembly ·
Wire harness or connector ·
EV control ECU ·
H2 SHUT VLV relay |
Master Warning: Comes on | Hydrogen Filling Control | A |
| P1E5A14 | Tank Shut Valve 3 Circuit Short to Ground or Open | H2 SHUT VLV relay has been requested to turn ON, the tank shut valve 3 is driven to ON, and the TNV3 voltage has remained at less than 0.2 V for more than 3 seconds.
(1 trip detection logic) |
·
No. 3 hydrogen tank assembly (tank shut valve 3) ·
Hydrogen fuel control ECU assembly ·
Wire harness or connector ·
EV control ECU ·
H2 SHUT VLV relay |
Master Warning: Comes on | Hydrogen Filling Control | A |
| Vehicle Condition | FC shutdown
(ignition switch ON) |
FC startup process | FC intermittent operation | FC is generating power
(vehicle is in stationary) |
FC is generating power
(vehicle is traveling) |
FC shutdown process |
|---|---|---|---|---|---|---|
| Data List (EV)
"FC Work Mode" |
Stop | Startup | Working | Finishing | ||
| Data List (EV)
"FC Intermittent Operation" |
OFF | ON | OFF | OFF | ||
| DTC Detection | - | ○ | ○ | ○ | ○ | ○ |
| DTC No. | Data List |
|---|---|
| P1E0014 | ·
Tank Shut Valve 1 Voltage*1 ·
Tank Shut Valve 1 Driving Request ·
Tank Shut Valve Power Supply Relay Driving Status*2 |
| P1E1014 | ·
Tank Shut Valve 2 Voltage*1 ·
Tank Shut Valve 2 Driving Request ·
Tank Shut Valve Power Supply Relay Driving Status*2 |
| P1E5A14 | ·
Tank Shut Valve 3 Voltage*1 ·
Tank Shut Valve 3 Driving Request ·
Tank Shut Valve Power Supply Relay Driving Status*2 |
*1: AD value for the TNV1, 2 and 3 terminals
*2: Actuation request to the power supply relay
WIRING DIAGRAM
Refer to DTC P1E0012.
Click hereEngine / Hybrid System>FC CONTROL>FC CONTROL SYSTEM>P1E0012
CAUTION / NOTICE / HINT
- NOTICE:
- ·
Inspect the fuses of circuits related to this system before performing the following procedure.
·This vehicle performs FC system shutdown process after turning the ignition switch off from ON (READY). Therefore, after the ignition switch is turned off from ON (READY), do not perform any work on the electrical system for at least 10 minutes including removing connectors or disconnecting the negative (-) auxiliary battery terminal.
·When the EV control ECU determines that the temperature of FC system components is below 0°C (32°F) when the vehicle is parked with the ignition switch off, it operates the FC air compressor, hydrogen pump and FC cooling water pump for a maximum of 180 seconds to drain the FC stack assembly. When performing inspection or repairs with the ignition switch off (not ON or ON (READY)), disconnect the cable from the negative (-) auxiliary battery terminal before performing work. (If the auxiliary battery voltage is needed to conduct inspection, perform the inspection in an environment with an ambient temperature of 10°C (50°F) or higher.)
- HINT:
-
After the repair, clear the DTCs and perform the following procedure to check that DTCs are not output.
- 1.
Turn the ignition switch to ON (READY) with the shift state in park (P) and wait for 1 minute or more.
PROCEDURE
Pre-procedure1
None
Procedure1
Check for DTCs.
- Powertrain > Hydrogen Filling Control > Trouble Codes
- 50001 494
- Result:
Result Proceed to Only P1E0014 is output A Only P1E1014 is output B Only P1E5A14 is output C P1E0014 and P1E1014 are output D P1E0014, P1E1014 and P1E5A14 are output E
Post-procedure1
Turn the ignition switch off.
A
B
C
D
E
Pre-procedure1
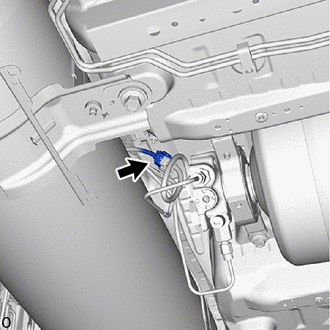
Disconnect the No. 1 hydrogen tank assembly (tank shut valve 1) connector.
Turn the ignition switch to ON.
Procedure1
Measure the voltage according to the value(s) in the table below.
- Standard Voltage:
Tester Connection Condition Specified Condition Click Location & Routing(h1)Location & Routingewd_type=routing;type=c;code=h1
Click Connector(h1)Body>Hydrogen Tank Valve Wire>No. 1 Hydrogen Tank Assemblyewd_type=component;type=c;code=h1;pinno=4
h1-4 (IB8) - Body ground Ignition switch ON 11 to 14 V
- Result:
Proceed to OK NG
Post-procedure1
Turn the ignition switch off.
Reconnect the No. 1 hydrogen tank assembly (tank shut valve 1) connector.
OK
NG
Pre-procedure1
Disconnect the No. 1 hydrogen tank assembly (tank shut valve 1) connector.
Disconnect the hydrogen fuel control ECU assembly connector.
Procedure1
Measure the resistance according to the value(s) in the table below.
- Standard Resistance:
Tester Connection Condition Specified Condition Click Location & Routing(h1,G5)Location & Routingewd_type=routing;type=c,c;code=h1,G5
Click Connector(h1)Body>Hydrogen Tank Valve Wire>No. 1 Hydrogen Tank Assemblyewd_type=component;type=c;code=h1;pinno=6
Click Connector(G5)Body>Floor Wire / No. 3 Floor Wire>Hydrogen Fuel Control ECU Assemblyewd_type=component;type=c;code=G5;pinno=6
h1-6 (IB9) - G5-6 (TNV1) Always Below 1 Ω h1-6 (IB9) or G5-6 (TNV1) - Body ground and other terminals Always 10 kΩ or higher
- Result:
Proceed to OK NG
Post-procedure1
Reconnect the hydrogen fuel control ECU assembly connector.
Reconnect the No. 1 hydrogen tank assembly (tank shut valve 1) connector.
OK
NG
Pre-procedure1
Disconnect the hydrogen fuel control ECU assembly connector.
Procedure1
Measure the resistance according to the value(s) in the table below.
- Standard Resistance:
Tester Connection Condition Specified Condition Click Location & Routing(G5)Location & Routingewd_type=routing;type=c;code=G5
Click Connector(G5)Body>Floor Wire / No. 3 Floor Wire>Hydrogen Fuel Control ECU Assemblyewd_type=component;type=c;code=G5;pinno=1
G5-1 (GTV1) - Body ground Always Below 1 Ω
- Result:
Proceed to OK NG
Post-procedure1
Reconnect the hydrogen fuel control ECU assembly connector.
OK
NG
Pre-procedure1
Disconnect the No. 1 hydrogen tank assembly (tank shut valve 1) connector.
Procedure1
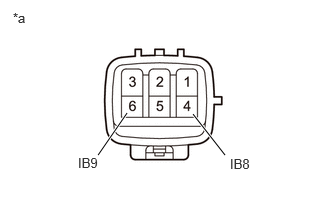
| *a | Component without harness connected
(No. 1 Hydrogen Tank Assembly (Tank Shut Valve 1)) |
Measure the resistance according to the value(s) in the table below.
- Standard Resistance:
Tester Connection Condition Specified Condition 4 (IB8) - 6 (IB9) 20°C (68°F) 1.68 to 3.68 Ω 4 (IB8) or 6 (IB9) -Body ground and other terminals Always 1 MΩ or higher
- Result:
Proceed to OK NG
Post-procedure1
Reconnect the No. 1 hydrogen tank assembly (tank shut valve 1) connector.
OK
NG
Pre-procedure1
Disconnect the No. 1 hydrogen tank assembly (tank shut valve 1) connector.
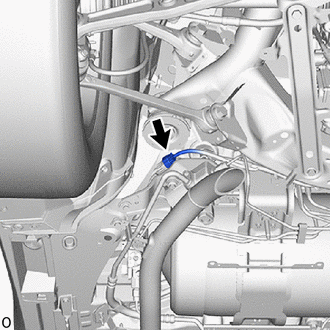
Disconnect the No. 2 hydrogen tank assembly (tank shut valve 2) connector.
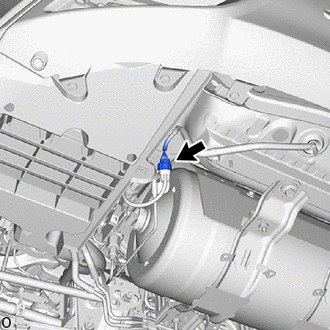
Disconnect the No. 3 hydrogen tank assembly (tank shut valve 3) connector.
Disconnect the hydrogen fuel control ECU assembly connector.
Remove the H2 SHUT VLV relay from the No. 1 front compartment relay block.
Procedure1
Measure the resistance according to the value(s) in the table below.
- Standard Resistance:
Tester Connection Condition Specified Condition Click Location & Routing(h1)Location & Routingewd_type=routing;type=c;code=h1
Click Connector(h1)Body>Hydrogen Tank Valve Wire>No. 1 Hydrogen Tank Assemblyewd_type=component;type=c;code=h1;pinno=4
h1-4 (IB8) - 5 (H2 SHUT VLV relay holder) Always Below 1 Ω h1-4 (IB8) or 5 (H2 SHUT VLV relay holder) - Body ground and other terminals Always 10 kΩ or higher
- Result:
Proceed to OK NG
Post-procedure1
Reinstall the H2 SHUT VLV relay.
Reconnect the hydrogen fuel control ECU assembly connector.
Reconnect the No. 3 hydrogen tank assembly (tank shut valve 3) connector.
Reconnect the No. 2 hydrogen tank assembly (tank shut valve 2) connector.
Reconnect the No. 1 hydrogen tank assembly (tank shut valve 1) connector.
OK
NG
Pre-procedure1
Disconnect the No. 2 hydrogen tank assembly (tank shut valve 2) connector.
Turn the ignition switch to ON.
Procedure1
Measure the voltage according to the value(s) in the table below.
- Standard Voltage:
Tester Connection Condition Specified Condition Click Location & Routing(G3)Location & Routingewd_type=routing;type=c;code=G3
Click Connector(G3)Body>Floor Wire / No. 3 Floor Wire>No. 2 Hydrogen Tank Assemblyewd_type=component;type=c;code=G3;pinno=4
G3-4 (TVR2) - Body ground Ignition switch ON 11 to 14 V
- Result:
Proceed to OK NG
Post-procedure1
Turn the ignition switch off.
Reconnect the No. 2 hydrogen tank assembly (tank shut valve 2) connector.
OK
NG
Pre-procedure1
Disconnect the No. 2 hydrogen tank assembly (tank shut valve 2) connector.
Disconnect the hydrogen fuel control ECU assembly connector.
Procedure1
Measure the resistance according to the value(s) in the table below.
- Standard Resistance:
Tester Connection Condition Specified Condition Click Location & Routing(G3,G5)Location & Routingewd_type=routing;type=c,c;code=G3,G5
Click Connector(G3)Body>Floor Wire / No. 3 Floor Wire>No. 2 Hydrogen Tank Assemblyewd_type=component;type=c;code=G3;pinno=6
Click Connector(G5)Body>Floor Wire / No. 3 Floor Wire>Hydrogen Fuel Control ECU Assemblyewd_type=component;type=c;code=G5;pinno=7
G3-6 (TNV2) - G5-7 (TNV2) Always Below 1 Ω G3-6 (TNV2) or G5-7 (TNV2) -Body ground and other terminals Always 10 kΩ or higher
- Result:
Proceed to OK NG
Post-procedure1
Reconnect the hydrogen fuel control ECU assembly connector.
Reconnect the No. 2 hydrogen tank assembly (tank shut valve 2) connector.
OK
NG
Pre-procedure1
Disconnect the hydrogen fuel control ECU assembly connector.
Procedure1
Measure the resistance according to the value(s) in the table below.
- Standard Resistance:
Tester Connection Condition Specified Condition Click Location & Routing(G5)Location & Routingewd_type=routing;type=c;code=G5
Click Connector(G5)Body>Floor Wire / No. 3 Floor Wire>Hydrogen Fuel Control ECU Assemblyewd_type=component;type=c;code=G5;pinno=2
G5-2 (GTV2) - Body ground Always Below 1 Ω
- Result:
Proceed to OK NG
Post-procedure1
Reconnect the hydrogen fuel control ECU assembly connector.
OK
NG
Pre-procedure1
Disconnect the No. 2 hydrogen tank assembly (tank shut valve 2) connector.
Procedure1
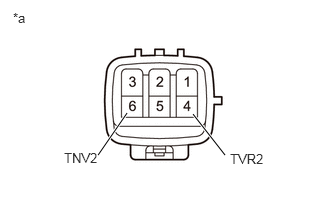
| *a | Component without harness connected
(No. 2 Hydrogen Tank Assembly (Tank Shut Valve 2)) |
Measure the resistance according to the value(s) in the table below.
- Standard Resistance:
Tester Connection Condition Specified Condition 4 (TVR2) - 6 (TNV2) 20°C (68°F) 1.68 to 3.68 Ω 4 (TVR2) or 6 (TNV2) -Body ground and other terminals Always 1 MΩ or higher
- Result:
Proceed to OK NG
Post-procedure1
Reconnect the No. 2 hydrogen tank assembly (tank shut valve 2) connector.
OK
NG
Pre-procedure1
Disconnect the No. 1 hydrogen tank assembly (tank shut valve 1) connector.
Disconnect the No. 2 hydrogen tank assembly (tank shut valve 2) connector.
Disconnect the No. 3 hydrogen tank assembly (tank shut valve 3) connector.
Disconnect the hydrogen fuel control ECU assembly connector.
Remove the H2 SHUT VLV relay from the No. 1 front compartment relay block.
Procedure1
Measure the resistance according to the value(s) in the table below.
- Standard Resistance:
Tester Connection Condition Specified Condition Click Location & Routing(G3)Location & Routingewd_type=routing;type=c;code=G3
Click Connector(G3)Body>Floor Wire / No. 3 Floor Wire>No. 2 Hydrogen Tank Assemblyewd_type=component;type=c;code=G3;pinno=4
G3-4 (TVR2) - 5 (H2 SHUT VLV relay holder) Always Below 1 Ω G3-4 (TVR2) or 5 (H2 SHUT VLV relay holder) - Body ground and other terminals Always 10 kΩ or higher
- Result:
Proceed to OK NG
Post-procedure1
Reinstall the H2 SHUT VLV relay.
Reconnect the hydrogen fuel control ECU assembly connector.
Reconnect the No. 3 hydrogen tank assembly (tank shut valve 3) connector.
Reconnect the No. 2 hydrogen tank assembly (tank shut valve 2) connector.
Reconnect the No. 1 hydrogen tank assembly (tank shut valve 1) connector.
OK
NG
Pre-procedure1
Disconnect the No. 3 hydrogen tank assembly (tank shut valve 3) connector.
Turn the ignition switch to ON.
Procedure1
Measure the voltage according to the value(s) in the table below.
- Standard Voltage:
Tester Connection Condition Specified Condition Click Location & Routing(G1)Location & Routingewd_type=routing;type=c;code=G1
Click Connector(G1)Body>Floor Wire / No. 3 Floor Wire>No. 3 Hydrogen Tank Assemblyewd_type=component;type=c;code=G1;pinno=4
G1-4 (TVR3) - Body ground Ignition switch ON 11 to 14 V
- Result:
Proceed to OK NG
Post-procedure1
Turn the ignition switch off.
Reconnect the No. 3 hydrogen tank assembly (tank shut valve 3) connector.
OK
NG
Pre-procedure1
Disconnect the No. 3 hydrogen tank assembly (tank shut valve 3) connector.
Disconnect the hydrogen fuel control ECU assembly connector.
Procedure1
Measure the resistance according to the value(s) in the table below.
- Standard Resistance:
Tester Connection Condition Specified Condition Click Location & Routing(G1,G4)Location & Routingewd_type=routing;type=c,c;code=G1,G4
Click Connector(G1)Body>Floor Wire / No. 3 Floor Wire>No. 3 Hydrogen Tank Assemblyewd_type=component;type=c;code=G1;pinno=6
Click Connector(G4)Body>Floor Wire / No. 3 Floor Wire>Hydrogen Fuel Control ECU Assemblyewd_type=component;type=c;code=G4;pinno=2
G1-6 (TNV3) - G4-2 (TNV3) Always Below 1 Ω G1-6 (TNV3) or G4-2 (TNV3) -Body ground and other terminals Always 10 kΩ or higher
- Result:
Proceed to OK NG
Post-procedure1
Reconnect the hydrogen fuel control ECU assembly connector.
Reconnect the No. 3 hydrogen tank assembly (tank shut valve 3) connector.
OK
NG
Pre-procedure1
Disconnect the hydrogen fuel control ECU assembly connector.
Procedure1
Measure the resistance according to the value(s) in the table below.
- Standard Resistance:
Tester Connection Condition Specified Condition Click Location & Routing(G4)Location & Routingewd_type=routing;type=c;code=G4
Click Connector(G4)Body>Floor Wire / No. 3 Floor Wire>Hydrogen Fuel Control ECU Assemblyewd_type=component;type=c;code=G4;pinno=1
G4-1 (GTV3) - Body ground Always Below 1 Ω
- Result:
Proceed to OK NG
Post-procedure1
Reconnect the hydrogen fuel control ECU assembly connector.
OK
NG
Pre-procedure1
Disconnect the No. 3 hydrogen tank assembly (tank shut valve 3) connector.
Procedure1
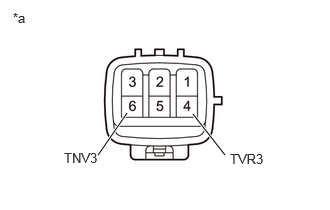
| *a | Component without harness connected
(No. 3 Hydrogen Tank Assembly (Tank Shut Valve 3)) |
Measure the resistance according to the value(s) in the table below.
- Standard Resistance:
Tester Connection Condition Specified Condition 4 (TVR3) - 6 (TNV3) 20°C (68°F) 1.68 to 3.68 Ω 4 (TVR3) or 6 (TNV3) -Body ground and other terminals Always 1 MΩ or higher
- Result:
Proceed to OK NG
Post-procedure1
Reconnect the No. 3 hydrogen tank assembly (tank shut valve 3) connector.
OK
NG
Post-procedure1
Disconnect the No. 1 hydrogen tank assembly (tank shut valve 1) connector.
Disconnect the No. 2 hydrogen tank assembly (tank shut valve 2) connector.
Disconnect the No. 3 hydrogen tank assembly (tank shut valve 3) connector.
Disconnect the hydrogen fuel control ECU assembly connector.
Remove the H2 SHUT VLV relay from the No. 1 front compartment relay block.
Procedure1
Measure the resistance according to the value(s) in the table below.
- Standard Resistance:
Tester Connection Condition Specified Condition Click Location & Routing(G1)Location & Routingewd_type=routing;type=c;code=G1
Click Connector(G1)Body>Floor Wire / No. 3 Floor Wire>No. 3 Hydrogen Tank Assemblyewd_type=component;type=c;code=G1;pinno=4
G1-4 (TVR3) - 5 (H2 SHUT VLV relay holder) Always Below 1 Ω G1-4 (TVR3) or 5 (H2 SHUT VLV relay holder) - Body ground and other terminals Always 10 kΩ or higher
- Result:
Proceed to OK NG
Pre-procedure1
Reinstall the H2 SHUT VLV relay.
Reconnect the hydrogen fuel control ECU assembly connector.
Reconnect the No. 3 hydrogen tank assembly (tank shut valve 3) connector.
Reconnect the No. 2 hydrogen tank assembly (tank shut valve 2) connector.
Reconnect the No. 1 hydrogen tank assembly (tank shut valve 1) connector.
OK
NG
Pre-procedure1
Disconnect the No. 1 hydrogen tank assembly (tank shut valve 1) connector.
Disconnect the No. 2 hydrogen tank assembly (tank shut valve 2) connector.
Disconnect the No. 3 hydrogen tank assembly (tank shut valve 3) connector.
Disconnect the hydrogen fuel control ECU assembly connector.
Remove the H2 SHUT VLV relay from the No. 1 front compartment relay block.
Procedure1
Measure the resistance according to the value(s) in the table below.
- Standard Resistance:
Tester Connection Condition Specified Condition Click Location & Routing(G5)Location & Routingewd_type=routing;type=c;code=G5
Click Connector(G5)Body>Floor Wire / No. 3 Floor Wire>Hydrogen Fuel Control ECU Assemblyewd_type=component;type=c;code=G5;pinno=20
G5-20 (+BP) - 5 (H2 SHUT VLV relay holder) Always Below 1 Ω G5-20 (+BP) or 5 (H2 SHUT VLV relay holder) - Body ground and other terminals Always 10 kΩ or higher
- Result:
Proceed to OK NG
Post-procedure1
Reinstall the H2 SHUT VLV relay.
Reconnect the hydrogen fuel control ECU assembly connector.
Reconnect the No. 3 hydrogen tank assembly (tank shut valve 3) connector.
Reconnect the No. 2 hydrogen tank assembly (tank shut valve 2) connector.
Reconnect the No. 1 hydrogen tank assembly (tank shut valve 1) connector.
OK
NG
OK
NG
Pre-procedure1
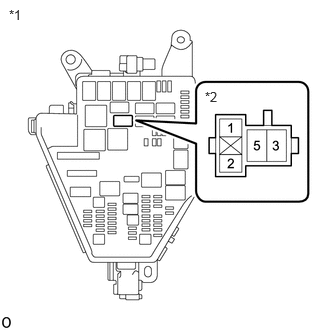
| *1 | No. 1 Front Compartment Relay Block |
| *2 | H2 SHUT VLV Relay Holder |
Remove the H2 SHUT VLV relay from the No. 1 front compartment relay block.
Procedure1
Measure the voltage according to the value(s) in the table below.
- Standard Voltage:
Tester Connection Condition Specified Condition 3 (H2 SHUT VLV relay holder) - Body ground Ignition switch off 11 to 14 V
- Result:
Proceed to OK NG
Post-procedure1
Reinstall the H2 SHUT VLV relay.
OK
NG
Pre-procedure1
Remove the H2 SHUT VLV relay from the No. 1 front compartment relay block.
Procedure1
Measure the resistance according to the value(s) in the table below.
- Standard Resistance:
Tester Connection Condition Specified Condition 1 (H2 SHUT VLV relay holder) - Body ground Always Below 1 Ω
- Result:
Proceed to OK NG
Post-procedure1
Reinstall the H2 SHUT VLV relay.
OK
NG
Pre-procedure1
Disconnect the EV control ECU connector.
Remove the H2 SHUT VLV relay from the No. 1 front compartment relay block.
Procedure1
Measure the resistance according to the value(s) in the table below.
- Standard Resistance:
Tester Connection Condition Specified Condition Click Location & Routing(A15)Location & Routingewd_type=routing;type=c;code=A15
Click Connector(A15)Instrument Panel>Front Compartment Main Wire>EV Control ECUewd_type=component;type=c;code=A15;pinno=1
A15-1 (RLTN) - 2 (H2 SHUT VLV relay holder) Always Below 1 Ω A15-1 (RLTN) or 2 (H2 SHUT VLV relay holder) - Body ground and other terminals Always 10 kΩ or higher
- Result:
Proceed to OK NG
Post-procedure1
Reinstall the H2 SHUT VLV relay.
Reconnect the EV control ECU connector.
OK
NG