1NZ-FXE ENGINE CONTROL SFI SYSTEM(w/o Canister Pump Module) P0443 Evaporative Emission Control System Purge Control Valve Circuit
DESCRIPTION
To reduce hydrocarbon (HC) emissions, evaporated fuel from the fuel tank is routed through a charcoal canister to the intake manifold for combustion in the cylinders.
The ECM changes the duty signals to the purge VSV (Vacuum Switching Valve for purge control) so that the intake amount of hydrocarbon (HC) emissions is appropriate for the driving conditions (engine load, engine speed, vehicle speed, etc.) after the engine is warmed up.
| DTC No. | DTC Detection Condition | Trouble Area |
|---|---|---|
| P0443 | Both of the following conditions (a) and (b) are met (1 trip detection logic):
(a) The target control value and actual control value do not match for 10 seconds or more. (b) The target control value and actual control value do not match for 80 times or more. |
·
Open or short in purge VSV circuit ·
Purge VSV ·
No. 1 integration relay ·
ECM |
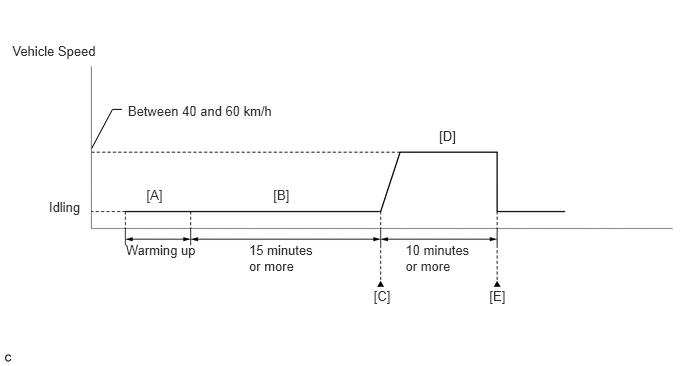
CONFIRMATION DRIVING PATTERN
Connect the intelligent tester to the DLC3.
Turn the power switch on (IG) and turn the tester on.
Clear the DTCs (even if no DTCs are stored, perform the clear DTC procedure).
Turn the power switch off and wait for at least 30 seconds.
Turn the power switch on (IG) and turn the tester on.
Put the engine in inspection mode (maintenance mode) (See page General>INTRODUCTION>REPAIR INSTRUCTION>INSPECTION MODE PROCEDURE).
Start the engine and warm it up until the engine coolant temperature is 75°C (167°F) or higher [A].
- HINT:
-
The A/C switch and all accessory switches should be off.
Idle the engine for 15 minutes or more [B].
- HINT:
-
Check the EVAP (Purge) VSV item in the Data List. When the value of this item is between 5 and 95%, the judgment will be performed.
Enter the following menus: Powertrain / Engine and ECT / DTC [C].
Read the pending DTCs.
- HINT:
- ·
If a pending DTC is output, the system is malfunctioning.
·If a pending DTC is not output, perform the following procedure.
Enter the following menus: Powertrain / Engine and ECT / Utility / All Readiness.
Input the DTC: P0443.
Check the DTC judgment result.
| Tester Display | Description |
|---|---|
| NORMAL | ·
DTC judgment completed ·
System normal |
| ABNORMAL | ·
DTC judgment completed ·
System abnormal |
| INCOMPLETE | ·
DTC judgment not completed ·
Perform driving pattern after confirming DTC enabling conditions |
| N/A | ·
Unable to perform DTC judgment ·
Number of DTCs which do not fulfill DTC preconditions has reached ECU memory limit |
- HINT:
- ·
If the judgment result shows NORMAL, the system is normal.
·If the judgment result shows ABNORMAL, the system has a malfunction.
·If the judgment result shows INCOMPLETE or N/A, perform steps [D] and [E].
Drive the vehicle at a constant speed between 40 and 60 km/h (25 and 37 mph) for 10 minutes or more [D].
- CAUTION:
-
When performing the confirmation driving pattern, obey all speed limits and traffic laws.
Check the DTC judgment result again [E].
WIRING DIAGRAM
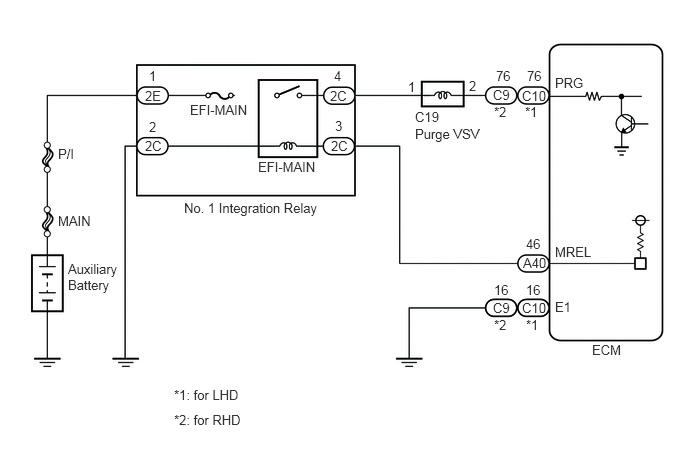
CAUTION / NOTICE / HINT
- NOTICE:
-
Inspect the fuses of circuits related to this system before performing the following inspection procedure.
- HINT:
-
Read freeze frame data using the intelligent tester. The ECM records vehicle and driving condition information as freeze frame data the moment a DTC is stored. When troubleshooting, freeze frame data can help determine if the vehicle was moving or stationary, if the engine was warmed up or not, if the air fuel ratio was lean or rich, and other data from the time the malfunction occurred.
PROCEDURE
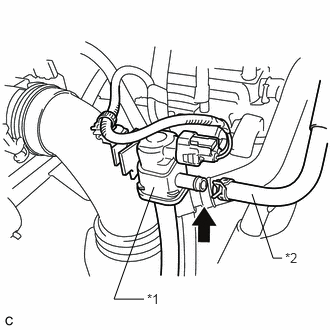
Disconnect the fuel vapor feed hose (on the canister side) of the purge VSV.
| *1 | Purge VSV |
| *2 | Fuel Vapor Feed Hose (to Canister) |
Connect the intelligent tester to the DLC3.
Turn the power switch on (IG).
Turn the tester on.
Put the engine in inspection mode (maintenance mode) (See page General>INTRODUCTION>REPAIR INSTRUCTION>INSPECTION MODE PROCEDURE).
Start the engine.
Enter the following menus: Powertrain / Engine and ECT / Active Test / Activate the VSV for EVAP Control.
Operate the purge VSV and check the air flow.
- OK:
Activate the VSV for Evap Control Specified Condition ON Air flows OFF Air does not flow
| Result | Proceed to |
|---|---|
| Abnormal | A |
| Normal | B |
- HINT:
-
Jiggle the wire harness and connector to increase the likelihood of detecting malfunctions that do not always occur.
A
B
Inspect the purge VSV (See page Engine / Hybrid System>1NZ-FXE EMISSION CONTROL>PURGE VALVE>INSPECTION).
OK
NG
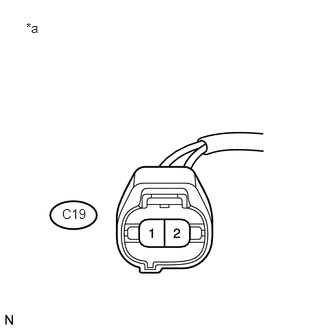
Disconnect the purge VSV connector.
Turn the power switch on (IG).
Measure the voltage according to the value(s) in the table below.
- Standard Voltage:
Tester Connection Condition Specified Condition C19-1 - Body ground Power switch on (IG) 11 to 14 V
| *a | Front view of wire harness connector
(to Purge VSV) |
OK
NG
Disconnect the purge VSV connector.
Disconnect the ECM connector.
Measure the resistance according to the value(s) in the table below.
- Standard Resistance:
for LHD Tester Connection Condition Specified Condition C19-2 - C10-76 (PRG) Always Below 1 Ω C19-2 or C10-76 (PRG) - Body ground Always 10 kΩ or higher
for RHD Tester Connection Condition Specified Condition C19-2 - C9-76 (PRG) Always Below 1 Ω C19-2 or C9-76 (PRG) - Body ground Always 10 kΩ or higher
OK
NG
Disconnect the purge VSV connector.
Remove the No. 1 integration relay and ENG W/PMP relay from the No. 2 engine room relay block and No. 2 junction block assembly.
- HINT:
-
Remove the ENG W/PMP relay connected between the checked terminals as the coil inside the relay influences the measurement value.
Measure the resistance according to the value(s) in the table below.
- Standard Resistance:
Tester Connection Condition Specified Condition C19-1 - 2C-4 Always Below 1 Ω C19-1 or 2C-4 - Body ground Always 10 kΩ or higher
OK
NG