HYBRID / BATTERY CONTROL HV RELAY ASSEMBLY INSTALLATION
PROCEDURE

 G92Z0
1.INSTALL HYBRID BATTERY JUNCTION BLOCK ASSEMBLY
- CAUTION:
-
Wear insulated gloves.
Install the hybrid battery junction block assembly with the 3 bolts.
- Torque:
- 7.5 N*m (76 kgf*cm, 66 in.*lbf)
Connect the connector to the hybrid battery junction block assembly.
- NOTICE:
-
The connector should be connected securely.
Using an insulated tool, install the 2 bolts.
- Torque:
- 5.4 N*m (55 kgf*cm, 48 in.*lbf)
- NOTICE:
-
Be sure to use a torque wrench to tighten the bolts.
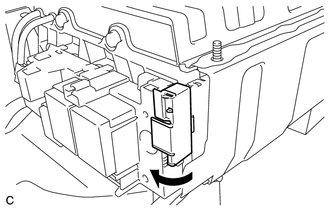
Connect the terminal cover.
- NOTICE:
-
The terminal cover should be connected securely.
G920R
2.INSTALL NO. 2 HYBRID BATTERY SHIELD SUB-ASSEMBLY
- CAUTION:
-
Wear insulated gloves.
Install the No. 2 hybrid battery shield sub-assembly with the 2 bolts and nut.
- Torque:
- 7.5 N*m (76 kgf*cm, 66 in.*lbf)
Move the HV battery to the installation position.
Install the HV battery with the 2 bolts and 2 nuts.
- Torque:
- 19 N*m (194 kgf*cm, 14 ft.*lbf)
Connect the 4 connectors and 4 clamps.
- NOTICE:
-
The connector should be connected securely.
82164
3.CONNECT FRAME WIRE
- CAUTION:
-
Wear insulated gloves.
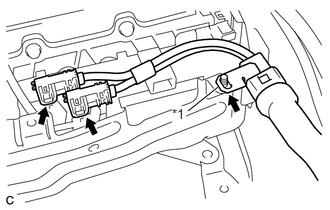
Connect the 2 connectors.
| *1 | Shielded Wire Ground |
- NOTICE:
- ·
Make sure that the ends of the frame wire do not cross over each other.
·The connector should be connected securely.
Connect the shielded wire ground.
G92N1A
4.INSTALL NO. 1 HYBRID VEHICLE BATTERY COVER PANEL LH
- CAUTION:
-
Wear insulated gloves.
Install the No. 1 hybrid vehicle battery cover panel LH with the 4 nuts.
- Torque:
- 7.5 N*m (76 kgf*cm, 66 in.*lbf)
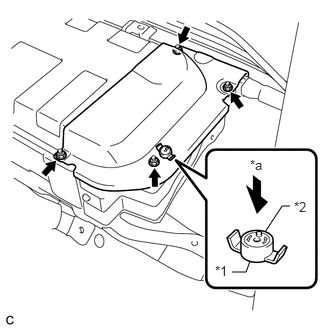
Install the battery cover lock striker, then push the button to lock it.
| *1 | Battery Cover Lock Striker |
| *2 | Button |
| *a | Push |
G92F1
5.INSTALL NO. 1 HYBRID BATTERY EXHAUST DUCT
899A0B
6.INSTALL NO. 3 INDOOR ELECTRICAL KEY ANTENNA ASSEMBLY
71033
7.INSTALL REAR SEAT CUSHION LEG SUB-ASSEMBLY
8.INSTALL REAR SEAT CUSHION ASSEMBLY (for Separate Type Seatback)
9.INSTALL REAR SEAT CUSHION ASSEMBLY (for Bench Type Seatback)
G3834
10.INSTALL SERVICE PLUG GRIP