INTERIOR PANELS / TRIM ROOF HEADLINING REMOVAL
PROCEDURE

 1.REMOVE REAR SEAT ASSEMBLY (for Separate Type Seatback)
2.REMOVE REAR SEAT ASSEMBLY (for Bench Type Seatback)
67918A
3.REMOVE REAR DOOR SCUFF PLATE LH
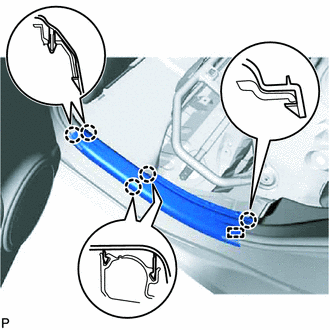
Disengage the 5 claws and guide and remove the rear door scuff plate LH.
67914
4.REMOVE FRONT DOOR SCUFF PLATE LH
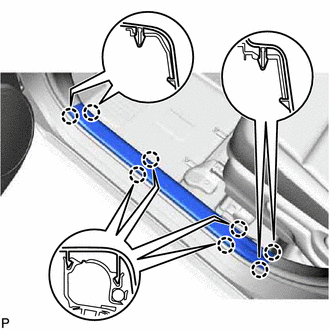
Disengage the 8 claws and remove the front door scuff plate LH.
62112
5.REMOVE COWL SIDE TRIM BOARD LH
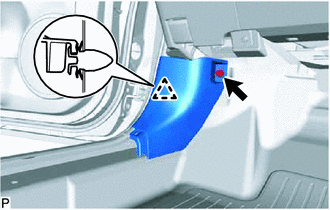
Remove the clip.
Disengage the clip and remove the cowl side trim board LH.
62312B
6.REMOVE FRONT DOOR OPENING TRIM WEATHERSTRIP LH
Remove the front door opening trim weatherstrip LH.
62212
7.REMOVE FRONT PILLAR GARNISH LH
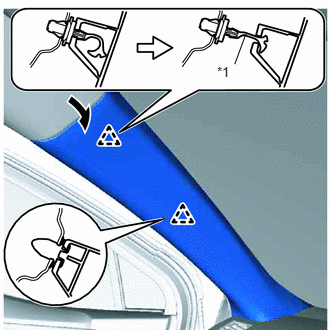
Pull the upper part of the garnish toward the inside of the cabin and disengage the garnish from the base of the 2 clips.
| *1 | Front Pillar Garnish Clip |
- HINT:
-
Let the front pillar garnish LH hang down from the front pillar garnish clip.
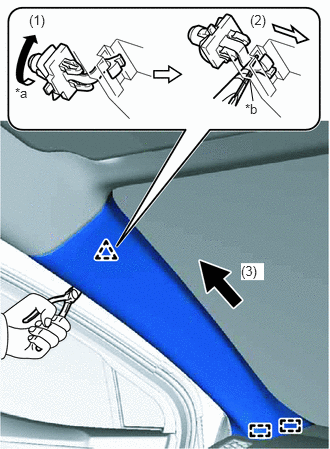
Using needle-nose pliers with the tips wrapped with protective tape, rotate the front pillar garnish clip 90° in the direction indicated by the arrow (1) shown in the illustration.
| *a | 90° |
| *b | Protective Tape |
Pull the front pillar garnish LH in the direction indicated by the arrow (2) shown in the illustration to disengage it from the front pillar garnish clip.
- NOTICE:
- ·
If the front pillar garnish clip is not removed from the vehicle body and is not damaged, the front pillar garnish clip can be reused.
·If the front pillar garnish clip is removed from the vehicle body, make sure to replace it with a new one.
Pull the front pillar garnish LH in the direction indicated by the arrow (3) shown in the illustration to disengage the 2 guides to remove the front pillar garnish LH.
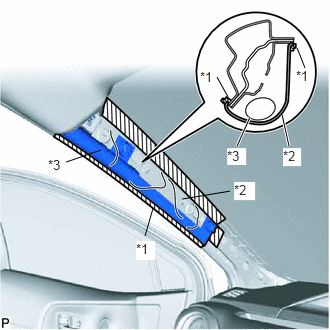
Protect the curtain shield airbag assembly.
| *1 | Adhesive Tape |
| *2 | Protective Cover |
| *3 | Curtain Shield Airbag Assembly |
Cover the airbag with a piece of cloth or nylon and secure the edges of the cover with tape as shown in the illustration.
- NOTICE:
-
Cover the curtain shield airbag with a protective cover as soon as the front pillar garnish is removed.
62332A
8.REMOVE REAR DOOR OPENING TRIM WEATHERSTRIP LH
Remove the rear door opening trim weatherstrip LH.
73233C
9.REMOVE LAP BELT OUTER ANCHOR COVER (for LH Side)
73220
10.DISCONNECT FRONT SEAT OUTER BELT ASSEMBLY LH
62414A
11.REMOVE CENTER PILLAR LOWER GARNISH LH
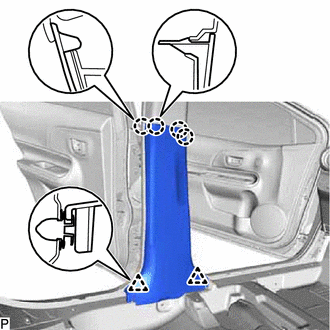
Disengage the 4 claws and 2 clips, and remove the center pillar lower garnish LH.
62412B
12.REMOVE CENTER PILLAR UPPER GARNISH LH
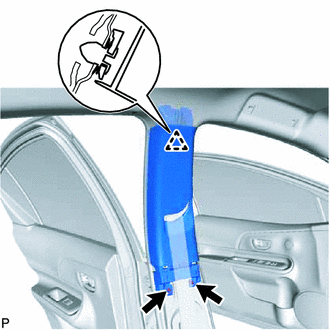
Remove the 2 screws and disengage the clip.
Pass the floor anchor of the front seat outer seat belt assembly LH through the center pillar upper garnish LH and remove the center pillar upper garnish LH.
67917A
13.REMOVE REAR DOOR SCUFF PLATE RH
- HINT:
-
Use the same procedure as for the LH side.
67913
14.REMOVE FRONT DOOR SCUFF PLATE RH
- HINT:
-
Use the same procedure as for the LH side.
62111C
15.REMOVE COWL SIDE TRIM BOARD RH
- HINT:
-
Use the same procedure as for the LH side.
62311B
16.REMOVE FRONT DOOR OPENING TRIM WEATHERSTRIP RH
- HINT:
-
Use the same procedure as for the LH side.
62211
17.REMOVE FRONT PILLAR GARNISH RH
- HINT:
-
Use the same procedure as for the LH side.
62331A
18.REMOVE REAR DOOR OPENING TRIM WEATHERSTRIP RH
- HINT:
-
Use the same procedure as for the LH side.
73233
19.REMOVE LAP BELT OUTER ANCHOR COVER (for RH Side)
- HINT:
-
Use the same procedure as for the LH side.
73210
20.DISCONNECT FRONT SEAT OUTER BELT ASSEMBLY RH
- HINT:
-
Use the same procedure as for the LH side.
62413A
21.REMOVE CENTER PILLAR LOWER GARNISH RH
- HINT:
-
Use the same procedure as for the LH side.
62411B
22.REMOVE CENTER PILLAR UPPER GARNISH RH
- HINT:
-
Use the same procedure as for the LH side.
58410B
23.REMOVE DECK BOARD ASSEMBLY
Remove the deck board assembly.
64997
24.REMOVE DECK FLOOR BOX LH
Remove the deck floor box LH.
64995
25.REMOVE DECK FLOOR BOX RH
- HINT:
-
Use the same procedure as for the LH side.
64330D
26.REMOVE PACKAGE TRAY TRIM PANEL ASSEMBLY
Remove the package tray trim panel assembly.
64716D
27.REMOVE REAR DECK TRIM COVER
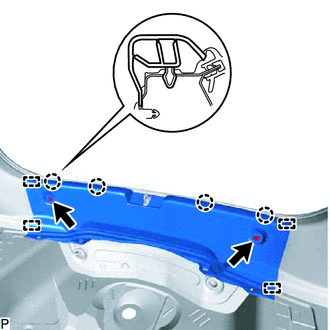
Remove the 2 clips.
Disengage the 4 claws and 2 guides, and remove the rear deck trim cover.
73370
28.DISCONNECT REAR SEAT 3 POINT TYPE OUTER BELT ASSEMBLY LH
58732C
29.REMOVE REAR ABSORBER CAP LH
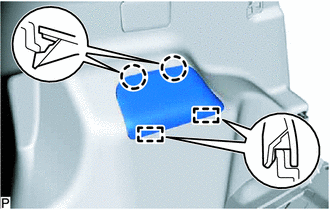
Disengage the 2 claws and 2 guides, and remove the rear absorber cap LH.
81330
30.REMOVE NO. 1 LUGGAGE COMPARTMENT LIGHT ASSEMBLY
64740C
31.REMOVE DECK TRIM SIDE PANEL ASSEMBLY LH
Turn the rear seatback hinge in the direction indicated by the arrow shown in the illustration.
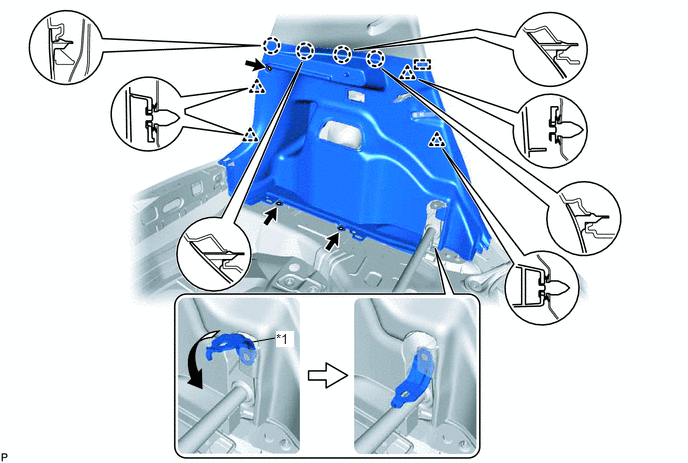
| *1 | Rear Seatback Hinge | - | - |
Remove the bolt and 2 screws.
Disengage the 4 claws, 4 clips and guide, and remove the deck trim side panel assembly LH.
62472A
32.REMOVE ROOF SIDE INNER GARNISH LH
Disengage the 5 clips.
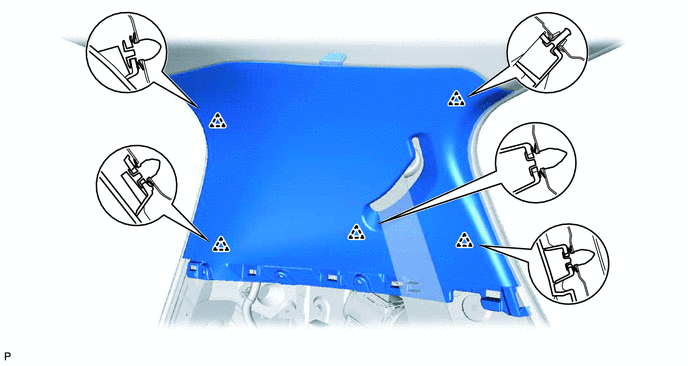
Pass the floor anchor of the rear seat 3 point type outer belt assembly LH through the roof side inner garnish LH and remove the roof side inner garnish LH.
73360
33.DISCONNECT REAR SEAT 3 POINT TYPE OUTER BELT ASSEMBLY RH
- HINT:
-
Use the same procedure as for the LH side.
58731C
34.REMOVE REAR ABSORBER CAP RH
- HINT:
-
Use the same procedure as for the LH side.
64730B
35.REMOVE DECK TRIM SIDE PANEL ASSEMBLY RH
- HINT:
-
Use the same procedure as for the LH side.
73350
36.DISCONNECT REAR CENTER SEAT LAP TYPE BELT ASSEMBLY
62471A
37.REMOVE ROOF SIDE INNER GARNISH RH
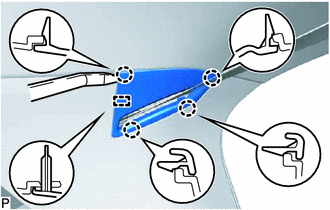
Using a moulding remover, disengage the 4 claws and guide, and disconnect the belt guide.
Disengage the 5 clips.
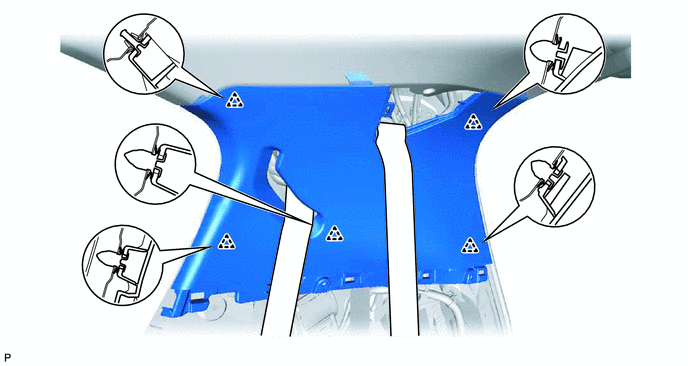
Pass the floor anchor of the rear seat 3 point type outer belt assembly RH through the roof side inner garnish RH and remove the roof side inner garnish RH.
81260A
38.REMOVE MAP LIGHT ASSEMBLY
81240
39.REMOVE NO. 1 ROOM LIGHT ASSEMBLY (w/ Room Light)
74610S
40.REMOVE ASSIST GRIP ASSEMBLY
- HINT:
-
Use the same procedure to remove all assist grips.
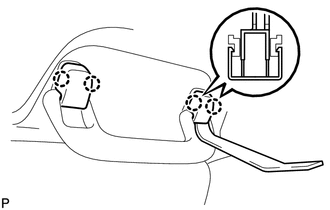
Using a moulding remover, disengage the 4 claws and remove the 2 assist grip covers.
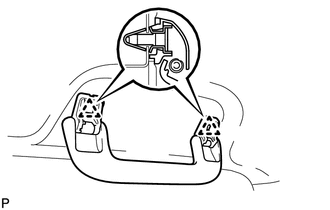
Disengage the 2 clips and remove the assist grip.
74320
41.REMOVE VISOR ASSEMBLY LH
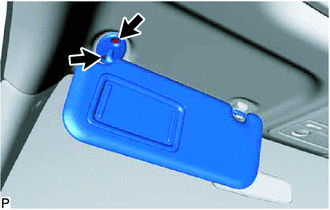
Disconnect the visor shaft from the visor holder.
Remove the 2 screws and the visor assembly LH.
74310
42.REMOVE VISOR ASSEMBLY RH
- HINT:
-
Use the same procedure as for the LH side.
74348
43.REMOVE VISOR HOLDER
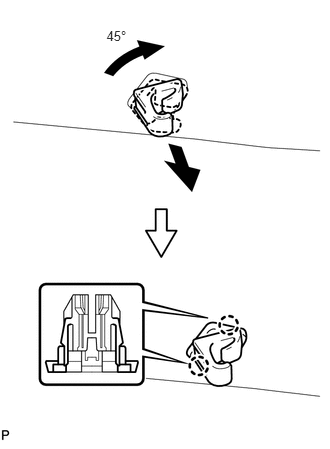
Turn the visor holder 45° clockwise and disengage the 2 claws to remove the visor holder.
- HINT:
-
Use the same procedure for the LH side and RH side.
44.REMOVE ROOF HEADLINING ASSEMBLY
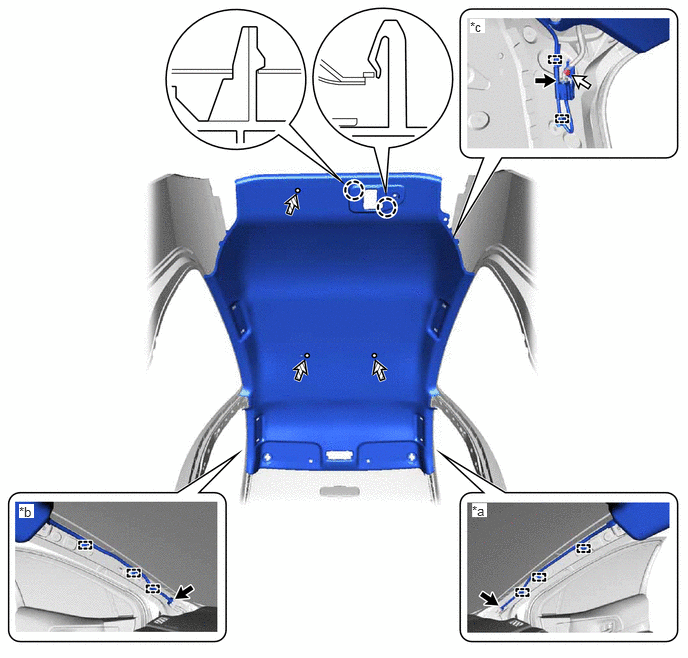
| *a | Front Pillar RH Side | *b | Front Pillar LH Side |
| *c | Rear Pillar RH Side | - | - |
for front pillar RH side:
Disconnect the connector.
Using a clip remover, disengage the 3 clamps.
for front pillar LH side:
Disconnect the connector.
Using a clip remover, disengage the 3 clamps.
for rear pillar RH side:
Disconnect the connector.
Remove the bolt and disconnect the connector bracket.
Using a clip remover, disengage the 2 clamps.
Using a clip remover, remove the 3 clips.
Disengage the 2 claws.
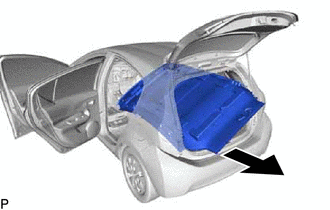
Remove the roof headlining assembly from the vehicle through the back door as shown in the illustration.
- NOTICE:
-
Do not damage the roof headlining assembly or vehicle interior.