1NZ-FXE ENGINE CONTROL SFI SYSTEM(w/ Canister Pump Module) P0102 Mass Air Flow Circuit Low P0103 Mass Air Flow Circuit High
DESCRIPTION
The mass air flow meter sub-assembly is a sensor that measures the amount of air flowing through the throttle valve. The ECM uses this information to determine fuel injection duration and to provide an appropriate air fuel ratio.
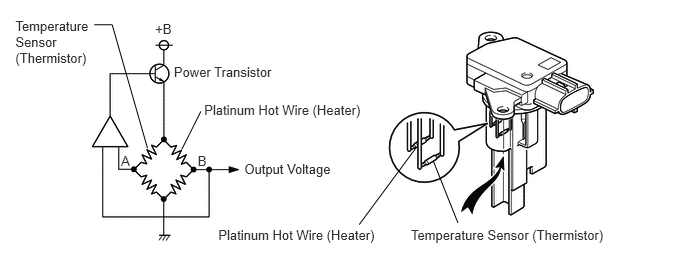
Inside the mass air flow meter sub-assembly, there is a heated platinum wire which is exposed to the flow of intake air. By applying a specific electrical current to the wire, the ECM heats it to a specific temperature. The flow of incoming air cools both the wire and an internal thermistor, affecting their resistance. To maintain a constant current value, the ECM varies the voltage applied to the wire and internal thermistor. The voltage level is proportional to the airflow through the sensor, and the ECM uses it to calculate the intake air volume.
The circuit is constructed so that the platinum hot wire and the temperature sensor create a bridge circuit, and the power transistor is controlled so that the potentials of A and B remain equal to maintain the predetermined temperature.
- HINT:
-
When any of these DTCs is stored, the ECM enters fail-safe mode. During fail-safe mode, the ignition timing is calculated by the ECM, according to the engine speed and throttle valve position. Fail-safe mode continues until a pass condition is detected.
| DTC No. | DTC Detection Condition | Trouble Area |
|---|---|---|
| P0102 | The mass air flow meter sub-assembly voltage is less than 0.2 V for 3 seconds.
(1 trip detection logic: Engine speed is less than 4000 rpm) (2 trip detection logic: Engine speed is 4000 rpm or higher) |
·
Open or short in mass air flow meter sub-assembly circuit ·
Mass air flow meter sub-assembly ·
No. 1 integration relay ·
ECM |
| P0103 | The mass air flow meter sub-assembly voltage is higher than 4.9 V for 3 seconds.
(1 trip detection logic: Engine speed is less than 4000 rpm) (2 trip detection logic: Engine speed is 4000 rpm or higher) |
·
Open or short in mass air flow meter sub-assembly circuit ·
Mass air flow meter sub-assembly ·
No. 1 integration relay ·
ECM |
- HINT:
-
When any of these DTCs are output, check the air flow rate using the GTS. Enter the following menus: Powertrain / Engine and ECT / Data List / Primary / MAF.
| Mass Air Flow Rate (gm/sec) | Malfunction |
|---|---|
| Approximately 0.0 | ·
Open in mass air flow meter sub-assembly power source circuit ·
Open or short in VG circuit |
| 271.0 or more | ·
Open in E2G circuit |
MONITOR DESCRIPTION
If there is a defect or an open or short circuit in the mass air flow meter sub-assembly, the voltage level deviates from the normal operating range. The ECM interprets this deviation as a malfunction in the mass air flow meter sub-assembly circuit and stores a DTC.
Example:
When the sensor output voltage remains less than 0.2 V, or higher than 4.9 V for 3 seconds, the ECM stores a DTC.
MONITOR STRATEGY
| Frequency of Operation | Continuous |
CONFIRMATION DRIVING PATTERN
Connect the GTS to the DLC3.
Turn the power switch on (IG) and turn the GTS on.
Clear the DTCs (even if no DTCs are stored, perform the clear DTC procedure).
Turn the power switch off and wait for at least 30 seconds.
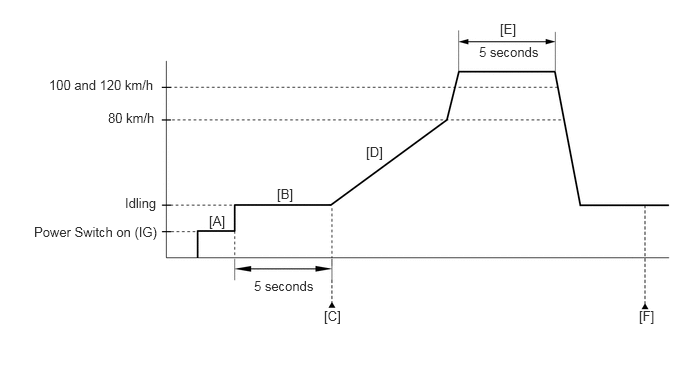
Turn the power switch on (IG) and turn the GTS on [A].
Put the engine in Inspection Mode (Maintenance Mode).
Click hereGeneral>INTRODUCTION>REPAIR INSTRUCTION>INSPECTION MODE PROCEDURE
Start the engine.
Idle the engine for 5 seconds [B].
Enter the following menus: Powertrain / Engine and ECT / Trouble Codes [C].
Read the pending DTCs.
- HINT:
- ·
If a pending DTC is output, the system is malfunctioning.
·If a pending DTC is not output, perform the following procedure.
During normal driving, increase the vehicle speed to 80 km/h (50 mph) [D].
- CAUTION:
-
When performing the confirmation driving pattern, obey all speed limits and traffic laws.
Depress the accelerator pedal fully to increase the vehicle speed to between 100 and 120 km/h (62 and 75 mph) (engine speed of 4000 rpm or higher) and then maintain the speed for at least 5 seconds [E].
- CAUTION:
-
When performing the confirmation driving pattern, obey all speed limits and traffic laws.
Enter the following menus: Powertrain / Engine and ECT / Trouble Codes [F].
Read the pending DTCs.
- HINT:
- ·
If a pending DTC is output, the system is malfunctioning.
·If a pending DTC is not output, perform the following procedure.
Enter the following menus: Powertrain / Engine and ECT / Utility / All Readiness.
Input the DTC: P0102 or P0103.
Check the DTC judgment result.
| GTS Display | Description |
|---|---|
| NORMAL | ·
DTC judgment completed ·
System normal |
| ABNORMAL | ·
DTC judgment completed ·
System abnormal |
| INCOMPLETE | ·
DTC judgment not completed ·
Perform driving pattern after confirming DTC enabling conditions |
| N/A | ·
Unable to perform DTC judgment ·
Number of DTCs which do not fulfill DTC preconditions has reached ECU memory limit |
- HINT:
- ·
If the judgment result shows NORMAL, the system is normal.
·If the judgment result shows ABNORMAL, the system has a malfunction.
·If the judgment result shows INCOMPLETE or N/A, perform steps [B] through [F] again.
WIRING DIAGRAM
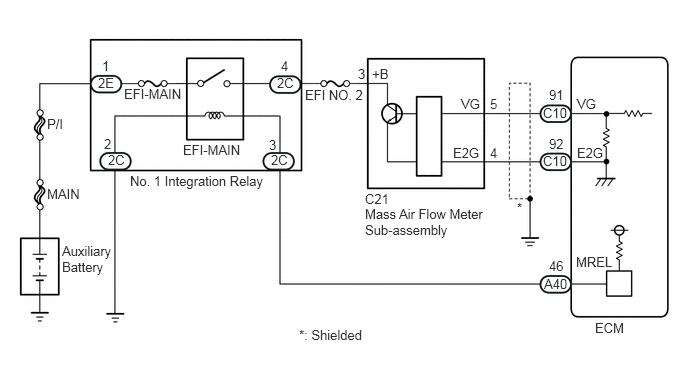
CAUTION / NOTICE / HINT
- NOTICE:
-
Inspect the fuses for circuits related to this system before performing the following inspection procedure.
- HINT:
-
Read freeze frame data using the GTS. The ECM records vehicle and driving condition information as freeze frame data the moment a DTC is stored. When troubleshooting, freeze frame data can help determine if the vehicle was moving or stationary, if the engine was warmed up or not, if the air fuel ratio was lean or rich, and other data from the time the malfunction occurred.
PROCEDURE
Connect the GTS to the DLC3.
Turn the power switch on (IG).
Turn the GTS on.
Enter the following menus: Powertrain / Engine and ECT / Trouble Codes.
Read the DTCs.
| Result | Proceed to |
|---|---|
| DTC P0102 is output | A |
| DTC P0103 is output | B |
A
B
Disconnect the mass air flow meter sub-assembly connector.
Turn the power switch on (IG).
Measure the voltage according to the value(s) in the table below.
- Standard Voltage:
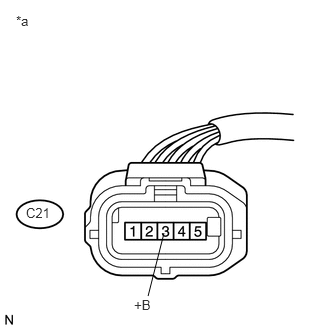
Tester Connection Condition Specified Condition C21-3 (+B) - Body ground Power switch on (IG) 11 to 14 V
| *a | Front view of wire harness connector
(to Mass Air Flow Meter Sub-assembly) |
OK
NG
Disconnect the mass air flow meter sub-assembly connector.
Disconnect the ECM connector.
Measure the resistance according to the value(s) in the table below.
- Standard Resistance:
Tester Connection Condition Specified Condition C21-5 (VG) - C10-91 (VG) Always Below 1 Ω C21-4 (E2G) - C10-92 (E2G) Always Below 1 Ω C21-5 (VG) or C10-91 (VG) - Body ground Always 10 kΩ or higher
OK
NG
Inspect the mass air flow meter sub-assembly, referring to the On-vehicle Inspection for Mass Air Flow Meter.
Click hereEngine / Hybrid System>1NZ-FXE (ENGINE CONTROL)>MASS AIR FLOW METER>ON-VEHICLE INSPECTION
Inspect the mass air flow meter sub-assembly, referring to the Inspection for Mass Air Flow Meter.
Click hereEngine / Hybrid System>1NZ-FXE (ENGINE CONTROL)>MASS AIR FLOW METER>INSPECTION
Inspect the function of the mass air flow meter sub-assembly.
Connect the GTS to the DLC3.
Turn the power switch on (IG).
Turn the GTS on.
Put the engine in Inspection Mode (Maintenance Mode).
Click hereGeneral>INTRODUCTION>REPAIR INSTRUCTION>INSPECTION MODE PROCEDURE
Start the engine.
Enter the following menus: Powertrain / Engine and ECT / Data List / Primary / MAF.
Check that the MAF value changes when the engine is raced.
- OK:
The reading changes.
- HINT:
-
Perform "Inspection After Repair" after replacing the mass air flow meter sub-assembly.
-
Click hereEngine / Hybrid System>1NZ-FXE (ENGINE CONTROL)>SFI SYSTEM(w/ Canister Pump Module)>INITIALIZATION
OK
NG
Disconnect the mass air flow meter sub-assembly connector.
Measure the resistance according to the value(s) in the table below.
- Standard Resistance:
Tester Connection Condition Specified Condition C21-4 (E2G) - Body ground Always Below 1 Ω
- HINT:
-
Perform "Inspection After Repair" after replacing the mass air flow meter sub-assembly.
-
Click hereEngine / Hybrid System>1NZ-FXE (ENGINE CONTROL)>SFI SYSTEM(w/ Canister Pump Module)>INITIALIZATION
OK
NG
Disconnect the mass air flow meter sub-assembly connector.
Disconnect the ECM connector.
Measure the resistance according to the value(s) in the table below.
- Standard Resistance:
Tester Connection Condition Specified Condition C21-4 (E2G) - C10-92 (E2G) Always Below 1 Ω
OK
NG
Disconnect the mass air flow meter sub-assembly connector.
Remove the No. 1 integration relay and ENG W/PMP relay from the No. 2 engine room relay block and No. 2 junction block assembly.
- HINT:
-
Remove the ENG W/PMP relay connected between the checked terminals as the coil inside the relay influences the measurement value.
Measure the resistance according to the value(s) in the table below.
- Standard Resistance:
Tester Connection Condition Specified Condition C21-3 (+B) - 2C-4 Always Below 1 Ω C21-3 (+B) or 2C-4 - Body ground Always 10 kΩ or higher
OK
NG