Home › Engine / Hybrid System › 1NZ-FXE (ENGINE CONTROL) › SFI SYSTEM(w/ Canister Pump Module) › from 2017.06
RM2170E _51 Engine / Hybrid System _057003 1NZ-FXE ENGINE CONTROL _0320444 SFI SYSTEM(w/ Canister Pump Module) J

1NZ-FXE ENGINE CONTROL  SFI SYSTEM(w/ Canister Pump Module)  VC Output Circuit  


DESCRIPTION

The ECM constantly generates a 5 V power source voltage from the auxiliary battery voltage supplied to the +B (BATT) terminal to operate the microprocessor. The ECM also provides this power source voltage to the sensors through the VC output circuit.
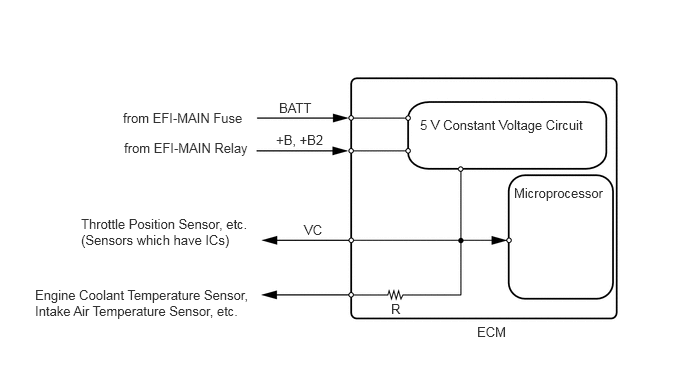
A240424E52
4.375,1.219 6.198,1.396 1.823,0.177 10 false 5 V Constant Voltage Circuit 5.354,1.927 6.365,2.344 1.01,0.417 10 false Microprocessor 1.292,1.458 2.781,1.698 1.49,0.24 10 false from EFI-MAIN Relay 1.281,1.146 2.625,1.313 1.344,0.167 10 false from EFI-MAIN Fuse 2.906,1.042 3.427,1.26 0.521,0.219 10 false BATT 0.844,2.25 2.635,2.99 1.792,0.74 10 false Throttle Position Sensor, etc. (Sensors which have ICs) 0.365,2.99 2.677,3.76 2.313,0.771 10 false Engine Coolant Temperature Sensor, Intake Air Temperature Sensor, etc. 4.073,3.135 4.333,3.344 0.26,0.208 10 false R 2.875,1.375 3.802,1.573 0.927,0.198 10 false +B, +B2 3.167,2.313 3.458,2.542 0.292,0.229 10 false VC 4.969,3.375 5.417,3.604 0.448,0.229 10 false ECM

When the VC circuit is short-circuited, the microprocessor in the ECM and the sensors that are supplied with power through the VC circuit are inactivated because power is not supplied from the VC circuit. Under this condition, the system does not start up and the MIL does not illuminate even if the system malfunctions.

HINT:

Under normal conditions, the MIL is illuminated when the power switch is turned to on (IG). The MIL goes off when the power switch on (READY).


WIRING DIAGRAM
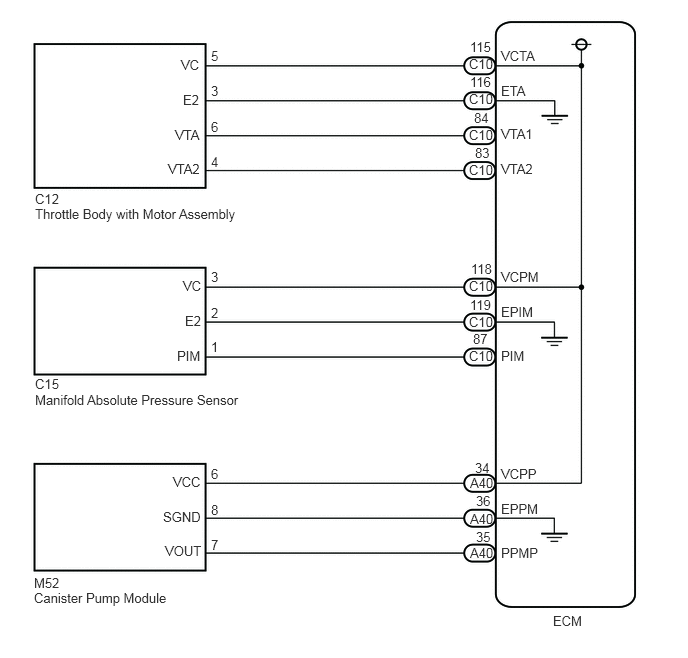
A269989E03
0.365,1.99 0.635,2.146 0.271,0.156 10 false C12 2.198,0.5 2.323,0.677 0.125,0.177 10 false 5 2.198,0.865 2.323,1.042 0.125,0.177 10 false 3 2.198,1.24 2.323,1.417 0.125,0.177 10 false 6 1.885,0.594 2.104,0.76 0.219,0.167 10 false VC 1.906,0.958 2.167,1.115 0.26,0.156 10 false E2 1.823,1.323 2.177,1.479 0.354,0.156 10 false VTA 2.198,1.604 2.323,1.781 0.125,0.177 10 false 4 2.198,3.177 2.323,3.354 0.125,0.177 10 false 2 2.198,3.531 2.323,3.708 0.125,0.177 10 false 1 0.354,5.99 0.885,6.344 0.531,0.354 10 false M52 0.354,6.146 1.823,6.313 1.469,0.167 10 false Canister Pump Module 2.198,4.854 2.323,5.031 0.125,0.177 10 false 6 2.198,5.594 2.323,5.771 0.125,0.177 10 false 7 2.198,5.229 2.323,5.406 0.125,0.177 10 false 8 1.802,4.938 2.146,5.104 0.344,0.167 10 false VCC 1.719,5.656 2.177,5.813 0.458,0.156 10 false VOUT 1.698,5.302 2.135,5.458 0.438,0.156 10 false SGND 4.896,0.406 5.156,0.563 0.26,0.156 10 false 115 4.885,0.583 5.156,0.74 0.271,0.156 10 false C10 5.219,0.5 5.615,0.656 0.396,0.156 10 false VCTA 5.219,0.865 5.604,1.021 0.385,0.156 10 false ETA 5.219,3.625 5.583,3.781 0.365,0.156 10 false PIM 5.219,2.802 5.667,2.958 0.448,0.156 10 false VCPM 5.219,5.677 5.646,5.833 0.427,0.156 10 false PPMP 5.219,3.167 5.625,3.323 0.406,0.156 10 false EPIM 5.76,6.385 6.115,6.552 0.354,0.167 10 false ECM 4.896,0.771 5.156,0.927 0.26,0.156 10 false 116 4.885,0.948 5.156,1.104 0.271,0.156 10 false C10 4.938,1.146 5.198,1.302 0.26,0.156 10 false 84 4.885,1.323 5.156,1.479 0.271,0.156 10 false C10 4.948,1.51 5.208,1.667 0.26,0.156 10 false 83 4.885,1.688 5.156,1.844 0.271,0.156 10 false C10 5.219,1.313 5.615,1.469 0.396,0.156 10 false VTA1 5.219,1.677 5.615,1.833 0.396,0.156 10 false VTA2 4.885,2.896 5.156,3.052 0.271,0.156 10 false C10 4.885,3.271 5.156,3.427 0.271,0.156 10 false C10 4.885,3.625 5.156,3.781 0.271,0.156 10 false C10 4.906,2.719 5.167,2.875 0.26,0.156 10 false 118 4.896,3.094 5.177,3.25 0.281,0.156 10 false 119 4.927,3.448 5.198,3.604 0.271,0.156 10 false 87 4.896,4.948 5.167,5.104 0.271,0.156 10 false A40 4.896,5.323 5.167,5.479 0.271,0.156 10 false A40 4.896,5.677 5.167,5.833 0.271,0.156 10 false A40 4.948,4.792 5.208,4.948 0.26,0.156 10 false 34 4.958,5.135 5.24,5.292 0.281,0.156 10 false 36 4.958,5.51 5.229,5.667 0.271,0.156 10 false 35 5.219,5.219 5.646,5.375 0.427,0.156 10 false EPPM 5.219,4.854 5.646,5.01 0.427,0.156 10 false VCPP 1.75,1.677 2.198,1.833 0.448,0.156 10 false VTA2 0.365,2.146 2.583,2.5 2.219,0.354 10 false Throttle Body with Motor Assembly 1.906,2.896 2.135,3.063 0.229,0.167 10 false VC 1.927,3.26 2.146,3.417 0.219,0.156 10 false E2 1.844,3.625 2.198,3.781 0.354,0.156 10 false PIM 2.198,2.802 2.323,2.979 0.125,0.177 10 false 3 0.365,3.917 0.635,4.073 0.271,0.156 10 false C15 0.365,4.083 2.563,4.24 2.198,0.156 10 false Manifold Absolute Pressure Sensor

PROCEDURE

1.CHECK MIL
a.

Check that the Malfunction Indicator Lamp (MIL) lights up when the power switch is turned to on (IG).

OK:

MIL lights up.


OK

PROCEED TO NEXT SUSPECTED AREA SHOWN IN PROBLEM SYMPTOMS TABLE

NG

2.CHECK COMMUNICATION BETWEEN GTS AND ECM
a.

Connect the GTS to the DLC3.


b.

Turn the power switch on (IG).


c.

Turn the GTS on.


d.

Check the communication between the GTS and ECM.

Result
Result Proceed to
Communication is not possible A
Communication is possible B


A

3.CHECK MIL (THROTTLE POSITION SENSOR)

B

3.CHECK MIL (THROTTLE POSITION SENSOR)
a.

Disconnect the throttle body with motor assembly connector.


b.

Turn the power switch on (IG).


c.

Check the MIL.

Result
Result Proceed to
MIL does not illuminate A
MIL illuminates B

HINT:

Perform "Inspection After Repair" after replacing the throttle body with motor assembly.

Click hereEngine / Hybrid System>1NZ-FXE (ENGINE CONTROL)>SFI SYSTEM(w/ Canister Pump Module)>INITIALIZATION


A

4.CHECK MIL (MANIFOLD ABSOLUTE PRESSURE SENSOR)

B

REPLACE THROTTLE BODY WITH MOTOR ASSEMBLY

4.CHECK MIL (MANIFOLD ABSOLUTE PRESSURE SENSOR)
a.

Disconnect the manifold absolute pressure sensor connector.


b.

Turn the power switch on (IG).


c.

Check the MIL.

Result
Result Proceed to
MIL does not illuminate A
MIL illuminates B


A

5.CHECK MIL (CANISTER PUMP MODULE)

B

REPLACE MANIFOLD ABSOLUTE PRESSURE SENSOR

5.CHECK MIL (CANISTER PUMP MODULE)
a.

Disconnect the canister pump module connector.


b.

Turn the power switch on (IG).


c.

Check the MIL.

Result
Result Proceed to
MIL does not illuminate A
MIL illuminates B


A

6.CHECK HARNESS AND CONNECTOR

B

6.CHECK HARNESS AND CONNECTOR
a.

Disconnect the throttle body with motor assembly connector.


b.

Disconnect the manifold absolute pressure sensor connector.


c.

Disconnect the canister pump module connector.


d.

Disconnect the ECM connectors.


e.

Measure the resistance according to the value(s) in the table below.

Standard Resistance:
Tester Connection Condition Specified Condition
C10-115 (VCTA) - Body ground Always 10 kΩ or higher
C10-118 (VCPM) - Body ground Always 10 kΩ or higher
A40-34 (VCPP) - Body ground Always 10 kΩ or higher


OK

NG

REPAIR OR REPLACE HARNESS OR CONNECTOR