STEERING COLUMN STEERING COLUMN ASSEMBLY INSTALLATION
CAUTION / NOTICE / HINT
- NOTICE:
- ·
Do not replace the spiral cable with sensor sub-assembly with the negative (-) auxiliary battery cable connected and the power switch on (IG).
·Do not rotate the spiral cable with sensor sub-assembly without the steering wheel with the negative (-) auxiliary battery cable connected and the power switch on (IG).
·Ensure that the steering wheel is installed and aligned straight when inspecting the steering sensor.
·Do not remove the spiral cable from the steering sensor.
PROCEDURE

 45250
1.INSPECT STEERING COLUMN ASSEMBLY
45260
2.INSTALL NO. 2 STEERING INTERMEDIATE SHAFT ASSEMBLY
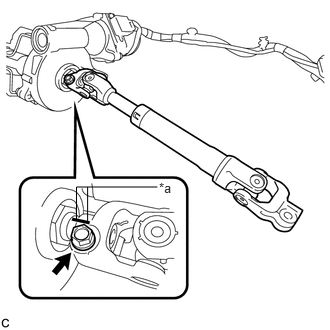
Align the matchmarks on the No. 2 steering intermediate shaft assembly and steering column assembly.
| *a | Matchmark |
Install the No. 2 steering intermediate shaft assembly to the steering column assembly.
Install the bolt.
- Torque:
- 35 N*m (357 kgf*cm, 26 ft.*lbf)
3.INSTALL STEERING POST ASSEMBLY
Install the steering post assembly with the bolt and 2 nuts.
- Torque:
- Bolt : 36 N*m (367 kgf*cm, 27 ft.*lbf)
- Nut : 25 N*m (255 kgf*cm, 18 ft.*lbf)
- NOTICE:
-
There are two different bolt sizes (12 mm (0.472 in.) or 14 mm (0.551 in.)) available.
Connect each connector and engage each wire harness clamp to the steering post assembly.
Engage the wire harness clamp.
45260
4.CONNECT NO. 2 STEERING INTERMEDIATE SHAFT ASSEMBLY (for LHD)
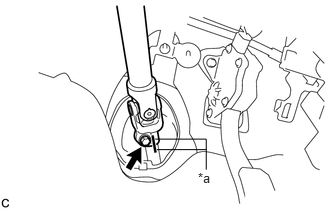
Align the matchmarks on the No. 2 steering intermediate shaft assembly and steering intermediate shaft.
| *a | Matchmark |
Connect the No. 2 steering intermediate shaft assembly to the steering intermediate shaft.
Install the bolt.
- Torque:
- 35 N*m (357 kgf*cm, 26 ft.*lbf)
45259A
5.INSTALL COLUMN HOLE COVER SILENCER SHEET (for LHD)
Install the column hole cover silencer sheet with the 2 clips.
Install the floor carpet.
87201
6.INSTALL NO. 1 AIR DUCT SUB-ASSEMBLY (for LHD)
Engage the 2 claws to install the No. 1 air duct sub-assembly.
87201
7.INSTALL NO. 1 AIR DUCT SUB-ASSEMBLY (for RHD)
Engage the 2 claws to install the No. 1 air duct sub-assembly.
8.INSTALL BRAKE PEDAL SUPPORT ASSEMBLY (for LHD)
9.INSTALL BRAKE PEDAL SUPPORT ASSEMBLY (for RHD)
10.INSTALL TURN SIGNAL SWITCH ASSEMBLY WITH SPIRAL CABLE SUB-ASSEMBLY
- NOTICE:
- ·
Do not replace the spiral cable with sensor sub-assembly with the negative (-) auxiliary battery cable connected and the power h on (IG).
·Do not rotate the spiral cable with sensor sub-assembly without the steering wheel with the negative (-) auxiliary battery cable connected and the power switch on (IG).
·Ensure that the steering wheel is installed and aligned straight when inspecting the steering sensor.
·Do not remove the spiral cable from the steering sensor.
Using pliers, expand the clamp.
While holding the clamp expanded, install the turn signal switch assembly with spiral cable sub-assembly to the steering post assembly and engage the claw.
Return the clamp to its original position.
Connect the connectors to the turn signal switch assembly with spiral cable sub-assembly.
45286
11.INSTALL STEERING COLUMN COVER
- NOTICE:
-
If the steering column cover is installed in the incorrect order, it will not be possible to assemble the lower steering column cover.
Engage the 2 claws and 2 pins to install the steering column cover (upper side).
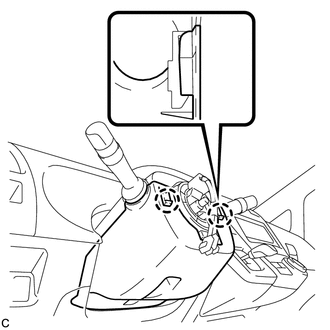
Engage the 2 claws to install the steering column cover (lower side) to the steering column cover (upper side).
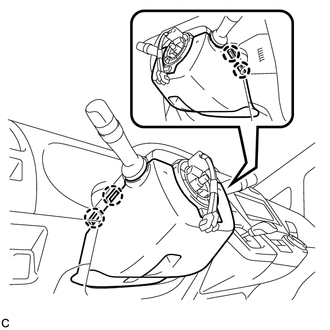
Engage the 4 claws.
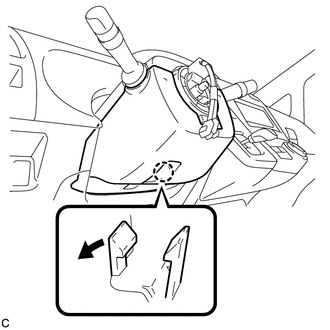
Insert a finger into the opening of the tilt lever of the steering column cover (lower side) to expand and engage the claw.
- NOTICE:
- ·
When disengaging the claw, be sure to expand only the part that faces the opening.
·Make sure that the claw has not become deformed or damaged as it may cause noise or poor installation of the steering column cover.
- HINT:
-
Press the area around the claw to engage it.
12.ALIGN FRONT WHEELS FACING STRAIGHT AHEAD
84307
13.ADJUST SPIRAL CABLE WITH SENSOR SUB-ASSEMBLY
45100
14.INSTALL STEERING WHEEL ASSEMBLY
15.CHECK STEERING WHEEL CENTER POINT
45130
16.INSTALL HORN BUTTON ASSEMBLY
17. ROTATION ANGLE SENSOR VALUE INITIALIZATION AND TORQUE SENSOR ZERO POINT CALIBRATION