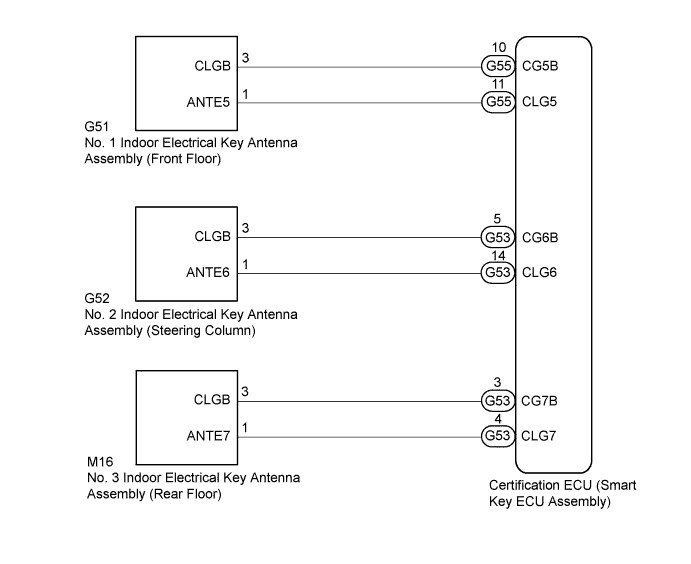
SMART KEY SYSTEM (for Entry Function) > Room Oscillator does not Recognize Key |
| Parameter Name | Cause of Problem and Countermeasure |
| Operating Engine Switch / Key RF Signal Interference | When the power switch was operated, the electrical key transmitter sub-assembly could not be confirmed due to wave interference. If the cause of the malfunction has not been stored but any devices that can cause wave interference in the cabin have been removed and the room oscillator successfully recognizes the key, the possibility of wave interference is high. |
| 1.CHECK ENTRY DOOR LOCK OPERATION |
Check that the entry lock and unlock functions operate for each door (Click here).
|
| ||||
| OK | |
 |
| 2.CHECK PUSH START FUNCTION |
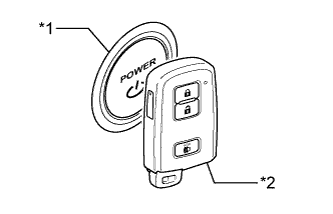 |
Remove the transmitter battery of the electrical key transmitter sub-assembly (Click here).
With the brake pedal depressed, face the logo side of the electrical transmitter sub-assembly towards the power switch, hold the transmitter near the power switch and then press the power switch.
When operating the power switch, check whether the hybrid system starts.
| *1 | Power Switch |
| *2 | Electrical Key Transmitter Sub-assembly |
|
| ||||
| OK | |
|
| 3.CHECK WAVE ENVIRONMENT |
Install the transmitter battery to the electrical key transmitter sub-assembly (Click here).
Bring the electrical key transmitter sub-assembly near the No. 1 indoor electrical key antenna assembly (front floor) and perform a smart key system check (Click here).
Bring the electrical key transmitter sub-assembly near the No. 2 indoor electrical key antenna assembly (steering column) and perform a smart key system check (Click here)
Bring the electrical key transmitter sub-assembly near the No. 3 indoor electrical key antenna assembly (rear floor) and perform a smart key system check (Click here)
| Result | Proceed to |
| System cannot be operated | A |
| System can be operated | B |
|
| ||||
| A | |
|
| 4.CHECK KEY DIAGNOSTIC MODE |
Check the following antennas in the key diagnostic mode (Click here).
Select either channel 1 or channel 2 and inspect the key diagnostic mode for each channel.
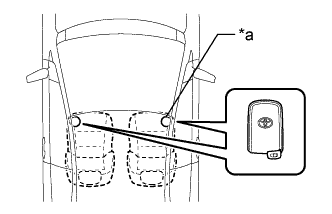 |
Check the No. 1 indoor electrical key antenna assembly (front floor).
| *a | Inspection Point |
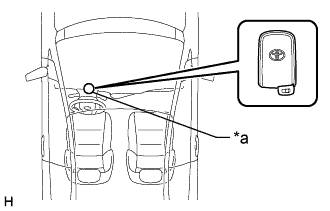 |
Check the No. 2 indoor electrical key antenna assembly (steering column).
| *a | Inspection Point |
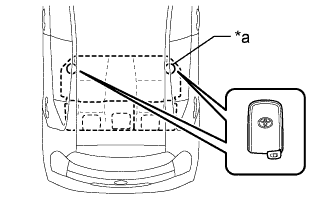 |
Check the No. 3 indoor electrical key antenna (rear floor):
| *a | Inspection Point |
| Result | Proceed to |
| Front floor operation check fails | A |
| Steering column operation check fails | B |
| Rear floor operation check fails | C |
| All operation checks are normal | D |
|
| ||||
|
| ||||
|
| ||||
| A | |
|
| 5.CHECK HARNESS AND CONNECTOR (NO. 1 INDOOR ELECTRICAL KEY ANTENNA ASSEMBLY - CERTIFICATION ECU) |
Disconnect the G51 No. 1 indoor electrical key antenna assembly (front floor) connector.
Disconnect the G55 certification ECU (smart key ECU assembly) connector.
Measure the resistance according to the value(s) in the table below.
| Tester Connection | Condition | Specified Condition |
| G51-1 (ANTE5) - G55-11 (CLG5) | Always | Below 1 Ω |
| G51-3 (CLGB) - G55-10 (CG5B) | Always | Below 1 Ω |
| G51-1 (ANTE5) or G55-11 (CLG5) - Body ground | Always | 10 kΩ or higher |
| G51-3 (CLGB) or G55-10 (CG5B) - Body ground | Always | 10 kΩ or higher |
|
| ||||
| OK | |
|
| 6.CHECK CERTIFICATION ECU (SMART KEY ECU ASSEMBLY) (OUTPUT TO NO. 1 INDOOR ELECTRICAL KEY ANTENNA) |
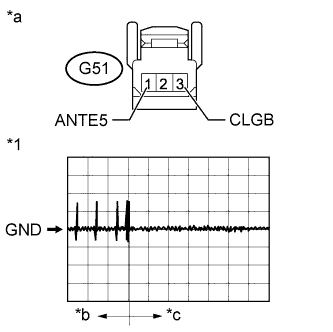 |
Disconnect the G51 No. 1 indoor electrical key antenna assembly (front floor) connector.
Connect the G55 certification ECU (smart key ECU assembly) connector.
Using an oscilloscope, check the waveform.
| Tester Connection | Switch Condition | Tool Setting | Specified Condition |
| G51-1 (ANTE5) - G51-3 (CLGB) | Procedure:
| 2 V/DIV., 500 ms/DIV. | Pulse generation (See waveform) |
| *1 | Waveform |
| *a | Front view of wire harness connector (to No. 1 indoor Electrical Key Antenna [Front Floor]) |
| *b | Within approximately 30 seconds from when the door is closed |
| *c | After approximately 30 seconds from when the door is closed |
|
| ||||
| OK | |
|
| 7.REPLACE NO. 1 INDOOR ELECTRICAL KEY ANTENNA ASSEMBLY (FRONT FLOOR) |
Temporarily replace the No. 1 indoor electrical key antenna assembly (front floor) with a new or known good one (Click here).
| NEXT | |
|
| 8.CHECK KEY DIAGNOSTIC MODE |
Check the following antenna in the key diagnostic mode (Click here).
Select either channel 1 or channel 2 and inspect the key diagnostic mode for each channel.
|
Check the No. 1 indoor electrical key antenna assembly (front floor).
When the electrical key transmitter sub-assembly is at the inspection point, check that the wireless door lock buzzer sounds.
| *a | Inspection Point |
|
| ||||
| OK | ||
 | ||
| ||
| 9.CHECK HARNESS AND CONNECTOR (NO. 2 INDOOR ELECTRICAL KEY ANTENNA ASSEMBLY - CERTIFICATION ECU) |
Disconnect the G52 No. 2 indoor electrical key antenna assembly (steering column) connector.
Disconnect the G53 certification ECU (smart key ECU assembly) connector.
Measure the resistance according to the value(s) in the table below.
| Tester Connection | Condition | Specified Condition |
| G52-1 (ANTE6) - G53-14 (CLG6) | Always | Below 1 Ω |
| G52-3 (CLGB) - G53-5 (CG6B) | Always | Below 1 Ω |
| G52-1 (ANTE6) or G53-14 (CLG6) - Body ground | Always | 10 kΩ or higher |
| G52-3 (CLGB) or G53-5 (CG6B) - Body ground | Always | 10 kΩ or higher |
|
| ||||
| OK | |
|
| 10.CHECK CERTIFICATION ECU (SMART KEY ECU ASSEMBLY) (OUTPUT TO NO. 2 INDOOR ELECTRICAL KEY ANTENNA) |
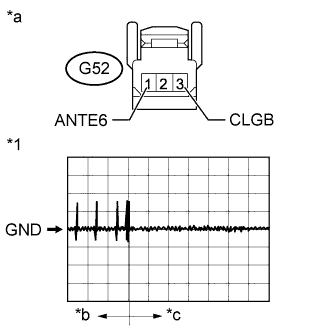 |
Disconnect the G52 No. 2 indoor electrical key antenna assembly (steering column) connector.
Connect the G53 certification ECU (smart key ECU assembly) connector.
Using an oscilloscope, check the waveform.
| Tester Connection | Switch Condition | Tool Setting | Specified Condition |
| G52-1 (ANTE6) - G52-3 (CLGB) | Procedure:
| 2 V/DIV., 500 ms/DIV. | Pulse generation (See waveform) |
| *1 | Waveform |
| *a | Front view of wire harness connector (to No. 2 indoor Electrical Key Antenna [Steering Column]) |
| *b | Within approximately 30 seconds from when the door is closed |
| *c | After approximately 30 seconds from when the door is closed |
|
| ||||
| OK | |
|
| 11.REPLACE NO. 2 INDOOR ELECTRICAL KEY ANTENNA ASSEMBLY (STEERING COLUMN) |
Temporarily replace the No. 2 indoor electrical key antenna assembly (steering column) with a new or known good one (Click here).
| NEXT | |
|
| 12.CHECK KEY DIAGNOSTIC MODE |
Check the following antenna in the key diagnostic mode (Click here).
Select either channel 1 or channel 2 and inspect the key diagnostic mode for each channel.
|
Check the No. 2 indoor electrical key antenna assembly (steering column).
When the electrical key transmitter sub-assembly is at the inspection point, check that the wireless door lock buzzer sounds.
| *a | Inspection Point |
|
| ||||
| OK | ||
| ||
| ||
| 13.CHECK HARNESS AND CONNECTOR (NO. 3 INDOOR ELECTRICAL KEY ANTENNA ASSEMBLY - CERTIFICATION ECU) |
Disconnect the M16 No. 3 indoor electrical key antenna assembly (rear floor) connector.
Disconnect the G53 certification ECU (smart key ECU assembly) connector.
Measure the resistance according to the value(s) in the table below.
| Tester Connection | Condition | Specified Condition |
| M16-1 (ANTE7) - G53-4 (CLG7) | Always | Below 1 Ω |
| M16-3 (CLGB) - G53-3 (CG7B) | Always | Below 1 Ω |
| M16-1 (ANTE7) or G53-4 (CLG7) - Body ground | Always | 10 kΩ or higher |
| M16-3 (CLGB) or G53-3 (CG7B) - Body ground | Always | 10 kΩ or higher |
|
| ||||
| OK | |
|
| 14.CHECK CERTIFICATION ECU (SMART KEY ECU ASSEMBLY) (OUTPUT TO NO. 3 INDOOR ELECTRICAL KEY ANTENNA) |
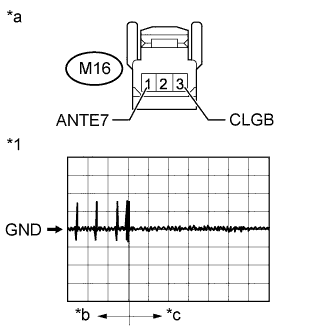 |
Disconnect the M16 No. 3 indoor electrical key antenna assembly (rear floor) connector.
Connect the G53 certification ECU (smart key ECU assembly) connector.
Using an oscilloscope, check the waveform.
| Tester Connection | Switch Condition | Tool Setting | Specified Condition |
| M16-1 (ANTE7) - M16-3 (CLGB) | Procedure:
| 2 V/DIV., 500 ms/DIV. | Pulse generation (See waveform) |
| *1 | Waveform |
| *a | Front view of wire harness connector (to No. 3 indoor Electrical Key Antenna [Rear Floor]) |
| *b | Within approximately 30 seconds from when the door is closed |
| *c | After approximately 30 seconds from when the door is closed |
|
| ||||
| OK | |
|
| 15.REPLACE NO. 3 INDOOR ELECTRICAL KEY ANTENNA ASSEMBLY (REAR FLOOR) |
Temporarily replace the No. 3 indoor electrical key antenna assembly (rear floor) with a new or known good one (Click here).
| NEXT | |
|
| 16.CHECK SELF DIAGNOSTIC MODE |
Check the following antenna in the key diagnostic mode (Click here).
Select either channel 1 or channel 2 and inspect the key diagnostic mode for each channel.
|
Check the No. 3 indoor electrical key antenna assembly (rear floor).
When the electrical key transmitter sub-assembly is at the inspection point, check that the wireless door lock buzzer sounds.
| *a | Inspection Point |
|
| ||||
| OK | ||
| ||
| ||

