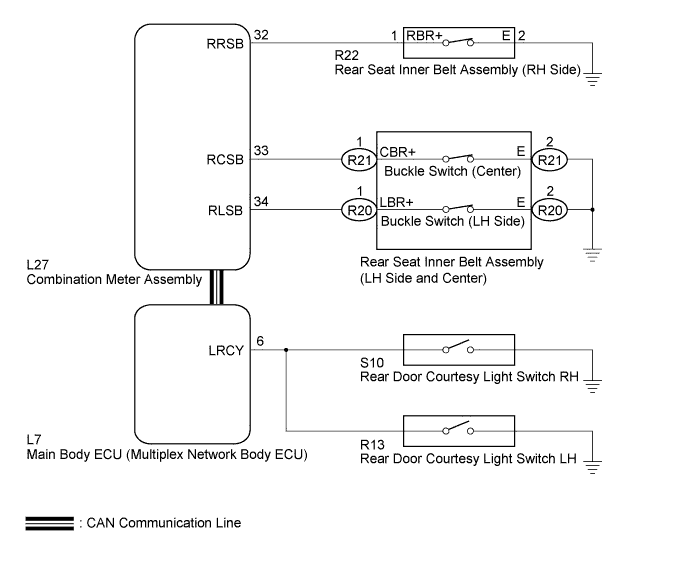
SEAT BELT WARNING SYSTEM > Rear Seat Belt Warning Light Malfunction |
| 1.CHECK REAR SEAT BELT WARNING |
Turn the power switch off and lock all doors.
Unlock all doors and turn the power switch on (IG).
Open and close the rear RH door. Then, check that the multi-information display on the combination meter assembly displays the rear seat belt warning.
Turn the power switch off and lock all doors.
Unlock all doors and turn the power switch on (IG).
Open and close the rear LH door. Then, check that the multi-information display on the combination meter assembly displays the rear seat belt warning.
Turn the power switch off and lock all doors.
Unlock all doors and turn the power switch on (IG). Then, check that the multi-information display on the combination meter assembly does not display the rear seat belt warning.
|
| ||||
| OK | |
 |
| 2.READ VALUE USING INTELLIGENT TESTER (REAR SEAT BELT BUCKLE SWITCH) |
Connect the intelligent tester to the DLC3.
Turn the power switch on (IG).
Turn the intelligent tester on.
Enter the following menus: Body / Combination Meter / Data List.
Read the Data List according to the display on the intelligent tester.
| Tester Display | Measurement Item/Range | Normal Condition | Diagnostic Note |
| 2nd-Row Seatbelt Buckle (R) | Rear RH side seat belt buckle switch signal/ON or OFF | ON: Rear RH side seat belt fastened. OFF: Rear RH side seat belt not fastened. | - |
| 2nd-Row Seatbelt Buckle (L) | Rear LH side seat belt buckle switch signal/ON or OFF | ON: Rear LH side seat belt fastened. OFF: Rear LH side seat belt not fastened. | - |
| 2nd-Row Seatbelt Buckle (C) | Rear center seat belt buckle switch signal/ON or OFF | ON: Rear center seat belt fastened. OFF: Rear center seat belt not fastened. | - |
| Result | Proceed to |
| OK or NG (for all buckle switches) | A |
| NG (for rear RH side buckle switch) | B |
| NG (for rear center buckle switch) | C |
| NG (for rear LH side buckle switch) | D |
| NG (for rear Center and LH side buckle switches) | E |
|
| ||||
|
| ||||
|
| ||||
|
| ||||
| A | ||
 | ||
| ||
| 3.READ VALUE USING INTELLIGENT TESTER (REAR DOOR COURTESY SWITCH) |
Connect the intelligent tester to the DLC3.
Turn the power switch on (IG).
Turn the intelligent tester on.
Enter the following menus: Body / Main Body / Data List.
Read the Data List according to the display on the intelligent tester.
| Tester Display | Measurement Item/Range | Normal Condition | Diagnostic Note |
| RR Door Courtesy SW | Rear door courtesy switch signal/ON or OFF | ON: Rear door LH or RH open. OFF: Rear door LH and RH closed. | - |
| RL Door Courtesy SW | Rear door courtesy switch signal/ON or OFF | ON: Rear door LH or RH open. OFF: Rear door LH and RH closed. | - |
|
| ||||
| OK | |
|
| 4.REPLACE NO. 3 METER CIRCUIT PLATE |
Replace the No. 3 meter circuit plate (Click here).
| NEXT | |
|
| 5.CHECK REAR SEAT BELT WARNING |
Check the rear seat belt warning function (Click here).
|
| ||||
| OK | ||
| ||
| ||
| 6.INSPECT REAR SEAT INNER BELT ASSEMBLY (RH SIDE) |
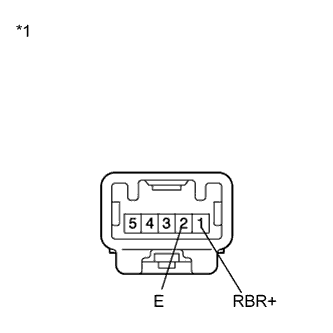 |
Remove the rear seat inner belt assembly RH (Click here).
Measure the resistance according to the value(s) in the table below.
| Tester Connection | Condition | Specified Condition |
| 1 (RBR+) - 2 (E) | Rear seat belt RH fastened | Below 1 Ω |
| 1 (RBR+) - 2 (E) | Rear seat belt RH not fastened | 10 kΩ or higher |
| *1 | Component without harness connected (Rear Seat Inner Belt Assembly (RH Side)) |
|
| ||||
| OK | |
|
| 7.CHECK HARNESS AND CONNECTOR (REAR SEAT INNER BELT RH - COMBINATION METER) |
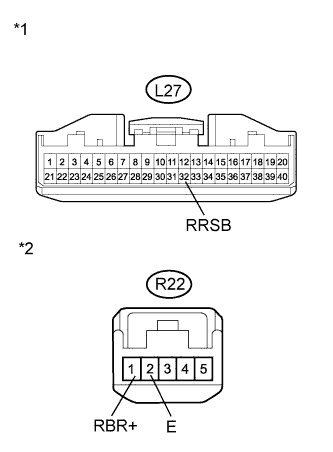 |
Disconnect the L27 connector.
Measure the resistance according to the value(s) in the table below.
| Tester Connection | Condition | Specified Condition |
| L27-32 (RRSB) - R22-1 (RBR+) | Always | Below 1 Ω |
| L27-32 (RRSB) - Body ground | Always | 10 kΩ or higher |
| R22-2 (E) - Body ground | Always | Below 1 Ω |
| *1 | Front view of wire harness connector (to Combination Meter Assembly) |
| *2 | Front view of wire harness connector (to Rear Seat Inner Belt Assembly (RH Side)) |
|
| ||||
| OK | ||
| ||
| ||
| 8.INSPECT REAR SEAT INNER BELT ASSEMBLY (CENTER) |
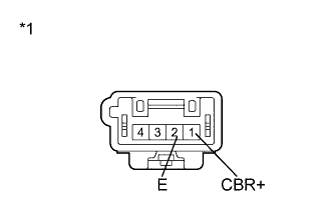 |
Remove the rear seat inner belt assembly (LH Side and Center) (Click here).
Measure the resistance according to the value(s) in the table below.
| Tester Connection | Condition | Specified Condition |
| 1 (CBR+) - 2 (E) | Rear seat belt center fastened | Below 1 Ω |
| 1 (CBR+) - 2 (E) | Rear seat belt center not fastened | 10 kΩ or higher |
| *1 | Component without harness connected (Rear Seat Inner Belt Assembly (LH Side and Center)) |
|
| ||||
| OK | |
|
| 9.CHECK HARNESS AND CONNECTOR (REAR SEAT INNER BELT CENTER - COMBINATION METER) |
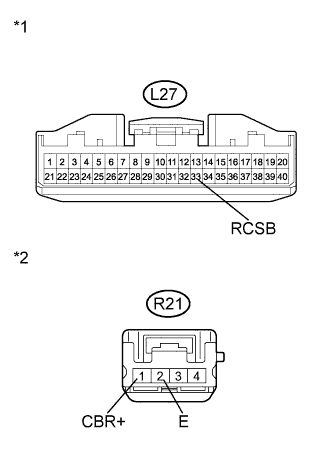 |
Disconnect the L27 meter connector.
Measure the resistance according to the value(s) in the table below.
| Tester Connection | Condition | Specified Condition |
| L27-33 (RCSB) - R21-1 (CBR+) | Always | Below 1 Ω |
| L27-33 (RCSB) - Body ground | Always | 10 kΩ or higher |
| R21-2 (E) - Body ground | Always | Below 1 Ω |
| *1 | Front view of wire harness connector (to Combination Meter Assembly) |
| *2 | Front view of wire harness connector (to Rear Seat Inner Belt Assembly (LH Side and Center)) |
|
| ||||
| OK | ||
| ||
| ||
| 10.INSPECT REAR SEAT INNER BELT ASSEMBLY (LH SIDE) |
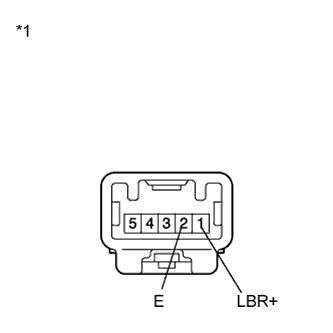 |
Remove the rear seat inner belt assembly (LH Side and Center) (Click here).
Measure the resistance according to the value(s) in the table below.
| Tester Connection | Condition | Specified Condition |
| 1 (LBR+) - 2 (E) | Rear seat inner belt LH fastened | Below 1 Ω |
| 1 (LBR+) - 2 (E) | Rear seat belt LH not fastened | 10 kΩ or higher |
| *1 | Component without harness connected (Rear Seat Inner Belt Assembly (LH Side and Center)) |
|
| ||||
| OK | |
|
| 11.CHECK HARNESS AND CONNECTOR (REAR SEAT INNER BELT CENTER - COMBINATION METER) |
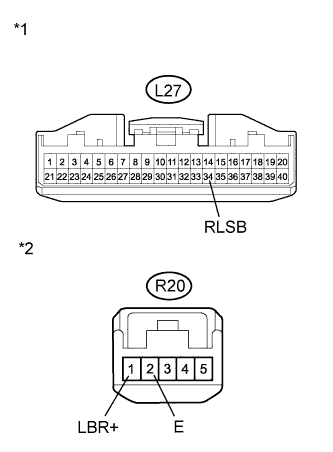 |
Disconnect the L27 connector.
Measure the resistance according to the value(s) in the table below.
| Tester Connection | Condition | Specified Condition |
| L27-34 (RLSB) - R20-1 (LBR+) | Always | Below 1 Ω |
| L27-34 (RLSB) - Body ground | Always | 10 kΩ or higher |
| R20-2 (E) - Body ground | Always | Below 1 Ω |
| *1 | Front view of wire harness connector (to Combination Meter Assembly) |
| *2 | Front view of wire harness connector (to Rear Seat Inner Belt Assembly (LH Side and Center)) |
|
| ||||
| OK | ||
| ||
| ||
| 12.CHECK HARNESS AND CONNECTOR (REAR SEAT INNER BELT (LH SIDE AND CENTER) - BODY GROUND) |
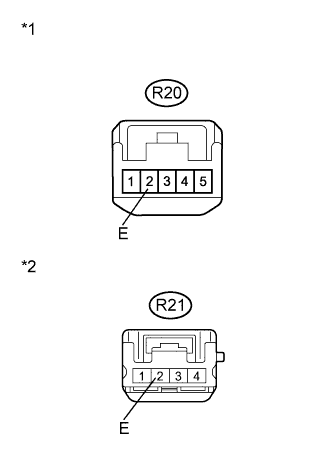 |
Disconnect the R21 and R20 connectors.
Measure the resistance according to the value(s) in the table below.
| Tester Connection | Condition | Specified Condition |
| R21-2 (E) - Body ground | Always | Below 1 Ω |
| R20-2 (E) - Body ground | Always | Below 1 Ω |
| *1 | Front view of wire harness connector (to Rear Seat Inner Belt Assembly (LH Side)) |
| *2 | Front view of wire harness connector (to Rear Seat Inner Belt Assembly (Center)) |
|
| ||||
| OK | ||
| ||
| ||

