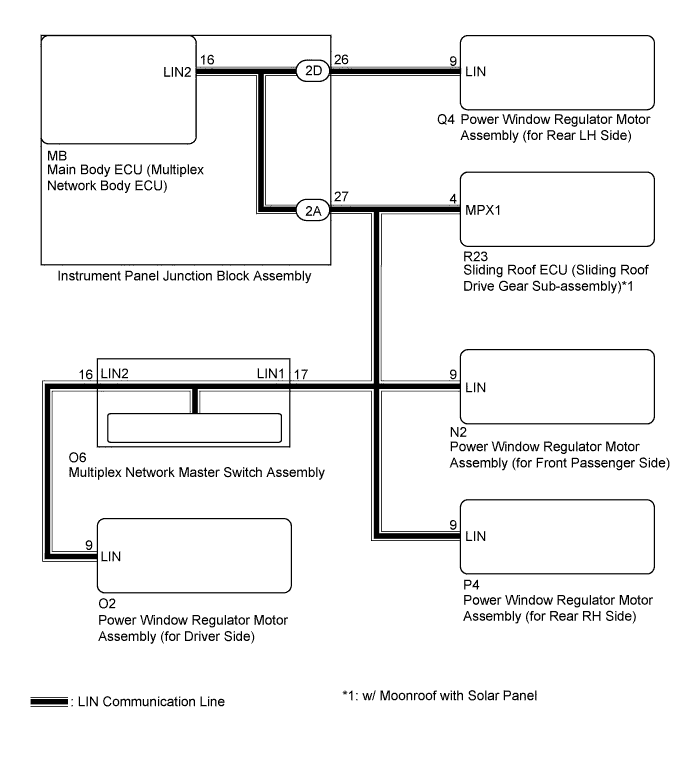
DTC B2325 LIN Communication Bus Malfunction |
| DTC No. | DTC Detection Condition | Trouble Area |
| B2325 | Main body ECU (multiplex network body ECU) detects errors in communication with the ECUs connected to the door bus lines 3 times in a row. |
|
| 1.CHECK HARNESS AND CONNECTOR (POWER WINDOW REGULATOR MOTOR (DRIVER SIDE) - MASTER SWITCH) |
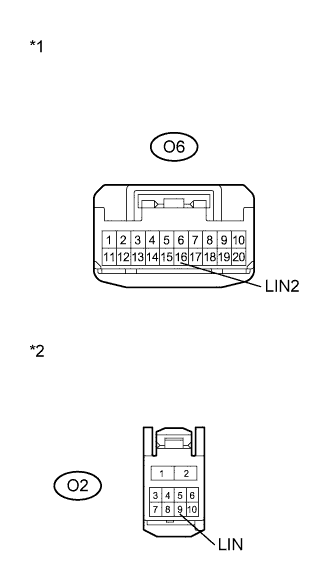 |
Disconnect the O6 multiplex network master switch connector.
Disconnect the O2 power window regulator motor (for driver side) connector.
Measure the resistance according to the value(s) in the table below.
| Tester Connection | Condition | Specified Condition |
| O6-16 (LIN2) - O2-9 (LIN) | Always | Below 1 Ω |
| O6-16 (LIN2) - Body ground | Always | 10 kΩ or higher |
| *1 | Front view of wire harness connector (to Multiplex Network Master Switch Assembly) |
| *2 | Front view of wire harness connector (to Power Window Regulator Motor Assembly (for Driver Side)) |
|
| ||||
| OK | |
 |
| 2.INSPECT MULTIPLEX NETWORK MASTER SWITCH ASSEMBLY |
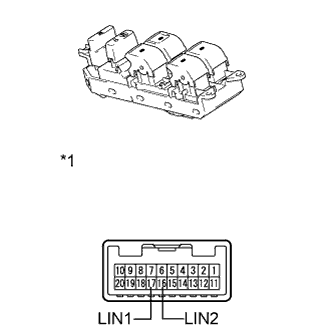 |
Remove the multiplex network master switch assembly (Click here).
Measure the resistance according to the value(s) in the table below.
| Tester Connection | Condition | Specified Condition |
| 16 (LIN2) - 17 (LIN1) | Always | Below 1 Ω |
| 16 (LIN2) - Body ground | Always | 10 kΩ or higher |
| *1 | Component without harness connected (Multiplex Network Master Switch Assembly) |
|
| ||||
| OK | |
|
| 3.INSPECT INSTRUMENT PANEL JUNCTION BLOCK ASSEMBLY |
Remove the instrument panel junction block assembly (Click here).
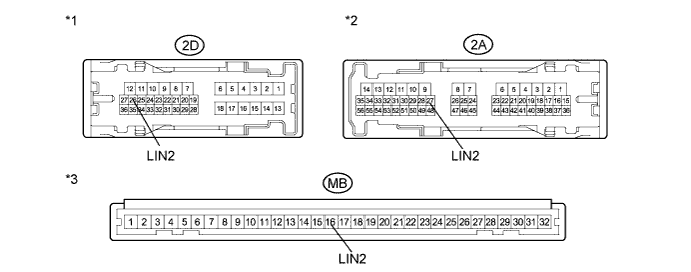
Remove the main body ECU (multiplex network body ECU) from the instrument panel junction block assembly.
Measure the resistance according to the value(s) in the table below.
| Tester Connection | Condition | Specified Condition |
| 2D-26 (LIN2) - MB-16 (LIN2) | Always | Below 1 Ω |
| 2A-27 (LIN2) - MB-16 (LIN2) | Always | Below 1 Ω |
| 2A-27 (LIN2) - Body ground | Always | 10 kΩ or higher |
| *1 | Component without harness connected (Instrument Panel Junction Block Assembly) | *2 | Component without harness connected (Instrument Panel Junction Block Assembly) |
| *3 | Component without harness connected (Instrument Panel Junction Block Assembly) | - | - |
|
| ||||
| OK | |
|
| 4.CHECK HARNESS AND CONNECTOR (INSTRUMENT JUNCTION BLOCK - EACH ECU) |
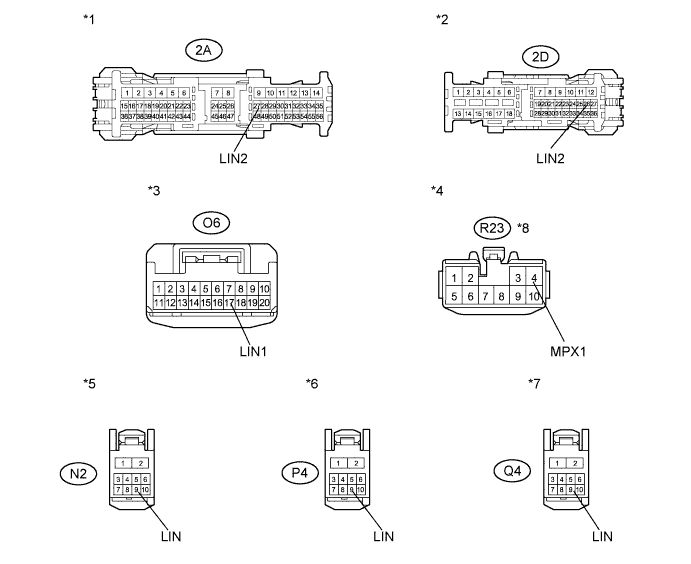
Disconnect the R23*1, N2, P4 and Q4 connectors.
Measure the resistance according to the value(s) in the table below.
| Tester Connection | Condition | Specified Condition |
| 2D-26 (LIN2) - Q4-9 (LIN) | Always | Below 1 Ω |
| 2A-27 (LIN2) - P4-9 (LIN) | Always | Below 1 Ω |
| 2A-27 (LIN2) - O6-17 (LIN1) | Always | Below 1 Ω |
| 2A-27 (LIN2) - N2-9 (LIN) | Always | Below 1 Ω |
| 2A-27 (LIN2) - R23-4 (MPX1)*1 | Always | Below 1 Ω |
| 2D-26 (LIN2) - Body ground | Always | 10 kΩ or higher |
| 2A-27 (LIN2) - Body ground | Always | 10 kΩ or higher |
| *1 | Front view of wire harness connector (to Instrument Panel Junction Block Assembly) | *2 | Front view of wire harness connector (to Instrument Panel Junction Block Assembly) |
| *3 | Front view of wire harness connector (to Multiplex Network Master Switch Assembly) | *4 | Front view of wire harness connector (to Sliding Roof ECU (Sliding Roof Driver Gear Sub-assembly)) |
| *5 | Front view of wire harness connector (to Power Window Regulator Motor Assembly (for Front Passenger Side)) | *6 | Front view of wire harness connector (to Power Window Regulator Motor Assembly (for Rear RH Side)) |
| *7 | Front view of wire harness connector (to Power Window Regulator Motor Assembly (for Rear LH Side)) | *8 | w/ Moonroof with Solar Panel |
|
| ||||
| OK | |
|
| 5.CHECK DTC OUTPUT (POWER WINDOW REGULATOR MOTOR ASSEMBLY (for REAR LH SIDE)) |
Reconnect the O6, 2A, 2D, R23*1, P4, O2 and N2 connectors.
Clear the DTC (Click here).
After 10 seconds have elapsed, check if the trouble occurs again.
Check for DTCs again.
| Result | Proceed to |
| DTC B2325 is output | A |
| DTC B2325 is not output | B |
|
| ||||
| A | |
|
| 6.CHECK DTC OUTPUT (MULTIPLEX NETWORK MASTER SWITCH ASSEMBLY) |
Reconnect the Q4 connector.
Disconnect the O6 connector.
Clear the DTC (Click here).
After 10 seconds have elapsed, check if the trouble occurs again.
Check for DTCs again.
| Result | Proceed to |
| DTC B2325 is output | A |
| DTC B2325 is not output | B |
|
| ||||
| A | |
|
| 7.CHECK DTC OUTPUT (POWER WINDOW REGULATOR MOTOR ASSEMBLY (for REAR RH SIDE)) |
Reconnect the O6 connector.
Disconnect the P4 connector.
Clear the DTC (Click here).
After 10 seconds have elapsed, check if the trouble occurs again.
Check for DTCs again.
| Result | Proceed to |
| DTC B2325 is output | A |
| DTC B2325 is not output | B |
|
| ||||
| A | |
|
| 8.CHECK DTC OUTPUT (POWER WINDOW REGULATOR MOTOR ASSEMBLY (for DRIVER SIDE)) |
Reconnect the P4 connector.
Disconnect the O2 connector.
Clear the DTC (Click here).
After 10 seconds have elapsed, check if the trouble occurs again.
Check for DTCs again.
| Result | Proceed to |
| DTC B2325 is output | A |
| DTC B2325 is not output | B |
|
| ||||
| A | |
|
| 9.CHECK DTC OUTPUT (POWER WINDOW REGULATOR MOTOR ASSEMBLY (for FRONT PASSENGER SIDE)) |
Reconnect the O2 connector.
Disconnect the N2 connector.
Clear the DTC (Click here).
After 10 seconds have elapsed, check if the trouble occurs again.
Check for DTCs again.
| Result | Proceed to |
| DTC B2325 is output (w/ Moonroof with Solar Panel) | A |
| DTC B2325 is output (w/o Moonroof with Solar Panel) | B |
| DTC B2325 is not output | C |
|
| ||||
|
| ||||
| A | |
|
| 10.CHECK DTC OUTPUT (SLIDING ROOF ECU (SLIDING ROOF DRIVE GEAR SUB-ASSEMBLY)) |
Reconnect the N2 connector.
Disconnect the R23 connector.
Clear the DTC (Click here).
After 10 seconds have elapsed, check if the trouble occurs again.
Check for DTCs again.
| Result | Proceed to |
| DTC B2325 is output | A |
| DTC B2325 is not output | B |
|
| ||||
| A | ||
 | ||
| ||
