HEATING / AIR CONDITIONING COMPRESSOR INSTALLATION
PROCEDURE

 1.ADJUST COMPRESSOR OIL
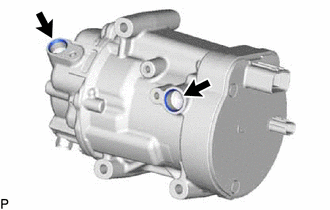
When replacing the compressor with motor assembly with a new one, gradually discharge the inert gas from the service valve, and drain the following amount of oil from the new compressor with motor assembly before installation.
- Standard:
(Oil capacity inside the new compressor with motor assembly: 110 to 125 cc (3.8 to 4.2 fl. oz)) - (Remaining oil amount in the removed compressor with motor assembly) = (Oil amount to be removed from the new compressor)
- NOTICE:
- ·
If a new compressor with motor assembly is installed without removing some oil, there will be too much oil in the system due to the oil remaining in the pipes of the vehicle. Excessive oil in the system prevents heat exchange in the refrigeration cycle and causes ineffective cooling.
·If the amount of oil remaining in the old compressor with motor assembly is too small, check the air conditioning system for oil leaks.
·Be sure to use ND-OIL 11 or equivalent compressor oil. If any compressor oil other than ND-OIL 11 is used, compressor with motor assembly insulation performance may decrease, resulting in leakage of electric power.
88370
2.INSTALL COMPRESSOR WITH MOTOR ASSEMBLY
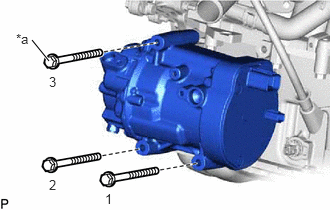
| *a | Bolt (A) |
Temporarily install the compressor with motor assembly with the bolt (A).
Install the compressor with motor assembly and bracket with the 3 bolts.
- Torque:
- 25 N*m (255 kgf*cm, 18 ft.*lbf)
- HINT:
-
Tighten the 3 bolts in the order shown in the illustration.
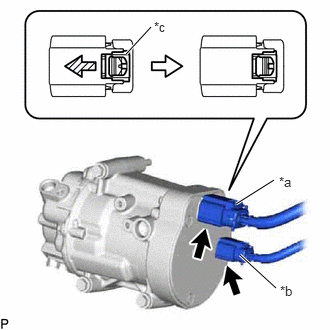
| *a | Connector (A) |
| *b | Connector (B) |
| *c | Green-colored Lock |

|
Slide |
Connect the connector (B).
Connect the connector (A) and slide the green-colored lock as shown in the illustration to lock it securely.
- CAUTION:
-
Make sure to wear insulated gloves.
- NOTICE:
-
Make sure that the connector is connected securely.
Connect the bracket with the bolt.
- Torque:
- 8.0 N*m (82 kgf*cm, 71 in.*lbf)
88704
3.CONNECT SUCTION HOSE SUB-ASSEMBLY
Remove the vinyl tape from the suction hose sub-assembly.
Sufficiently apply compressor oil to a new O-ring and the fitting surface of the compressor with motor assembly.
- Compressor Oil:
ND-OIL 11 or equivalent
Install the O-ring to the suction hose sub-assembly.
- NOTICE:
- ·
Keep the O-ring and O-ring fitting surface free of foreign matter.
·Do not use any compressor oil other than ND-OIL 11 or equivalent. If any compressor oil other than ND-OIL 11 or equivalent is used, compressor motor insulation performance may decrease, resulting in leakage of electric power.
Connect the suction hose sub-assembly to the compressor with motor assembly with the bolt.
- Torque:
- 9.8 N*m (100 kgf*cm, 87 in.*lbf)
88703
4.CONNECT DISCHARGE HOSE SUB-ASSEMBLY
Remove the vinyl tape from the discharge hose sub-assembly.
Sufficiently apply compressor oil to a new O-ring and the fitting surface of the compressor with motor assembly.
- Compressor Oil:
ND-OIL 11 or equivalent
Install the O-ring to the discharge hose sub-assembly.
- NOTICE:
- ·
Keep the O-ring and O-ring fitting surface free of foreign matter.
·Do not use any compressor oil other than ND-OIL 11 or equivalent. If any compressor oil other than ND-OIL 11 or equivalent is used, compressor motor insulation performance may decrease, resulting in leakage of electric power.
Connect the discharge hose sub-assembly to the compressor with motor assembly with the bolt.
- Torque:
- 9.8 N*m (100 kgf*cm, 87 in.*lbf)
17751
5.INSTALL INLET NO. 1 AIR CLEANER
17771A
6.INSTALL AIR CLEANER BRACKET
17701
7.INSTALL AIR CLEANER CASE SUB-ASSEMBLY
17801
8.INSTALL AIR CLEANER FILTER ELEMENT SUB-ASSEMBLY
17705
9.INSTALL AIR CLEANER CAP SUB-ASSEMBLY
17752
10.INSTALL INLET NO. 2 AIR CLEANER
53289A
11.INSTALL RADIATOR SUPPORT OPENING COVER
51441
12.INSTALL NO. 1 ENGINE UNDER COVER
G3834
13.INSTALL SERVICE PLUG GRIP
14.CHARGE AIR CONDITIONING SYSTEM WITH REFRIGERANT
for HFC-134a (R134a):
Click hereVehicle Interior>HEATING / AIR CONDITIONING>REFRIGERANT(for HFC-134a(R134a))>REPLACEMENT
for HFO-1234yf (R1234yf):
Click hereVehicle Interior>HEATING / AIR CONDITIONING>REFRIGERANT(for HFO-1234yf(R1234yf))>REPLACEMENT
15.WARM UP COMPRESSOR
for HFC-134a (R134a):
Click hereVehicle Interior>HEATING / AIR CONDITIONING>REFRIGERANT(for HFC-134a(R134a))>REPLACEMENT
for HFO-1234yf (R1234yf):
Click hereVehicle Interior>HEATING / AIR CONDITIONING>REFRIGERANT(for HFO-1234yf(R1234yf))>REPLACEMENT
16.INSPECT FOR REFRIGERANT LEAK
for HFC-134a (R134a):
Click hereVehicle Interior>HEATING / AIR CONDITIONING>REFRIGERANT(for HFC-134a(R134a))>REPLACEMENT
for HFO-1234yf (R1234yf):
Click hereVehicle Interior>HEATING / AIR CONDITIONING>REFRIGERANT(for HFO-1234yf(R1234yf))>REPLACEMENT