VEHICLE PROXIMITY NOTIFICATION SYSTEM VEHICLE PROXIMITY NOTIFICATION SYSTEM There is No Sound Made
DESCRIPTION
The hybrid vehicle control ECU controls the vehicle approaching speaker assembly based on received signals.
WIRING DIAGRAM
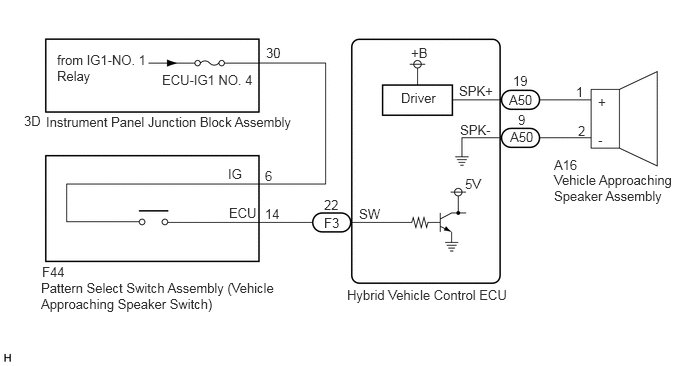
CAUTION / NOTICE / HINT
- NOTICE:
-
Inspect the fuses for circuits related to this system before performing the following inspection procedure.
PROCEDURE
Turn the power switch off.
Connect the GTS to the DLC3.
Turn the power switch on (IG).
Turn the GTS on.
Enter the following menus: Powertrain / Hybrid Control / Trouble Codes.
- Powertrain > Hybrid Control > Trouble Codes
- 50001 397
Check for DTCs.
- Result:
Result Proceed to Hybrid control system DTCs are not output A Hybrid control system DTCs are output B
A
B
Click hereEngine / Hybrid System>HYBRID / BATTERY CONTROL>HYBRID CONTROL SYSTEM>DIAGNOSTIC TROUBLE CODE CHART
Turn the power switch off.
Connect the GTS to the DLC3.
Turn the power switch on (IG).
Turn the GTS on.
Enter the following menus: Body Electrical / Vehicle Proximity Notification System / Data List.
Read the Data List according to the display on the GTS.
- Body Electrical > Vehicle Proximity Notification System > Data List
-
Tester Display Measurement Item Range Normal Condition Diagnostic Note Operation Cancel SW Pattern select switch assembly (vehicle approaching speaker switch) signal OFF or ON OFF: Pattern select switch assembly (vehicle approaching speaker switch) is not pressed.
ON: Pattern select switch assembly (vehicle approaching speaker switch) is pressed.-
- Body Electrical > Vehicle Proximity Notification System > Data List
-
Tester Display Operation Cancel SW - 50003 393 5
- Result:
Result Proceed to The GTS display changes according to the operation of the vehicle approaching speaker switch A The GTS display does not change according to the operation of the vehicle approaching speaker switch B
A
B
Turn the power switch off.
Connect the GTS to the DLC3.
Turn the power switch on (IG).
Turn the GTS on.
Enter the following menus: Body Electrical / Vehicle Proximity Notification System / Active Test.
Perform the Active Test according to the display on the GTS.
- Body Electrical > Vehicle Proximity Notification System > Active Test
-
Tester Display Measurement Item Control Range Diagnostic Note Proximity Sound (Vehicle Stationary) Proximity sound (Vehicle stationary) OFF or ON Produces warning sound when vehicle is stopped
- Body Electrical > Vehicle Proximity Notification System > Active Test
-
Tester Display Proximity Sound (Vehicle Stationary) - 50004 359 2
- Result:
Result Proceed to The warning sound is produced A The warning sound is not produced B
A
B
Remove the vehicle approaching speaker assembly.
Click hereVehicle Exterior>VEHICLE PROXIMITY NOTIFICATION SYSTEM>VEHICLE APPROACHING SPEAKER>REMOVAL
Inspect the vehicle approaching speaker assembly.
Click hereVehicle Exterior>VEHICLE PROXIMITY NOTIFICATION SYSTEM>VEHICLE APPROACHING SPEAKER>INSPECTION
- Result:
Proceed to OK NG
OK
NG
Click hereVehicle Exterior>VEHICLE PROXIMITY NOTIFICATION SYSTEM>VEHICLE APPROACHING SPEAKER>REMOVAL
Disconnect the A50 hybrid vehicle control ECU connector.
Measure the resistance according to the value(s) in the table below.
- Standard Resistance:
Tester Connection Condition Specified Condition A50-19 (SPK+) - A16-1 (+) Always Below 1 Ω A50-9 (SPK-) - A16-2 (-) Always Below 1 Ω A50-19 (SPK+) or A16-1 (+) - Body ground Always 10 kΩ or higher A50-9 (SPK-) or A16-2 (-) - Body ground Always 10 kΩ or higher
- Result:
Proceed to OK NG
OK
NG
Remove the pattern select switch assembly (vehicle approaching speaker switch).
Click hereVehicle Exterior>VEHICLE PROXIMITY NOTIFICATION SYSTEM>VEHICLE APPROACHING SPEAKER SWITCH>REMOVAL
Inspect the pattern select switch assembly (vehicle approaching speaker switch).
Click hereVehicle Exterior>VEHICLE PROXIMITY NOTIFICATION SYSTEM>VEHICLE APPROACHING SPEAKER SWITCH>INSPECTION
- Result:
Proceed to OK NG
OK
NG
Click hereVehicle Exterior>VEHICLE PROXIMITY NOTIFICATION SYSTEM>VEHICLE APPROACHING SPEAKER SWITCH>REMOVAL
Measure the voltage according to the value(s) in the table below.
- Standard Voltage:
Tester Connection Condition Specified Condition F44-6 (IG) - Body ground Power switch on (IG) 11 to 14 V Power switch off Below 1 V
- Result:
Proceed to OK NG
OK
NG
Disconnect the F3 hybrid vehicle control ECU connector.
Measure the resistance according to the value(s) in the table below.
- Standard Resistance:
Tester Connection Condition Specified Condition F3-22 (SW) - F44-14 (ECU) Always Below 1 Ω F3-22 (SW) or F44-14 (ECU) - Body ground Always 10 kΩ or higher
- Result:
Proceed to OK NG
OK
NG
Disconnect the 3D instrument panel junction block assembly connector.
Measure the voltage according to the value(s) in the table below.
- Standard Voltage:
Tester Connection Condition Specified Condition F44-6 (IG) - 3D-30 Always Below 1 Ω F44-6 (IG) or 3D-30 - Body ground Always 10 kΩ or higher
- Result:
Proceed to OK NG
OK
NG