LIGHTING (EXT) LIGHTING SYSTEM High Beam Headlight Circuit
DESCRIPTION
The No. 1 headlight ECU sub-assemblies control the high beam headlights.
WIRING DIAGRAM
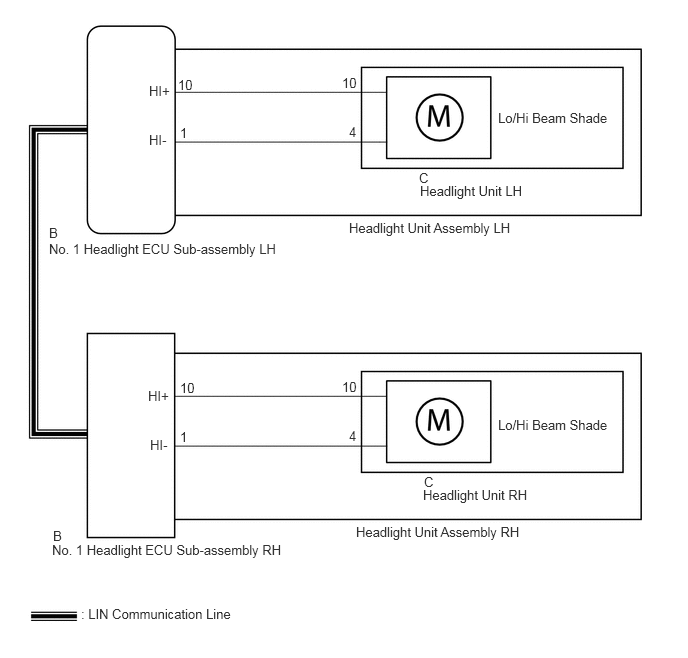
CAUTION / NOTICE / HINT
- NOTICE:
-
If the No. 1 headlight ECU sub-assembly LH has been replaced, it is necessary to synchronize the vehicle information and initialize the No. 1 headlight ECU sub-assembly LH.
-
Click hereVehicle Exterior>LIGHTING (EXT)>LIGHTING SYSTEM>INITIALIZATION
PROCEDURE
Connect the GTS to the DLC3.
Turn the power switch on (IG).
Turn the GTS on.
Enter the following menus: Body Electrical / HL AutoLeveling / Active Test.
Perform the Active Test according to the display on the GTS.
- Body Electrical > HL AutoLeveling > Active Test
-
Tester Display Measurement Item Control Range Diagnostic Note Headlight High Beam High beam headlights ON or OFF -
- Body Electrical > HL AutoLeveling > Active Test
-
Tester Display Headlight High Beam - 50004 361 6
- OK:
High beam headlights illuminate.
- Result:
Result Proceed to OK A NG (for LH Side) B NG (for RH Side) C
A
B
C
Remove the headlight assembly LH.
Click hereVehicle Exterior>LIGHTING (EXT)>HEADLIGHT ASSEMBLY>REMOVAL
Remove the headlight unit LH from the headlight assembly LH.
Click hereVehicle Exterior>LIGHTING (EXT)>HEADLIGHT ASSEMBLY>DISASSEMBLY
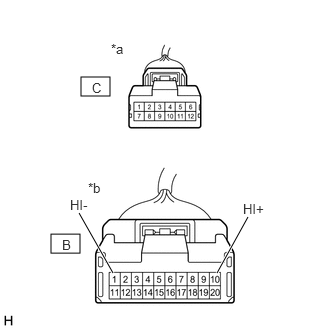
| *a | Component without harness connected
(to Headlight Unit LH) |
| *b | Component without harness connected
(to No. 1 Headlight ECU Sub-assembly LH) |
Measure the resistance according to the value(s) in the table below.
- Standard Resistance:
Tester Connection Condition Specified Condition B-10 (HI+) - C-10 Always Below 1 Ω B-1 (HI-) - C-4 Always Below 1 Ω
- Result:
Proceed to OK NG
OK
NG
Reconnect the C headlight unit LH connector.
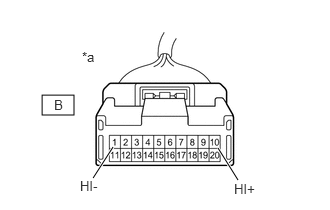
| *a | Component without harness connected
(to No. 1 Headlight ECU Sub-assembly LH) |
Apply auxiliary battery voltage to the headlight unit LH and check that the LO/HI beam shade operates normally.
- OK:
Condition Specified Condition Auxiliary battery positive (+) → B-10 (HI+)
Auxiliary battery negative (-) → B-1 (HI-)LO/HI beam shade operates normally
- Result:
Proceed to OK NG
OK
NG
Remove the headlight assembly RH.
Click hereVehicle Exterior>LIGHTING (EXT)>HEADLIGHT ASSEMBLY>REMOVAL
Remove the headlight unit RH from the headlight assembly RH.
Click hereVehicle Exterior>LIGHTING (EXT)>HEADLIGHT ASSEMBLY>DISASSEMBLY
| *a | Component without harness connected
(to Headlight Unit RH) |
| *b | Component without harness connected
(to No. 1 Headlight ECU Sub-assembly RH) |
Measure the resistance according to the value(s) in the table below.
- Standard Resistance:
Tester Connection Condition Specified Condition B-10 (HI+) - C-10 Always Below 1 Ω B-1 (HI-) - C-4 Always Below 1 Ω
- Result:
Proceed to OK NG
OK
NG
Reconnect the C headlight unit RH connector.
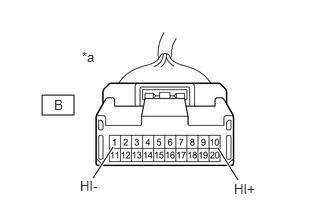
| *a | Component without harness connected
(to No. 1 Headlight ECU Sub-assembly RH) |
Apply auxiliary battery voltage to the headlight unit RH and check that the LO/HI beam shade operates normally.
- OK:
Condition Specified Condition Auxiliary battery positive (+) → B-10 (HI+)
Auxiliary battery negative (-) → B-1 (HI-)LO/HI beam shade operates normally
- Result:
Proceed to OK NG
OK
NG