HEATING / AIR CONDITIONING AIR CONDITIONING SYSTEM B1449/49 Rear Air Outlet Damper Control Servo Motor Circuit
DESCRIPTION
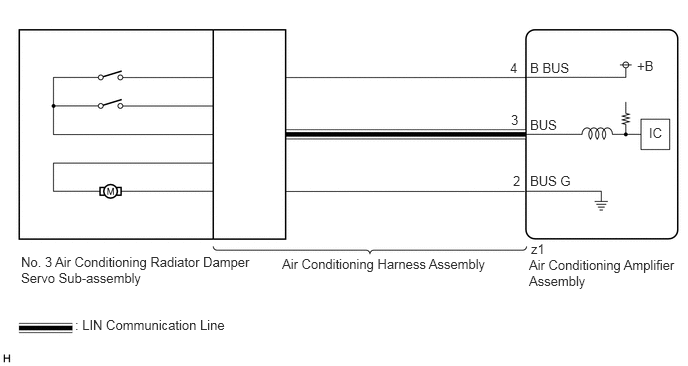
The No. 3 air conditioning radiator damper servo sub-assembly sends pulse signals to inform the air conditioning amplifier assembly of the damper position. The air conditioning amplifier assembly activates the motor (normal or reverse) based on these signals to move the air mix damper to the appropriate position, which controls the rear air outlet switching. The air conditioning amplifier assembly communicates with the servo through a communication/driver IC and wiring assembly called the air conditioning harness assembly.
| DTC No. | Detection Item | DTC Detection Condition | Trouble Area | Memory |
|---|---|---|---|---|
| B1449/49 | Rear Air Outlet Damper Control Servo Motor Circuit | Air mix damper position sensor value does not change even if air conditioning amplifier assembly operates No. 3 air conditioning radiator damper servo sub-assembly | ·
No. 3 air conditioning radiator damper servo sub-assembly ·
Air conditioning harness assembly ·
Air conditioning amplifier assembly ·
Air conditioning radiator assembly |
Memorized
(30 sec. or more)* |
*: The air conditioning amplifier assembly stores this DTC if the malfunction has occurred for the period of time indicated in the brackets.
WIRING DIAGRAM
CAUTION / NOTICE / HINT
- HINT:
- ·
Confirm that no mechanical problem is present because this DTC can be output when either a damper link or damper is mechanically locked.
·When installing the damper servo motor, make sure to install it correctly.
Click hereVehicle Interior>HEATING / AIR CONDITIONING>AIR CONDITIONING UNIT>REASSEMBLY
PROCEDURE
Check for DTCs.
Click hereVehicle Interior>HEATING / AIR CONDITIONING>AIR CONDITIONING SYSTEM>DTC CHECK / CLEAR
- Body Electrical > Air Conditioner > Trouble Codes
- 50001 121
- Result:
Result Proceed to DTC B1497/97 is output A DTC B1497/97 is not output B
A
B
Check that the No. 3 air conditioning radiator damper servo sub-assembly is installed correctly.
Click hereVehicle Interior>HEATING / AIR CONDITIONING>AIR CONDITIONING UNIT>REASSEMBLY
- OK:
The No. 3 air conditioning radiator damper servo sub-assembly is installed correctly.
- Result:
Proceed to OK NG
OK
NG
Check for a wire harness caught between the links of the motors and dampers.
- OK:
No wire harnesses are caught between the links of the motors and dampers.
- Result:
Proceed to OK NG
OK
NG
Remove the No. 3 air conditioning radiator damper servo sub-assembly.
Click hereVehicle Interior>HEATING / AIR CONDITIONING>AIR CONDITIONING UNIT>DISASSEMBLY
Operate the dampers by hand.
- OK:
The dampers are easily operated by hand.
- Result:
Proceed to OK NG
OK
NG
Remove the No. 2 air conditioning radiator damper servo sub-assembly.
Click hereVehicle Interior>HEATING / AIR CONDITIONING>AIR CONDITIONING UNIT>DISASSEMBLY
Connect the No. 2 air conditioning radiator damper servo sub-assembly connector to the No. 3 air conditioning radiator damper servo sub-assembly.
Connect the GTS to the DLC3.
Turn the power switch on (IG).
Turn the GTS on.
Enter the following menus: Body Electrical / Air Conditioner / Active Test.
Perform the Active Test according to the display on the GTS.
- Body Electrical > Air Conditioner > Active Test
-
Tester Display Measurement Item Control Range Diagnostic Note Air Outlet Servo Pulse (P) No. 2 air conditioning radiator damper servo sub-assembly pulse* Min.: 128
Max.: 383Operates between 164 to 256 pulses
*: Thus this Active Test is for the No. 2 air conditioning radiator damper servo sub-assembly, in this case it is used to check the operation of the No. 3 air conditioning radiator damper servo sub-assembly.
- Body Electrical > Air Conditioner > Active Test
-
Tester Display Air Outlet Servo Pulse (P) - 50004 121 97
- OK:
The No. 3 air conditioning radiator damper servo sub-assembly operates.
- Result:
Proceed to OK NG
OK
NG