INSTALLATION
Removal / installation · Vehicles built Nov 2005 – Dec 2006
Versions by build date: Nov 2005 – Dec 2006 Jan 2007 – Jul 2007 from Aug 2007
| 1.
INSTALL TIE ROD END SUB-ASSEMBLY LH |
 |
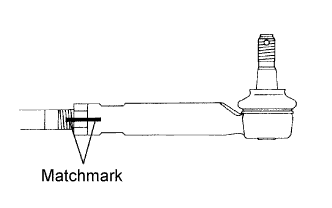
- Screw the lock nut and tie rod end sub-assembly LH on the rack end until the matchmarks are aligned and temporarily tighten the lock nut.
- HINT:
- Fully tighten the lock nut after adjusting toe-in.
| 2.
INSTALL TIE ROD END SUB-ASSEMBLY RH |
|
- HINT:
- Use the same procedures described for the tie rod end sub-assembly LH.
| 3.
INSTALL STEERING GEAR ASSEMBLY |
|
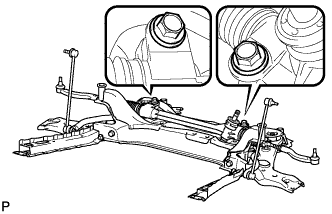
Install the steering gear onto the front suspension crossmember with the 2 bolts and 2 nuts.
-
Torque:
- 138 N*m{
1407 kgf*cm
, 102 ft.*lbf
}
- NOTICE:
- Keep the nut from rotating while turning the bolt.
| 4.
INSTALL INTERMEDIATE SHAFT |
|
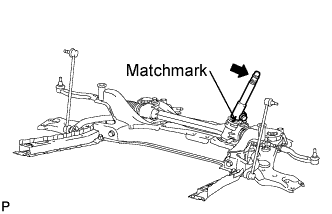
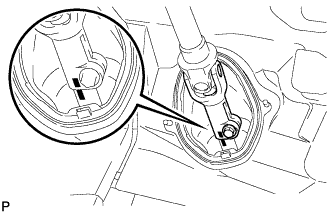
Align the matchmarks and install the intermediate shaft onto the steering gear.
-
Torque:
- 35 N*m{
360 kgf*cm
, 26 ft.*lbf
}
| 5.
INSTALL NO. 1 STEERING COLUMN HOLE COVER SUB-ASSEMBLY |
|
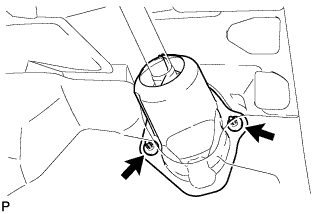
Install the column hole cover onto the steering gear with a new clamp.
| 6.
INSTALL ENGINE ASSEMBLY WITH TRANSAXLE |
|
for 1AZ-FE:
Install the engine with transaxle (Click here).
for 2AZ-FE:
Install the engine with transaxle (Click here).
for 2AD-FHV
Install the engine with transaxle (Click here).
for 2AD-FTV
Install the engine with transaxle (Click here).
| 7.
INSTALL NO. 1 STEERING COLUMN HOLE COVER SUB-ASSEMBLY |
|
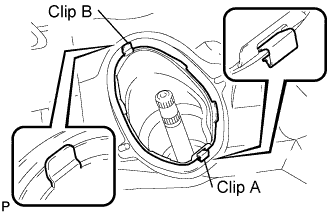
- Attach clip B onto the body portion and install the No. 1 hole cover onto the body portion with clip A.
- NOTICE:
- Make sure that the lip portion of the No. 1 hole cover is not damaged.
| 8.
CONNECT STEERING SLIDING YOKE SUB-ASSEMBLY |
|
Align the matchmarks and install the sliding yoke onto the intermediate shaft.
-
Torque:
- 35 N*m{
360 kgf*cm
, 26 ft.*lbf
}
| 9.
INSTALL COLUMN HOLE COVER SILENCER SHEET |
|
Install the column hole cover silencer sheet with the 2 clips.
Install the floor carpet.
| 10.
CONNECT TIE ROD END SUB-ASSEMBLY LH |
|
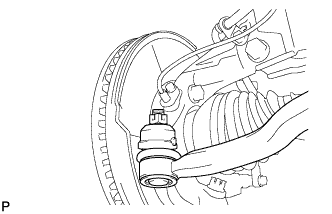
Connect the tie rod end onto the steering knuckle with the castle nut.
-
Torque:
- 49 N*m{
500 kgf*cm
, 36 ft.*lbf
}
- NOTICE:
- If the holes for the clip are not aligned, tighten the nut up to 60° further.
Install a new cotter pin.
| 11.
CONNECT TIE ROD END SUB-ASSEMBLY RH |
|
- HINT:
- Use the same procedure for the RH side as for the LH side.
| 12.
INSTALL FRONT WHEELS |
|
-
Torque:
- 103 N*m{
1,050 kgf*cm
, 76 ft.*lbf
}
| 13.
CONNECT CABLE TO NEGATIVE BATTERY TERMINAL |
|
| 14.
POSITION FRONT WHEELS FACING STRAIGHT AHEAD |
|
| 15.
INSPECT AND ADJUST FRONT WHEEL ALIGNMENT |
|
Inspect and adjust the wheel alignment (Click here).