Brake Warning Light Remains ON
Circuit diagnosis · Vehicles built from Aug 2008
Versions by build date: Nov 2005 – Dec 2006 Jan 2007 – Jul 2007 Aug 2007 – Jul 2008 from Aug 2008
DESCRIPTION
If any of the following conditions are detected, the brake warning light remains on:
- The ECU connectors are disconnected from the skid control ECU.
- The brake fluid level is insufficient.
- The parking brake is applied.
- The EBD is defective.
WIRING DIAGRAM
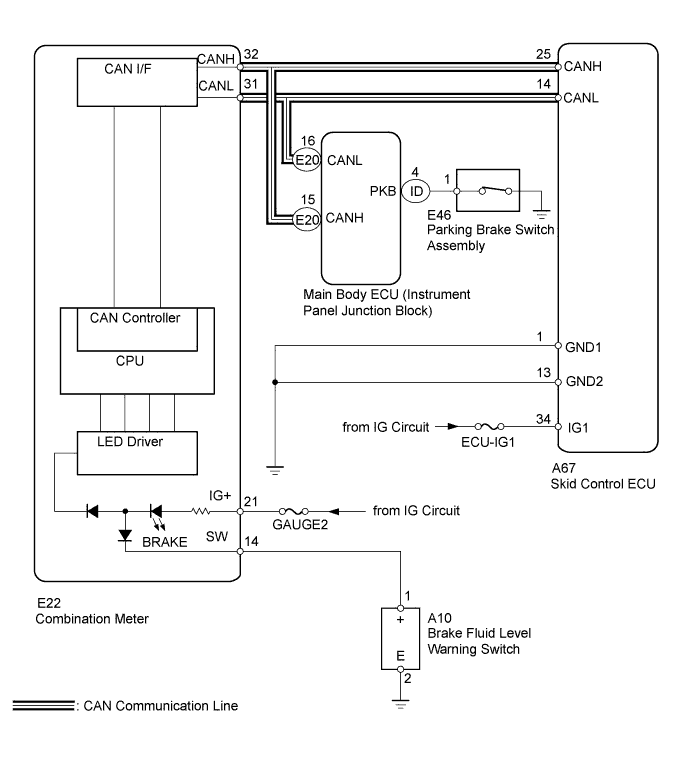

INSPECTION PROCEDURE
- NOTICE:
- When replacing the brake actuator assembly, perform zero point calibration (Click here).
| 1. PREPARE FOR INSPECTION |
 |
Check that both of the following conditions are satisfied.
- The brake fluid level in the brake master cylinder reservoir is correct.
- The parking brake is released.
- HINT:
- When the ABS warning light remains illuminated, repair the malfunctions in the ABS system first.
| NEXT |
|
 |
|
| 2. CHECK DTC FOR ABS |
|
Check if any ABS DTCs are output (Click here).
- Result:
Result
|
Proceed to
|
DTC is not output.
|
A
|
DTC is output.
|
B
|
|
B |
 |
|
| REPAIR CIRCUITS INDICATED BY OUTPUT DTCS (Click here)
|
|
|
| A |
|
|
|
| 3. CHECK CAN COMMUNICATION SYSTEM |
|
Check if a CAN communication system DTC is output (Click here).
- Result:
Result
|
Proceed to
|
DTC is not output.
|
A
|
DTC is output.
|
B
|
|
B |
|
|
|
|
| A |
|
|
|
| 4. INSPECT SKID CONTROL ECU CONNECTOR |
|
Check if the skid control ECU connector is properly installed.
- OK:
- The skid control ECU connector is properly installed.
|
NG |
|
|
| CONNECT CONNECTOR TO ECU SECURELY |
|
|
| OK |
|
|
|
| 5. CHECK HARNESS AND CONNECTOR (SKID CONTROL ECU - BATTERY AND BODY GROUND) |
|
- Disconnect the skid control ECU connector.
Measure the resistance according to the value(s) in the table below.
- Standard Resistance:
Tester Connection
|
Condition
|
Specified Condition
|
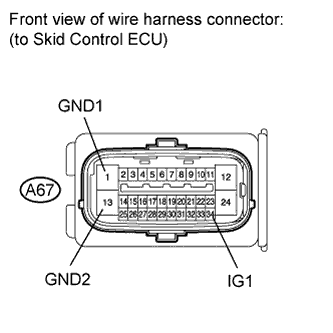
A67-1 (GND1) - Body ground
|
Always
|
Below 1 Ω
|
A67-13 (GND2) - Body ground
|
Always
|
Below 1 Ω
|
Measure the voltage according to the value(s) in the table below.
- Standard Voltage:
Tester Connection
|
Switch Condition
|
Specified Condition
|
A67-34 (IG1) - Body ground
|
Ignition switch ON
|
11 to 14 V
|
|
NG |
|
|
| REPAIR OR REPLACE HARNESS OR CONNECTOR |
|
|
| OK |
|
|
|
| 6. READ VALUE USING INTELLIGENT TESTER (PARKING BRAKE SWITCH) |
|
Using the Data List, check for proper functioning of the parking brake switch.
ABS/VSC/TRC:
Tester Display
|
Measurement Item/Range
|
Normal Condition
|
Diagnostic Note
|
Parking Brake SW
|
Parking brake switch / ON or OFF
|
ON: Parking brake applied
OFF: Parking brake released
|
-
|
- OK:
- When the parking brake lever is operated, the display changes as shown above.
|
NG |
 |
|
|
|
| OK |
|
|
|
| 7. INSPECT BRAKE FLUID LEVEL WARNING SWITCH |
|
- Remove the reservoir tank cap and strainer.
Disconnect the brake fluid level warning switch connector.
Measure the resistance according to the value(s) in the table below.
- HINT:
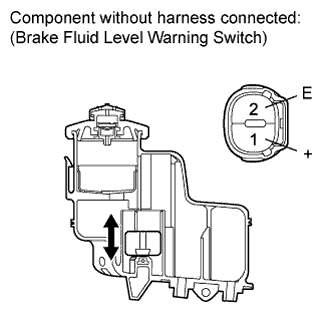
- A float is placed inside the reservoir. Its position can be changed by increasing or decreasing the brake fluid level.
- Standard Resistance:
Tester Connection
|
Condition
|
Specified Condition
|
1 (+) - 2 (E)
|
Float up (Switch off)
|
10 kΩ or higher
|
1 (+) - 2 (E)
|
Float down (Switch on)
|
Below 1 Ω
|
- Result:
Result
|
Proceed to
|
OK
|
A
|
NG
|
for LHD
|
B
|
for RHD
|
C
|
- HINT:
- If there is no problem after the above check is finished, adjust the brake fluid level to the MAX level.
|
B |
|
|
| REPLACE BRAKE MASTER CYLINDER RESERVOIR SUB-ASSEMBLY (Click here)
|
|
|
|
C |
|
|
| REPLACE BRAKE MASTER CYLINDER RESERVOIR SUB-ASSEMBLY (Click here)
|
|
|
| A |
|
|
|
| 8. CHECK HARNESS AND CONNECTOR (BRAKE FLUID LEVEL WARNING SW - COMBINATION METER/BODY GROUND) |
|
- Disconnect the combination meter connector.
Disconnect the brake fluid level warning switch connector.
Measure the resistance according to the value(s) in the table below.
- Standard Resistance:
Tester Connection
|
Condition
|
Specified Condition
|
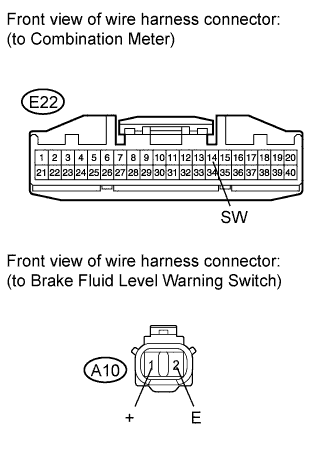
E22-14 (SW) - A10-1 (+)
|
Always
|
Below 1 Ω
|
E22-14 (SW) - Body ground
|
Always
|
10 kΩ or higher
|
A10-2 (E) - Body ground
|
Always
|
Below 1 Ω
|
|
NG |
|
|
| REPAIR OR REPLACE HARNESS OR CONNECTOR |
|
|
| OK |
|
|
|
| 9. INSPECT COMBINATION METER ASSEMBLY |
|
Inspect the combination meter (Click here).
|
NG |
|
|
|
|
| OK |
|
 |
|
|
| 10. INSPECT PARKING BRAKE SWITCH ASSEMBLY |
|
- Remove the parking brake switch (Click here).
Measure the resistance according to the value(s) in the table below.
- Standard Resistance:
Tester Connection
|
Switch Condition
|
Specified Condition
|
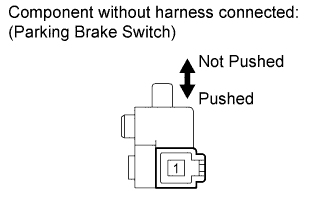
1 - Body ground
|
Parking brake switch on
(Switch pin not pushed)
|
Below 1 Ω
|
Parking brake switch off
(Switch pin pushed)
|
10 kΩ or higher
|
|
NG |
|
|
| REPLACE PARKING BRAKE SWITCH ASSEMBLY (Click here)
|
|
|
| OK |
|
|
|
| 11. CHECK HARNESS AND CONNECTOR (PARKING BRAKE SWITCH - JUNCTION BLOCK/BODY GROUND) |
|
- Disconnect the junction block connector.
Disconnect the parking brake switch connector.
Measure the resistance according to the value(s) in the table below.
- Standard Resistance:
Tester Connection
|
Condition
|
Specified Condition
|
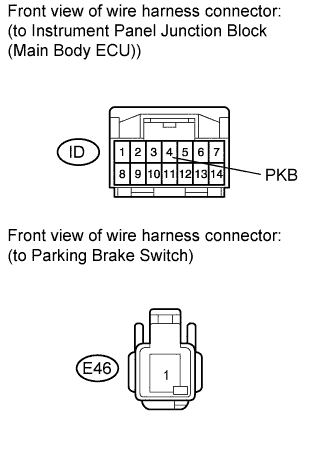
ID-4 (PKB) - E46-1
|
Always
|
Below 1 Ω
|
ID-4 (PKB) - Body ground
|
Always
|
10 kΩ or higher
|
|
NG |
|
|
| REPAIR OR REPLACE HARNESS OR CONNECTOR |
|
|
| OK |
|
|
|
| REPLACE INSTRUMENT PANEL JUNCTION BLOCK |
|