2AD-FTV ENGINE MECHANICAL ENGINE UNIT REASSEMBLY
CAUTION / NOTICE / HINT
- NOTICE:
- ·
When replacing the injectors (including shuffling the injectors between the cylinders), common rail assembly, intake manifold or cylinder head sub-assembly, it is necessary to replace the injection pipes with new ones.
·When replacing the fuel supply pump assembly, common rail assembly, intake manifold or cylinder head sub-assembly, it is necessary to replace the fuel inlet pipe sub-assembly with a new one.
PROCEDURE

 11415
1.INSTALL CYLINDER BLOCK WATER DRAIN COCK SUB-ASSEMBLY
Apply adhesive to the cylinder block water drain cock sub-assembly.
- Seal packing:
Toyota Genuine Seal Packing 1282B, Three Bond 1282B or equivalent
Install the cylinder block water drain cock sub-assembly.
- Torque:
- 25 N*m (255 kgf*cm, 18 ft.*lbf)
13620B
2.INSTALL ENGINE BALANCER ASSEMBLY
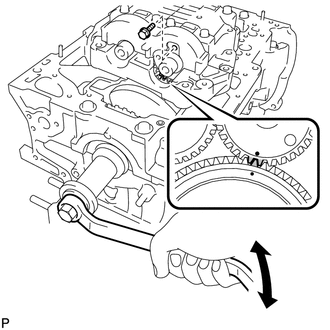
| *1 | Service Bolt |
| *2 | Timing Mark |
Turn the crankshaft with a wrench to align the timing mark of the drive gear with that of the driven gear (1 dot mark each), and then mesh the gears and install the engine balancer assembly to the engine.
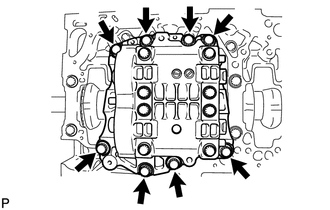
Temporarily install the engine balancer bolts.
- HINT:
-
The engine balancer bolts are tightened in 2 progressive steps.
Step 1
Uniformly tighten the 8 bolts in several passes in the sequence shown in the illustration.
- Torque:
- 50 N*m (510 kgf*cm, 37 ft.*lbf)
Step 2
Mark the front of the engine balancer bolts with paint.
Tighten the engine balancer bolts by 90°.
Check that the painted marks are now at a 90° angle to the front.
Remove the service bolt from the engine balancer assembly.
12216G
3.INSTALL OIL BAFFLE PLATE
Install the oil baffle plate with the 2 bolts.
- Torque:
- 9.0 N*m (92 kgf*cm, 80 in.*lbf)
11401L
4.INSTALL ENGINE REAR OIL SEAL
11115
5.SELECT CYLINDER HEAD GASKET
11115
6.INSTALL CYLINDER HEAD GASKET
11101
7.INSTALL CYLINDER HEAD SUB-ASSEMBLY
13750
8.INSPECT VALVE LASH ADJUSTER ASSEMBLY
13750
9.INSTALL VALVE LASH ADJUSTER ASSEMBLY
13801
10.INSTALL NO. 1 VALVE ROCKER ARM SUB-ASSEMBLY
13511
11.INSTALL CAMSHAFT
13471A
12.INSTALL CRANKSHAFT PULLEY SET CRANKSHAFT KEY
Install the 2 crankshaft pulley set crankshaft keys to the crankshaft.
13523
13.INSTALL CAMSHAFT TIMING SPROCKET
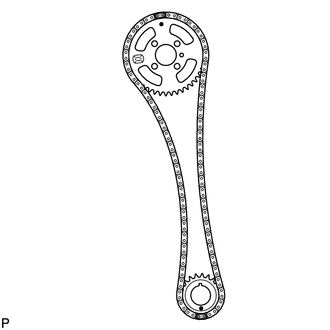
| *1 | Hole |
| *2 | Timing Mark |
| *3 | Yellow Paint Mark |
Install the crankshaft timing sprocket and camshaft timing sprocket to the chain sub-assembly so that the timing marks of the sprockets and paint marks of the chain sub-assembly are aligned.
Install the camshaft timing sprocket to the No. 2 camshaft by fitting the straight pin of the No. 2 camshaft into the hole on the camshaft timing sprocket.
Install the crankshaft timing sprocket to the crankshaft.
While holding the hexagon portion of the No. 2 camshaft, install and uniformly tighten the 4 bolts of the No. 2 camshaft.
- Torque:
- 20 N*m (204 kgf*cm, 15 ft.*lbf)
13519
14.INSTALL OIL PUMP DRIVE GEAR
Install the oil pump drive gear to the crankshaft.
13561
15.INSTALL NO. 1 CHAIN VIBRATION DAMPER
Install the No. 1 chain vibration damper with the 2 bolts.
- Torque:
- 21 N*m (214 kgf*cm, 15 ft.*lbf)
13559
16.INSTALL CHAIN TENSIONER SLIPPER
Install the chain tensioner slipper.
13540
17.INSTALL NO. 1 CHAIN TENSIONER ASSEMBLY
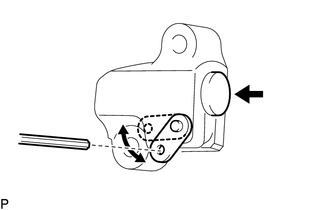
| *1 | Plunger |
| *2 | Stopper Plate |
Move the stopper plate upward to release the lock, and push the plunger deep into the No. 1 chain tensioner assembly.
Move the stopper plate downward to set the lock, and insert SST into the stopper plate hole.
- SST
- 09240-00020 (09242-00200)
Install the No. 1 chain tensioner assembly with the 2 bolts.
- Torque:
- 9.0 N*m (92 kgf*cm, 80 in.*lbf)
Remove SST.
11301C
18.INSTALL FRONT CRANKSHAFT OIL SEAL
11302
19.INSTALL TIMING CHAIN COVER SUB-ASSEMBLY
13471
20.INSTALL CRANKSHAFT PULLEY
Align the keyway of the crankshaft pulley with the key located on the crankshaft, and then slide the crankshaft pulley into place to install it.
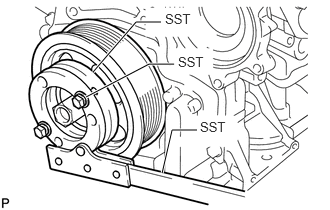
Using SST, install a new crankshaft pulley bolt.
- SST
- 09213-58014 (91551-80840)
09330-00021
- Torque:
- 300 N*m (3059 kgf*cm, 221 ft.*lbf)
15104
21.INSTALL OIL STRAINER SUB-ASSEMBLY
15677
22.INSTALL OIL FILTER BRACKET
23.INSTALL OIL FILTER ELEMENT
12102A
24.INSTALL NO. 2 OIL PAN SUB-ASSEMBLY
11201
25.INSTALL CYLINDER HEAD COVER SUB-ASSEMBLY
23699A
26.INSTALL NOZZLE HOLDER CLAMP SEAT
12108
27.INSTALL OIL FILLER CAP SUB-ASSEMBLY
16323
28.INSTALL WATER INLET HOUSING
89491
29.INSTALL ENGINE OIL LEVEL SENSOR
Install the engine oil level sensor with the 4 bolts.
- Torque:
- 7.0 N*m (71 kgf*cm, 62 in.*lbf)
15781
30.INSTALL NO. 1 OIL COOLER BRACKET
15710
31.INSTALL OIL COOLER ASSEMBLY
83530
32.INSTALL ENGINE OIL PRESSURE SWITCH ASSEMBLY
16100
33.INSTALL ENGINE WATER PUMP ASSEMBLY
89422C
34.INSTALL ENGINE COOLANT TEMPERATURE SENSOR
11401G
35.INSTALL CRANKSHAFT POSITION SENSOR
Install the crankshaft position sensor with the 2 bolts.
- Torque:
- 8.8 N*m (90 kgf*cm, 78 in.*lbf)
Connect the crankshaft position sensor harness and install the clip.
11301K
36.INSTALL CAMSHAFT POSITION SENSOR
Install the camshaft position sensor with the bolt.
- Torque:
- 8.8 N*m (90 kgf*cm, 78 in.*lbf)
23670
37.INSTALL INJECTOR ASSEMBLY
23762
38.INSTALL NO. 2 NOZZLE LEAKAGE PIPE