3ZR-FAE ENGINE CONTROL CONTINUOUSLY VARIABLE VALVE LIFT CONTROLLER INSTALLATION
CAUTION / NOTICE / HINT
- HINT:
-
Perform "Inspection After Repairs" after replacing the continuously variable valve lift controller assembly.
-
Click hereEngine / Hybrid System>3ZR-FAE ENGINE CONTROL>SFI SYSTEM>INITIALIZATION
PROCEDURE

 222A0
1.INSTALL CONTINUOUSLY VARIABLE VALVE LIFT CONTROLLER ASSEMBLY
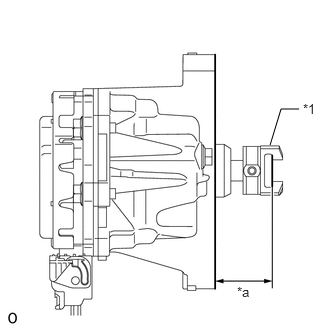
| *1 | Connector |
| *a | Protruding Distance |
Measure the protruding distance of the continuously variable valve lift controller assembly.
- HINT:
- ·
When reinstalling the continuously variable valve lift controller assembly, perform the measurement after the valve lift control actuator connector is installed.
·It is not necessary to perform this measurement when installing a new continuously variable valve lift controller assembly as the protruding distance is 34.57 to 34.73 mm (1.36 to 1.37 in.).
- Standard protruding distance:
34.57 to 34.73 mm (1.36 to 1.37 in.)
If the protruding distance of the continuously variable valve lift controller assembly is not 34.57 to 34.73 mm (1.36 to 1.37 in.), perform the Active Test and adjust the protruding distance to the specified value.
Click hereEngine / Hybrid System>3ZR-FAE ENGINE CONTROL>CONTINUOUSLY VARIABLE VALVE LIFT CONTROLLER>INSPECTION
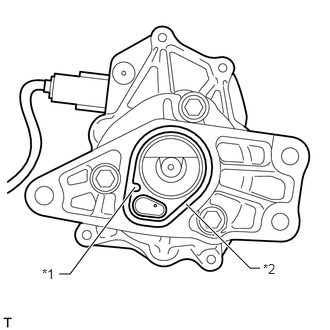
| *1 | Protrusion |
| *2 | New O-Ring |
Install a new O-ring to the continuously variable valve lift controller assembly.
- NOTICE:
- ·
Align the protrusion of the O-ring with the protrusion of the continuously variable valve lift controller assembly.
·Make sure that the O-ring is not protruding from the groove in the continuously variable valve lift controller assembly.
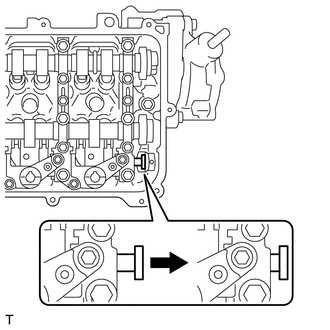
Rotate the crankshaft clockwise to retract the valve rocker shaft.
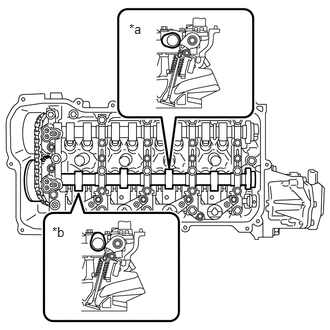
| *a | No. 3 Cylinder |
| *b | No. 1 Cylinder |
Rotate the crankshaft clockwise again until the intake camshaft position at the No. 1 cylinder and No. 3 cylinder is as shown in the illustration.
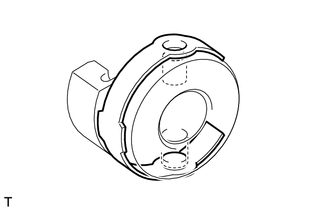
Install the valve lift control actuator connector clip to the valve lift control actuator connector.
- NOTICE:
-
Be sure to insert the protrusions of the valve lift control actuator connector clip into the holes in the valve lift control actuator connector.
- HINT:
-
When the continuously variable valve lift controller assembly is new, a valve lift control actuator connector is attached to it. Remove the valve lift control actuator connector before performing these procedures.
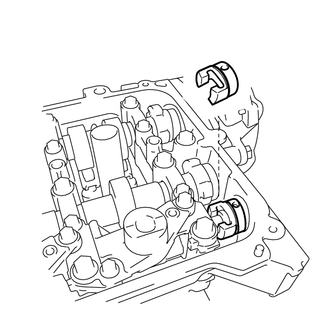
Install the valve lift control actuator connector to the valve rocker shaft.
Insert the continuously variable valve lift controller assembly into the camshaft housing sub-assembly.
Place the wire harness clamp bracket onto the stud bolts.
Install the continuously variable valve lift controller assembly to the camshaft housing with the bolt and 2 nuts.
- Torque:
- 18 N*m (184 kgf*cm, 13 ft.*lbf)
- NOTICE:
-
Make sure the O-ring is not caught between the parts.
- HINT:
-
Perform "Inspection After Repairs" after replacing the continuously variable valve lift controller assembly.
-
Click hereEngine / Hybrid System>3ZR-FAE ENGINE CONTROL>SFI SYSTEM>INITIALIZATION
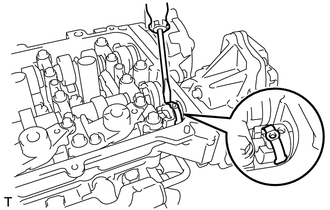
Using a screwdriver, slide the valve lift control actuator connector clip from the valve lift control actuator connector.
- NOTICE:
-
Slide only the upper part of the valve lift control actuator connector clip as the straight pin falls out from the bottom if the valve lift control actuator connector clip is completely removed.
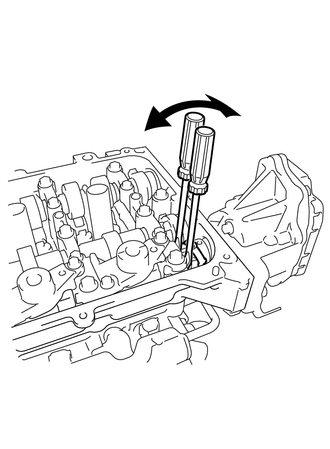
Using 2 screwdrivers, lightly pry the valve lift control actuator connector and align the hole in the valve lift control actuator connector with the hole in the continuously variable valve lift controller assembly.
- NOTICE:
- ·
Do not forcefully pry the valve lift control actuator connector.
·Do not damage the camshaft housing sub-assembly and camshaft bearing cap.
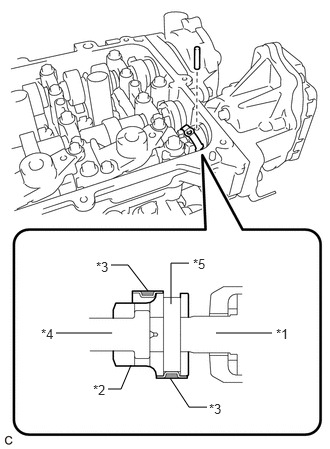
| *1 | Continuously Variable Valve Lift Controller Assembly |
| *2 | Valve Lift Control Actuator Connector |
| *3 | Valve Lift Control Actuator Connector Clip |
| *4 | Valve Rocker Shaft |
| *5 | Straight Pin |
Insert the straight pin into the valve lift control actuator connector.
- NOTICE:
-
Do not use a tool to insert the straight pin. Insert the straight pin by hand.
- HINT:
-
If the straight pin is difficult to insert, insert the pin while lightly prying the valve lift control actuator connector.
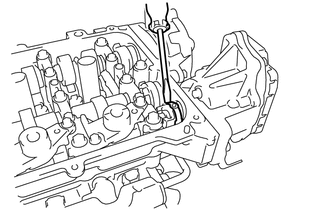
Using a screwdriver, install the valve lift control actuator connector clip to the valve lift control actuator connector.
- NOTICE:
-
Insert the protrusion of the valve lift control actuator connector clip into the hole in the valve lift control actuator connector.
11213
2.INSTALL CYLINDER HEAD COVER GASKET
11201
3.INSTALL CYLINDER HEAD COVER SUB-ASSEMBLY
17361M
4.INSTALL AIR TUBE
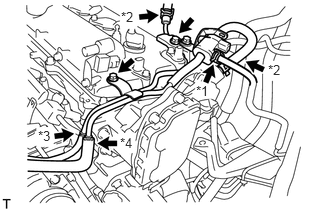
| *1 | Fuel Vapor Feed Hose |
| *2 | Union to Connector Tube Hose |
| *3 | No. 2 Air Hose |
| *4 | No. 1 Fuel Vapor Feed Hose |
Install the air tube with the 2 bolts.
- Torque:
- 10 N*m (102 kgf*cm, 7 ft.*lbf)
Connect the No. 2 air hose and No. 1 fuel vapor feed hose.
Connect the 2 union to connector tube hoses, and slide the 2 clamps to secure them.
Connect the fuel vapor feed hose to the purge VSV, and slide the clamp to secure it.
19500
5.INSTALL IGNITION COIL ASSEMBLY
Install the 4 ignition coil assemblies with the 4 bolts.
- Torque:
- 10 N*m (102 kgf*cm, 7 ft.*lbf)
6.CONNECT ENGINE WIRE
Attach the 9 clamps, and then connect the connectors.
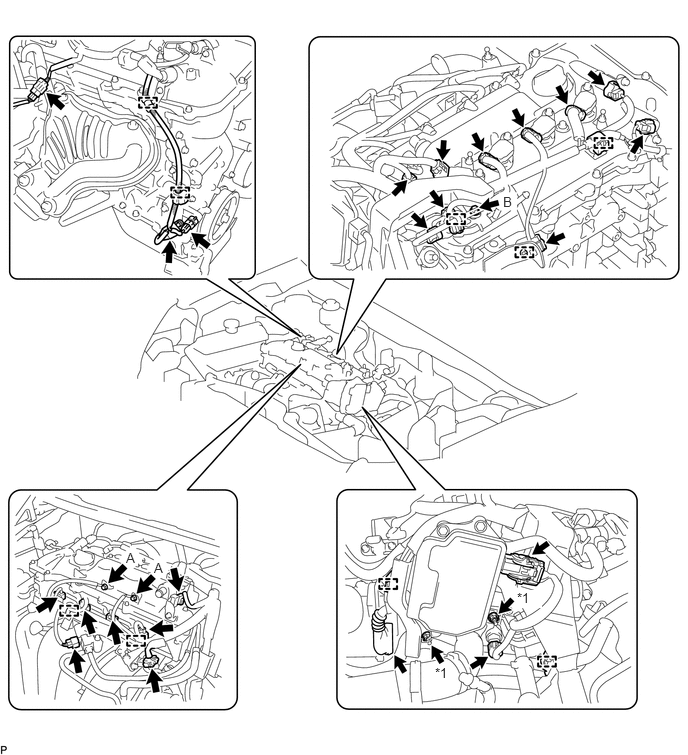
| *1 | Nut | - | - |
Connect the engine wire with the 3 bolts and 2 nuts.
- Torque:
- for bolt A : 8.4 N*m (86 kgf*cm, 74 in.*lbf)
- for bolt B : 7.7 N*m (79 kgf*cm, 68 in.*lbf)
- for nut : 7.7 N*m (79 kgf*cm, 68 in.*lbf)
74431
7.INSTALL BATTERY TRAY
28800
8.INSTALL BATTERY
74404A
9.INSTALL BATTERY CLAMP SUB-ASSEMBLY
10.INSTALL AIR CLEANER CASE SUB-ASSEMBLY
17705
11.INSTALL AIR CLEANER CAP SUB-ASSEMBLY
12.CONNECT CABLE TO NEGATIVE BATTERY TERMINAL
- NOTICE:
-
When disconnecting the cable, some systems need to be initialized after the cable is reconnected.
-
Click hereGeneral>INTRODUCTION>REPAIR INSTRUCTION>INITIALIZATION
11212
13.INSTALL NO. 2 CYLINDER HEAD COVER