LIGHTING (EXT) AUTOMATIC HEADLIGHT BEAM LEVEL CONTROL SYSTEM Vehicle Speed Signal Circuit
DESCRIPTION
The headlight leveling ECU receives the vehicle speed signal from the combination meter.
WIRING DIAGRAM
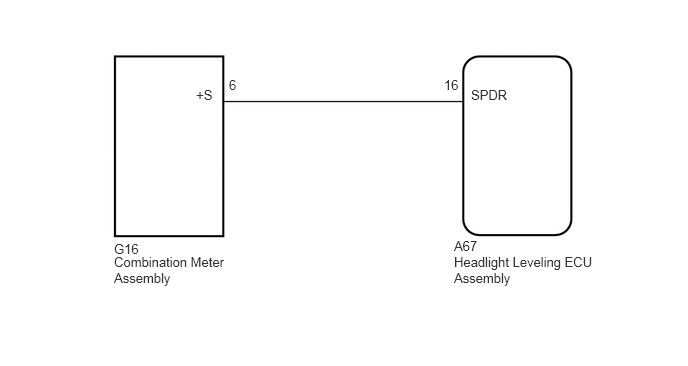
CAUTION / NOTICE / HINT
- HINT:
-
After replacing the headlight leveling ECU, initialization of the ECU is necessary.
-
Click hereVehicle Exterior>LIGHTING (EXT)>AUTOMATIC HEADLIGHT BEAM LEVEL CONTROL SYSTEM>INITIALIZATION
PROCEDURE
Using the GTS, read the Data List.
- Body Electrical > HL AutoLeveling > Data List
-
Tester Display Measurement Item Range Normal Condition Diagnostic Note Vehicle Speed Vehicle speed 0 to 327.67 km/h Actual vehicle speed -
- Body Electrical > HL AutoLeveling > Data List
-
Tester Display Vehicle Speed - 50003 165 16
- OK:
The display is as specified in the normal condition column.
- Result:
Proceed to OK NG
OK
Click hereVehicle Exterior>LIGHTING (EXT)>AUTOMATIC HEADLIGHT BEAM LEVEL CONTROL SYSTEM>PROBLEM SYMPTOMS TABLE
NG
Disconnect the G16 combination meter connector.
Disconnect the A67 headlight leveling ECU connector.
Measure the resistance according to the value(s) in the table below.
- Standard Resistance:
Tester Connection Condition Specified Condition G16-6 (+S) - A67-16 (SPDR) Always Below 1 Ω G16-6 (+S) - Body ground Always 10 kΩ or higher
- Result:
Proceed to OK NG
OK
NG
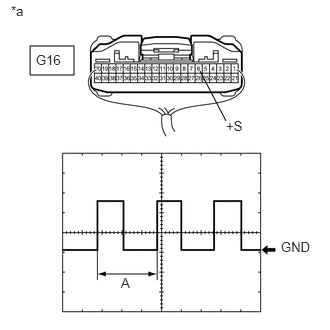
| *a | Component with harness connected
(Combination Meter Assembly) |
Remove the combination meter with its connector still connected.
Click hereVehicle Interior>METER / GAUGE / DISPLAY>COMBINATION METER>REMOVAL
Connect an oscilloscope to the combination meter connector.
Check the waveform.
- Measurement Condition:
Item Content Terminal No. (Symbol) G16-6 (+S) - Body ground Tool setting 5 V/DIV., 20 ms./DIV. Condition Vehicle is driven at approximately 20 km/h (12 mph)
- Result:
Proceed to Waveform is as shown in the illustration Waveform is not as shown in the illustration
- HINT:
-
When the system is functioning normally, one wheel revolution generates 4 pulses. As the vehicle speed increases, the width indicated by (A) in the illustration narrows
Waveform is as shown in the illustration
Waveform is not as shown in the illustration
Click hereVehicle Interior>METER / GAUGE / DISPLAY>METER / GAUGE SYSTEM>HOW TO PROCEED WITH TROUBLESHOOTING