2WW INTAKE / EXHAUST EXHAUST MANIFOLD W/ TURBOCHARGER INSTALLATION
PROCEDURE

 17141
1.INSTALL EXHAUST MANIFOLD
Install 2 new gaskets to the cylinder head sub-assembly.
Temporarily install the exhaust manifold with the 8 nuts.
Tighten the 8 nuts of the exhaust manifold.
- Torque:
- 11 N*m (112 kgf*cm, 8 ft.*lbf)
Tighten the 8 nuts again.
- Torque:
- 13 N*m (133 kgf*cm, 10 ft.*lbf)
25680
2.INSTALL EGR COOLER ASSEMBLY WITH EGR VALVE ASSEMBLY
3.INSTALL NO. 1 EXHAUST MANIFOLD HEAT INSULATOR
23801Q
4.CONNECT FUEL FEED PIPE SUB-ASSEMBLY
17360A
5.CONNECT NO. 1 AIR TUBE ASSEMBLY
Connect the No. 1 air tube assembly to the manual transaxle assembly with the 2 bolts.
- Torque:
- 24 N*m (245 kgf*cm, 18 ft.*lbf)
Connect the outlet heater water hose to the No. 2 radiator pipe, and slide the clamp to secure the hose.
Connect the water hose sub-assembly to the No. 1 radiator pipe, and slide the clamp to secure the hose.
Attach the clamp and connect the water hose sub-assembly to the compressor outlet elbow.
Connect the water by-pass hose assembly to the No. 2 radiator pipe, and slide the clamp to secure the hose.
Connect the radiator hose sub-assembly to the No. 1 radiator pipe, and slide the clamp to secure the hose.
87246C
6.INSTALL NO. 4 WATER BY-PASS HOSE
Install the No. 4 water by-pass hose to the No. 2 radiator pipe, and slide the clamp to secure the hose.
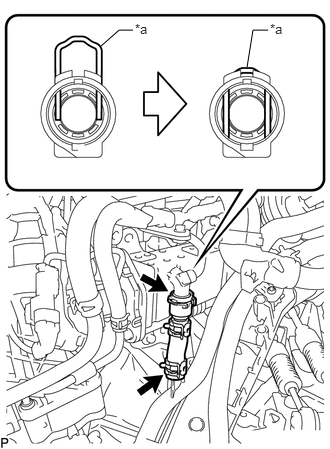
| *a | Retainer |
Connect the No. 4 water by-pass hose to the EGR cooler assembly and lock the retainer as shown in the illustration.
7.CONNECT ENGINE WIRE
Connect the engine wire to the No. 1 air tube assembly with the 2 bolts.
- Torque:
- 8.4 N*m (86 kgf*cm, 74 in.*lbf)
Attach the 2 clamps to the No. 1 air tube assembly.
17201
8.INSTALL TURBOCHARGER SUB-ASSEMBLY
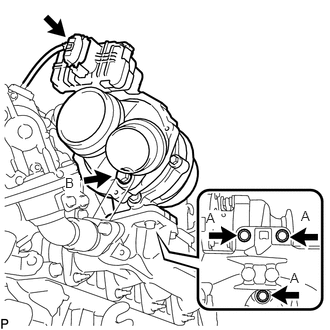
Temporarily install a new gasket, the turbocharger sub-assembly and the 3 bolts (A).
Temporarily install the bolt (B).
Tighten the 4 bolts.
- Torque:
- for bolt (A) : 25 N*m (255 kgf*cm, 18 ft.*lbf)
- for bolt (B) : 10 N*m (102 kgf*cm, 7 ft.*lbf)
Connect the connector to the turbocharger sub-assembly.
9.INSTALL NO. 1 EXHAUST MANIFOLD PIPE
Temporarily install the No. 1 exhaust manifold pipe with the bolt.
Temporarily install 2 new gaskets with the union bolt.
Tighten the bolt and union bolt.
- Torque:
- for bolt : 8.0 N*m (82 kgf*cm, 71 in.*lbf)
- for union bolt : 35 N*m (357 kgf*cm, 26 ft.*lbf)
Connect the exhaust manifold pressure sensor connector.
15481
10.CONNECT NO. 1 TURBO OIL PIPE
Connect the No. 1 turbo oil pipe and 2 new gaskets with the union bolt.
- Torque:
- 22 N*m (224 kgf*cm, 16 ft.*lbf)
15474
11.INSTALL TURBO OIL OUTLET PIPE
Install a new O-ring to the turbo oil outlet pipe.
Install a new gasket and the turbo oil outlet pipe with the 3 bolts.
- Torque:
- 10 N*m (102 kgf*cm, 7 ft.*lbf)
17275A
12.CONNECT COMPRESSOR OUTLET ELBOW
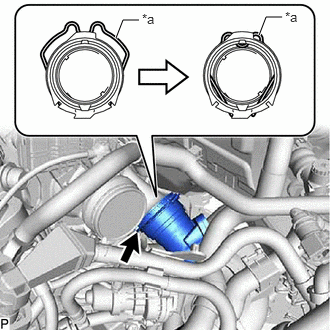
| *a | Retainer |
Connect the compressor outlet elbow to the turbocharger sub-assembly and lock the retainer as shown in the illustration.
13.INSTALL AIR CLEANER CASE SUB-ASSEMBLY
Install the air cleaner case sub-assembly with the 3 bolts.
- Torque:
- 7.0 N*m (71 kgf*cm, 62 in.*lbf)
17880
14.INSTALL AIR CLEANER CAP SUB-ASSEMBLY WITH AIR CLEANER HOSE ASSEMBLY
Install the air cleaner filter element sub-assembly to the air cleaner case sub-assembly.
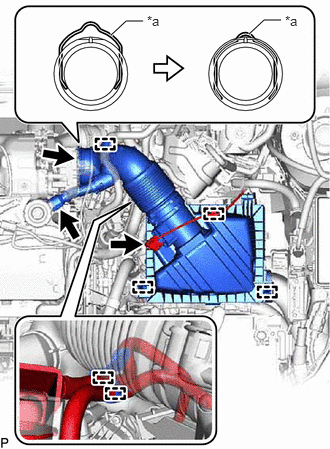
| *a | Retainer |
Connect the air cleaner hose assembly to the turbocharger sub-assembly and lock the retainer as shown in the illustration.
Attach the 2 clamps to install the air cleaner cap sub-assembly.
Connect the ventilation hose to the cylinder head cover sub-assembly.
Attach the clamp and connect the No. 2 fuel hose to the air cleaner hose assembly.
Attach the clamp and connect the No. 1 fuel hose to the air cleaner hose assembly.
Attach the clamp and connect the vacuum hose to the air cleaner hose assembly.
Attach the clamp and connect the mass air flow meter sub-assembly connector.
74414B
15.INSTALL BATTERY BRACKET REINFORCEMENT
Install the battery bracket reinforcement with the 2 bolts.
- Torque:
- 20 N*m (204 kgf*cm, 15 ft.*lbf)
74410
16.INSTALL BATTERY CARRIER ASSEMBLY
Install the battery carrier assembly with the 3 bolts.
- Torque:
- 20 N*m (204 kgf*cm, 15 ft.*lbf)
Install the ground wire to the battery carrier assembly with the bolt.
- Torque:
- 19.2 N*m (196 kgf*cm, 14 ft.*lbf)
Attach the clamp to connect the engine wire.
74431
17.INSTALL BATTERY TRAY
28800
18.INSTALL BATTERY
28899
19.INSTALL BATTERY INSULATOR
74404A
20.INSTALL BATTERY CLAMP SUB-ASSEMBLY
Attach the hook of the battery clamp sub-assembly to the battery carrier assembly.
Partially tighten the nut and temporarily install the bolt.
Adjust the battery clamp sub-assembly position.
Tighten the nut and bolt.
- Torque:
- for bolt : 16.5 N*m (168 kgf*cm, 12 ft.*lbf)
- for nut : 4.9 N*m (50 kgf*cm, 43 in.*lbf)
25051
21.INSTALL EXHAUST MANIFOLD CONVERTER SUB-ASSEMBLY
22.CONNECT CABLE TO POSITIVE BATTERY TERMINAL
23.CONNECT CABLE TO NEGATIVE BATTERY TERMINAL
- NOTICE:
-
When disconnecting the cable, some systems need to be initialized after the cable is reconnected.
-
Click hereGeneral>INTRODUCTION>REPAIR INSTRUCTION>INITIALIZATION
24.ADD ENGINE COOLANT
25.INSPECT FOR COOLANT LEAK