2WW EMISSION CONTROL EGR COOLER INSTALLATION
PROCEDURE

 25620
1.INSTALL EGR VALVE ASSEMBLY
25680
2.INSTALL EGR COOLER ASSEMBLY WITH EGR VALVE ASSEMBLY
Install a new water pipe to the EGR cooler assembly.
Install a new gasket to the No. 2 EGR pipe sub-assembly.
- HINT:
-
Make sure that the claw of the gasket faces the No. 2 EGR pipe sub-assembly.
Temporarily install the EGR cooler assembly with EGR valve assembly with the 7 bolts.
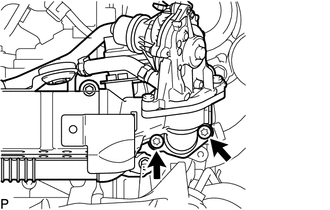
Using a T45 "TORX" socket wrench, tighten the 2 bolts.
- Torque:
- 5.0 N*m (51 kgf*cm, 44 in.*lbf)
Loosen the 2 bolts 90°.
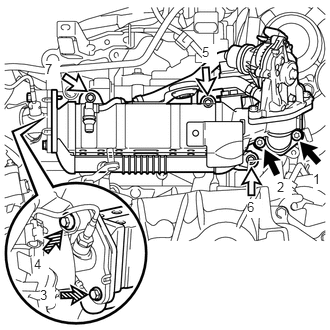

|
Bolt (A) |

|
Bolt (B) |

|
Bolt (C) |
Tighten the 7 bolts (A), (B) and (C), and then 2 nuts in the order shown in the illustration.
- Torque:
- for Bolt (A) : 13 N*m (133 kgf*cm, 10 ft.*lbf)
- for Bolt (B) : 19 N*m (194 kgf*cm, 14 ft.*lbf)
- for Bolt (C) : 8.0 N*m (82 kgf*cm, 71 in.*lbf)
- HINT:
- ·
When tightening the bolts (A), use a T45 "TORX" socket wrench.
·When tightening the bolts (B), use a 6 mm hexagon wrench.
Connect the vacuum hose to the EGR cooler assembly.
Connect the hose clamp to the EGR cooler hose.
Attach the clamp and connect the engine wire to the EGR valve assembly.
Connect the EGR valve assembly connector.
3.INSTALL NO. 1 EXHAUST MANIFOLD HEAT INSULATOR
Install the No. 1 exhaust manifold heat insulator with the 2 bolts.
- Torque:
- 8.0 N*m (82 kgf*cm, 71 in.*lbf)
Attach the 2 clamps and connect the engine wire.
Attach the 2 clamps and connect the air fuel ratio sensor.
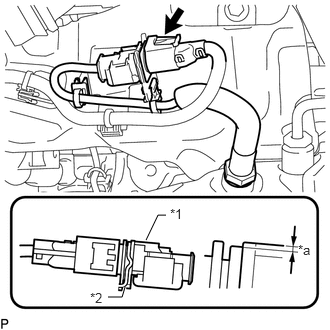
| *1 | Air Fuel Ratio Sensor |
| *2 | Bracket |
| *a | 1.5 mm (0.0591 in.) or less |
Lower the air fuel ratio sensor connector to the position shown in the illustration and connect the air fuel ratio sensor connector.
17271
4.INSTALL NO. 1 TURBO INSULATOR
23801Q
5.CONNECT FUEL FEED PIPE SUB-ASSEMBLY
Connect the fuel feed pipe sub-assembly to the fuel pipe clamp.
Connect the vacuum hose to the No. 2 fuel hose.
Connect the fuel feed pipe sub-assembly with the 2 bolts.
- Torque:
- 8.0 N*m (82 kgf*cm, 71 in.*lbf)
Attach the 2 clamps and connect the engine wire.
17360A
6.CONNECT NO. 1 AIR TUBE ASSEMBLY
87246C
7.INSTALL NO. 4 WATER BY-PASS HOSE
82121
8.CONNECT ENGINE WIRE
17275A
9.CONNECT COMPRESSOR OUTLET ELBOW
10.INSTALL AIR CLEANER CASE SUB-ASSEMBLY
17801
11.INSTALL AIR CLEANER FILTER ELEMENT SUB-ASSEMBLY
17880
12.INSTALL AIR CLEANER CAP SUB-ASSEMBLY WITH AIR CLEANER HOSE ASSEMBLY
74414B
13.INSTALL BATTERY BRACKET REINFORCEMENT
74410
14.INSTALL BATTERY CARRIER ASSEMBLY
74431
15.INSTALL BATTERY TRAY
28800
16.INSTALL BATTERY
28899
17.INSTALL BATTERY INSULATOR
74404A
18.INSTALL BATTERY CLAMP SUB-ASSEMBLY
19.CONNECT CABLE FROM POSITIVE BATTERY TERMINAL
20.CONNECT CABLE FROM NEGATIVE BATTERY TERMINAL
- NOTICE:
-
When disconnecting the cable, some systems need to be initialized after the cable is reconnected.
-
Click hereGeneral>INTRODUCTION>REPAIR INSTRUCTION>INITIALIZATION
21.ADD ENGINE COOLANT
22.INSPECT FOR COOLANT LEAK
12612A
23.INSTALL NO. 1 ENGINE COVER
51441
24.INSTALL NO. 1 ENGINE UNDER COVER
25.PERFORM INITIALIZATION
Perform EGR learning value reset.
Click hereEngine / Hybrid System>2WW ENGINE CONTROL>ECD SYSTEM>INITIALIZATION