EB61F MANUAL TRANSMISSION / TRANSAXLE MANUAL TRANSAXLE ASSEMBLY INSTALLATION
CAUTION / NOTICE / HINT
- NOTICE:
-
When the transaxle is removed, be sure to use a new clutch release with bearing cylinder and new installation bolts. Removal of the transaxle allows the compressed clutch release with bearing cylinder to return to its original position, and dust could damage the seal of the clutch release with bearing cylinder, possibly causing clutch fluid leaks.
PROCEDURE

 1.INSTALL WIRE HARNESS CLAMP BRACKET
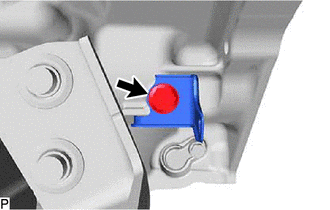
for Rear of Vehicle (w/ Stop and Start System):
Install the wire harness clamp bracket with the bolt.
- Torque:
- 19.1 N*m (195 kgf*cm, 14 ft.*lbf)
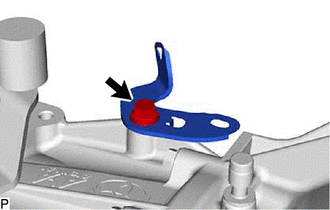
for Front of Vehicle:
Install the wire harness clamp bracket with the bolt.
- Torque:
- 19.1 N*m (195 kgf*cm, 14 ft.*lbf)
36100A
2.INSTALL TRANSFER AND TRANSAXLE SETTING STUD BOLT
Transfer Side:
Click hereDrivetrain>GF1A TRANSFER / 4WD / AWD>TRANSFER ASSEMBLY>REASSEMBLY
Clean the transfer and transaxle setting stud bolt holes.
Apply adhesive 1324 to 2 or 3 threads on one half of a new transfer and transaxle setting stud bolt A as shown in the illustration.
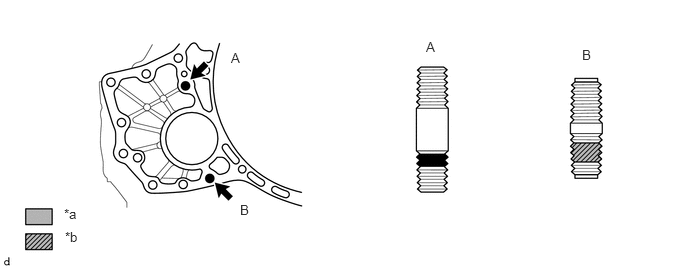
| *a | Toyota Genuine Adhesive 1324 | *b | Sealant |
- Adhesive:
Toyota Genuine Adhesive 1324, Three Bond 1324 or equivalent
- NOTICE:
- ·
Do not apply adhesive 1324 to the ends of the transfer and transaxle setting stud bolt.
·Install the transfer and transaxle setting stud bolt immediately after applying adhesive to prevent the adherence of foreign matter.
Install the 2 new transfer and transaxle setting stud bolts to the transaxle case positions shown in the illustration.
- Torque:
- 39.2 N*m (400 kgf*cm, 29 ft.*lbf)
- NOTICE:
-
Install the transfer and transaxle setting stud bolt so that the side that has sealant and adhesive is facing the automatic transaxle assembly.
- HINT:
-
Stud transfer and transaxle setting stud bolt length:
-
Stud transfer and transaxle setting stud bolt A: 69 mm (2.72 in.)
-
Stud transfer and transaxle setting stud bolt B: 47 mm (1.85 in.)
36100
3.INSTALL TRANSFER ASSEMBLY
33403K
4.INSTALL SPEEDOMETER DRIVEN HOLE COVER SUB-ASSEMBLY
Coat a new O-ring with gear oil.
Install the O-ring to the speedometer driven hole cover sub-assembly.
Install the speedometer driven hole cover sub-assembly to the manual transaxle case with the bolt.
- Torque:
- 5.5 N*m (56 kgf*cm, 49 in.*lbf)
31400
5.INSTALL CLUTCH RELEASE WITH BEARING CYLINDER ASSEMBLY
31407B
6.REMOVE CLUTCH RELEASE BLEEDER SUB-ASSEMBLY
7.INSPECT CLUTCH PIPE LINE
31407B
8.INSTALL CLUTCH RELEASE BLEEDER SUB-ASSEMBLY
31490
9.INSTALL CLUTCH ACCUMULATOR ASSEMBLY
12321A
10.INSTALL REAR ENGINE MOUNTING BRACKET
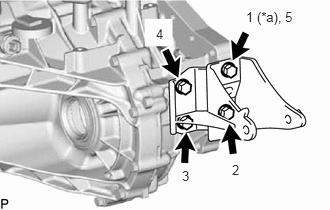
| *a | Temporarily |
Temporarily install the rear engine mounting bracket with the 4 bolts.
Tighten the 4 bolts of the rear engine mounting bracket in the order shown in the illustration.
- Torque:
- 45 N*m (459 kgf*cm, 33 ft.*lbf)
12325A
11.INSTALL ENGINE MOUNTING BRACKET LH
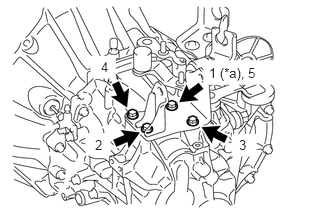
| *a | Temporarily |
Clean the bolts and the installation holes in the engine mounting bracket LH.
Apply adhesive to the 4 bolts.
- Adhesive:
Toyota Genuine Adhesive 1324, Three Bond 1324 or equivalent
Temporarily install the engine mounting bracket LH with the 4 bolts.
Tighten the 4 bolts of the engine mounting bracket LH in the order shown in the illustration.
- Torque:
- 64 N*m (653 kgf*cm, 47 ft.*lbf)
12311A
12.INSTALL FRONT ENGINE MOUNTING BRACKET
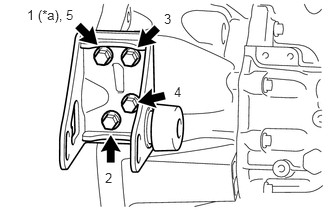
| *a | Temporarily |
Temporarily install the front engine mounting bracket with the 4 bolts.
Tighten the 4 bolts of the front engine mounting bracket in the order shown in the illustration.
- Torque:
- 64 N*m (653 kgf*cm, 47 ft.*lbf)
30300
13.INSTALL MANUAL TRANSAXLE ASSEMBLY
Align the input shaft with the clutch disc and install the manual transaxle to the engine.
- NOTICE:
- ·
Make sure that the dowel pins are not loose, bent, damaged or scratched and then install the transaxle onto the engine with the contact surfaces of the engine and transaxle flat against each other.
·Insert the dowel pins into the dowel holes securely so that the end face of the transaxle assembly fits close against the engine assembly before tightening the bolts.
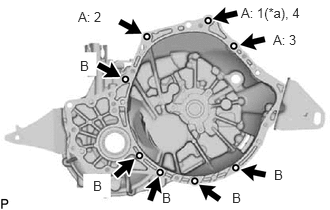
| *a | Temporarily |
Temporarily install the manual transaxle assembly with the bolt (*a).
Tighten the 3 bolts labeled A in the order shown in the illustration, and then install the 5 bolts labeled B.
- Torque:
- for Bolt A : 38 N*m (387 kgf*cm, 28 ft.*lbf)
- for Bolt B : 40 N*m (408 kgf*cm, 30 ft.*lbf)
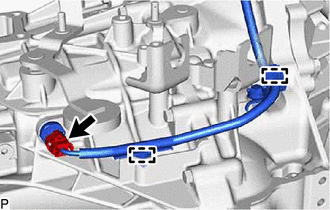
Connect the engine wire.
w/ Stop and Start System:
Connect the neutral position switch connector and 2 clamps.
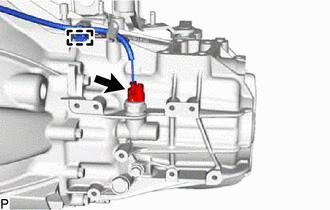
Connect the clamp and back-up light switch connector.
28100
14.INSTALL STARTER ASSEMBLY (for 3ZR-FE)
for 1.0 kW Type:
Click hereEngine / Hybrid System>3ZR-FE STARTING>STARTER(for 1.0 kW Type)>INSTALLATION
for 1.3 kW Type:
Click hereEngine / Hybrid System>3ZR-FE STARTING>STARTER(for 1.3 kW Type)>INSTALLATION
28100
15.INSTALL STARTER ASSEMBLY (for 3ZR-FAE)
w/o Stop and Start System:
Click hereEngine / Hybrid System>3ZR-FAE STARTING>STARTER>INSTALLATION
w/ Stop and Start System:
Click hereEngine / Hybrid System>3ZR-FAE STARTING>STARTER(w/ Stop And Start System)>INSTALLATION
16.INSTALL ENGINE ASSEMBLY WITH TRANSAXLE
for 3ZR-FE:
Click hereEngine / Hybrid System>3ZR-FE ENGINE MECHANICAL>ENGINE ASSEMBLY>INSTALLATION
for 3ZR-FAE:
Click hereEngine / Hybrid System>3ZR-FAE ENGINE MECHANICAL>ENGINE ASSEMBLY>INSTALLATION