GF1A TRANSFER / 4WD / AWD DYNAMIC TORQUE CONTROL 4WD/AWD SYSTEM TC and CG Terminal Circuit
DESCRIPTION
for Segment Display Type:
Connecting terminals TC and CG of the DLC3 causes the 4WD ECU assembly to display 2-digit DTCs by flashing the 4WD/AWD warning light.
for TFT Display Type:
Connecting terminals TC and CG of the DLC3 causes the 4WD ECU assembly to display a DTC on the multi-information display.
- HINT:
-
When each warning light remains blinking, a short to ground in the wiring of terminal TC of the DLC3 or an internal short to ground in each ECU is suspected.
WIRING DIAGRAM
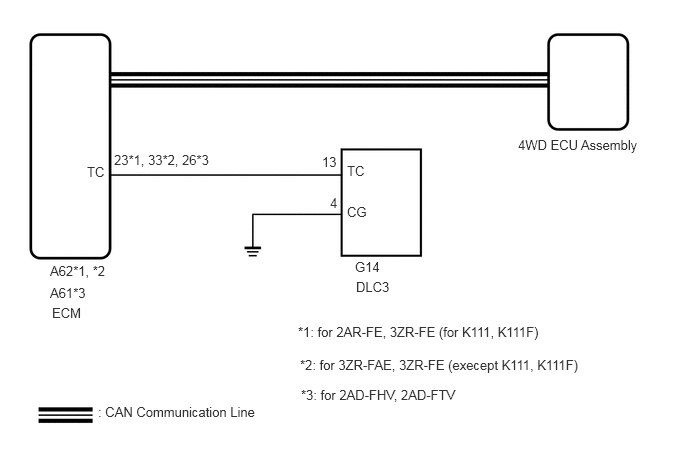
CAUTION / NOTICE / HINT
- HINT:
-
Check the condition of each related circuit connector before troubleshooting.
PROCEDURE
Check if the CAN communication system DTC is output.
for LHD with Central Gateway ECU: Click herePower Source / Network>NETWORKING>CAN COMMUNICATION SYSTEM(for LHD with Central Gateway ECU)>DIAGNOSIS SYSTEM
for RHD with Central Gateway ECU: Click herePower Source / Network>NETWORKING>CAN COMMUNICATION SYSTEM(for RHD with Central Gateway ECU)>DIAGNOSIS SYSTEM
for LHD without Central Gateway ECU: Click herePower Source / Network>NETWORKING>CAN COMMUNICATION SYSTEM(for LHD without Central Gateway ECU)>DIAGNOSIS SYSTEM
for RHD without Central Gateway ECU: Click herePower Source / Network>NETWORKING>CAN COMMUNICATION SYSTEM(for RHD without Central Gateway ECU)>DIAGNOSIS SYSTEM
- Result:
Result Proceed to CAN communication system DTC is not output A CAN communication system DTC is output (for LHD with Central Gateway ECU) B CAN communication system DTC is output (for RHD with Central Gateway ECU) C CAN communication system DTC is output (for LHD without Central Gateway ECU) D CAN communication system DTC is output (for RHD without Central Gateway ECU) E
A
B
C
D
E
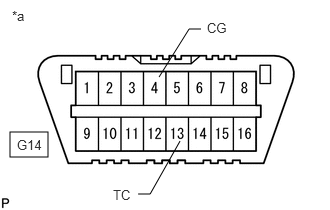
| *a | Front view of DLC3 |
Turn the ignition switch to ON.
Measure the voltage according to the value(s) in the table below.
- Standard Voltage:
Tester Connection Switch Condition Specified Condition G14-13 (TC) - G14-4 (CG) Ignition switch ON 11 to 14 V
- Result:
Proceed to OK NG
OK
NG
Turn the ignition switch off.
for 2AR-FE, 3ZR-FAE, 3ZR-FE:
Disconnect the A62 ECM connector.
for 2AD-FHV, 2AD-FTV:
Disconnect the A61 ECM connector.
Measure the resistance according to the value(s) in the table below.
- Standard Resistance:
for 2AR-FE, 3ZR-FE (for K111, K111F) Tester Connection Condition Specified Condition G14-13 (TC) - A62-23 (TC) Always Below 1 Ω G14-13 (TC) - Body ground Always 10 kΩ or higher
for 2AD-FHV, 2AD-FTV Tester Connection Condition Specified Condition G14-13 (TC) - A61-26 (TC) Always Below 1 Ω G14-13 (TC) - Body ground Always 10 kΩ or higher
for 3ZR-FAE, 3ZR-FE (execept K111, K111F) Tester Connection Condition Specified Condition G14-13 (TC) - A62-33 (TC) Always Below 1 Ω G14-13 (TC) - Body ground Always 10 kΩ or higher
- Result:
Proceed to OK NG
OK
NG
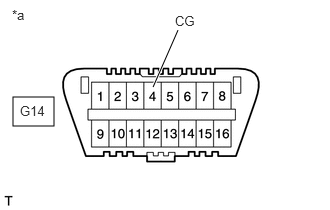
| *a | Front view of DLC3 |
Measure the resistance according to the value(s) in the table below.
- Standard Resistance:
Tester Connection Condition Specified Condition G14-4 (CG) - Body ground Always Below 1 Ω
- Result:
Proceed to OK NG
OK
NG
| *a | Front view of DLC3 |
Turn the ignition switch off.
Using SST, connect terminals 13 (TC) and 4 (CG) of the DLC3.
- SST
- 09843-18040
Turn the ignition switch to ON.
Check that the malfunction indicator lamp is blinking.
- Result:
Proceed to Malfunction indicator lamp is blinking (for 2AD-FHV) Malfunction indicator lamp is blinking (for 2AD-FTV) Malfunction indicator lamp is blinking (for 2AR-FE) Malfunction indicator lamp is blinking (for 3ZR-FAE) Malfunction indicator lamp is blinking (for 3ZR-FE) Malfunction indicator lamp is not blinking
Malfunction indicator lamp is blinking (for 2AD-FHV)
Malfunction indicator lamp is blinking (for 2AD-FTV)
Malfunction indicator lamp is blinking (for 2AR-FE)
Malfunction indicator lamp is blinking (for 3ZR-FAE)
Malfunction indicator lamp is blinking (for 3ZR-FE)
Malfunction indicator lamp is not blinking