WIPER / WASHER WASHER MOTOR REMOVAL
CAUTION / NOTICE / HINT
The necessary procedures (adjustment, calibration, initialization, or registration) that must be performed after parts are removed, installed, or replaced during the windshield washer jar assembly removal/installation are shown below.
| Replaced Part or Performed Procedure | Necessary Procedure | Effect/Inoperative Function when Necessary Procedure not Performed | Link |
|---|---|---|---|
| Front bumper assembly (Including removal and installation) | ·
Ultrasonic sensor detection angle ·
Ultrasonic sensor detection angle registration |
Parking support brake system (for HV model) | ( ) |
| Front television camera view adjustment | Panoramic view monitor system (for HV model) | ()
|
| Replaced Part or Performed Procedure | Necessary Procedure | Effect/Inoperative Function when Necessary Procedure not Performed | Link |
|---|---|---|---|
| Front bumper assembly (Including removal and installation) | ·
Ultrasonic sensor detection angle ·
Ultrasonic sensor detection angle registration |
Parking support brake system (for Gasoline model) | ()
|
| Front television camera view adjustment | Panoramic view monitor system (for Gasoline model) | ()
|
PROCEDURE

 1.REMOVE FRONT WHEEL
53895B
2.REMOVE FRONT FENDER FRONT SPLASH SHIELD RH (for Long Type)
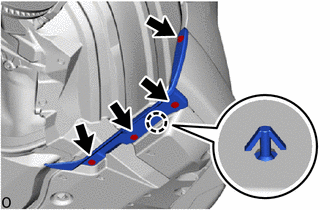
Remove the 4 screws.
Detach the claw and remove the front fender front splash shield RH.
53895B
3.REMOVE FRONT FENDER FRONT SPLASH SHIELD RH (for Short Type)
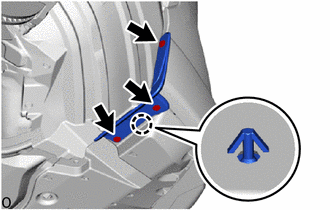
Remove the 3 screws.
Detach the claw and remove the front fender front splash shield RH.
76621D
4.REMOVE FRONT FENDER MUDGUARD RH (w/ Mudguard)
- HINT:
-
Use the same procedure described for the LH side.
-
Click hereVehicle Exterior>EXTERIOR PANELS / TRIM>MUDGUARD>REMOVAL
51441
5.REMOVE NO. 1 ENGINE UNDER COVER
75601A
6.REMOVE FRONT FENDER MOULDING SUB-ASSEMBLY RH (for Off Road Package)
- HINT:
-
Use the same procedure described for the LH side.
-
Click hereVehicle Exterior>EXTERIOR PANELS / TRIM>WHEEL OPENING MOULDING (for Front)>REMOVAL
75601A
7.REMOVE FRONT FENDER MOULDING SUB-ASSEMBLY RH (except Off Road Package)
- HINT:
-
Use the same procedure described for the LH side.
-
Click hereVehicle Exterior>EXTERIOR PANELS / TRIM>WHEEL OPENING MOULDING (for Front)>REMOVAL
53875A
8.REMOVE FRONT FENDER LINER RH
w/ Mudguard:
Remove the 8 clips and 2 screws.
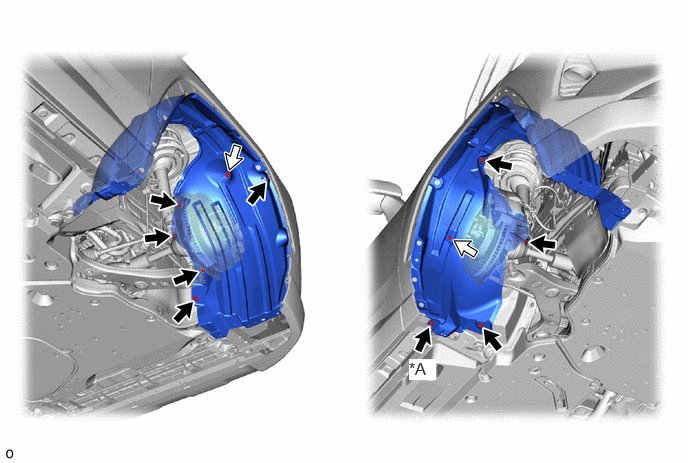
| *A | w/o Mudguard | - | - |

|
Clip | 
|
Screw |
w/o Mudguard:
Remove the 9 clips and 2 screws.
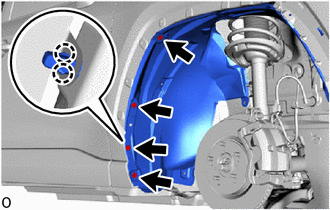
Using a screwdriver with its tip wrapped with protective tape, detach the claw and remove the 4 grommets.
Remove the front fender liner RH.
9.DRAIN WASHER FLUID
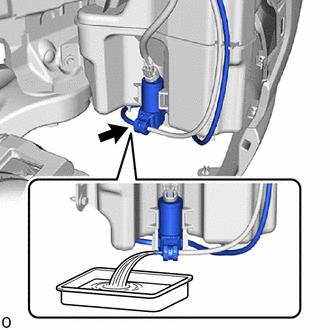
Disconnect the washer hose from the windshield washer motor and pump assembly, and drain the washer fluid.
- HINT:
-
Use a container to collect the washer fluid.
85310
10.REMOVE WINDSHIELD WASHER MOTOR AND PUMP ASSEMBLY
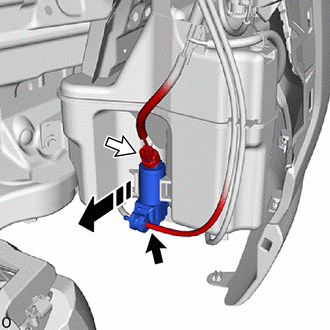

|
Remove in this Direction |
|
|
Washer hose |
|
|
Connector |
Disconnect the washer hose from the windshield washer motor and pump assembly.
Disconnect the connector.
Remove the windshield washer motor and pump assembly as shown in the illustration.
52119A
11.REMOVE FRONT BUMPER COVER
for Off Road Package:
Click hereVehicle Exterior>EXTERIOR PANELS / TRIM>FRONT BUMPER (for Off Road Package)>REMOVAL
except Off Road Package:
Click hereVehicle Exterior>EXTERIOR PANELS / TRIM>FRONT BUMPER (except Off Road Package)>REMOVAL
85280A
12.REMOVE HEADLIGHT CLEANER MOTOR AND PUMP ASSEMBLY (w/ Headlight Cleaner System)
85301
13.REMOVE WASHER INLET SUB-ASSEMBLY
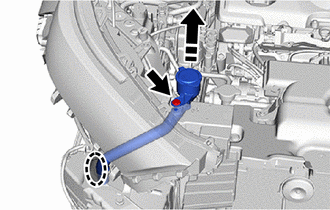

|
Place Hand Here |
|
|
Remove in this Direction |
Remove the clip.
Place your hands at the position shown in the illustration and remove the washer inlet sub-assembly in the direction indicated by the arrow.
85330
14.REMOVE WINDSHIELD WASHER JAR ASSEMBLY
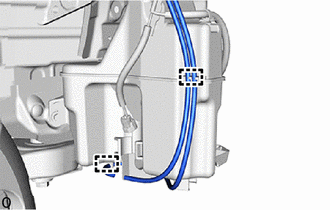
Detach the clamp and disconnect the washer hose.
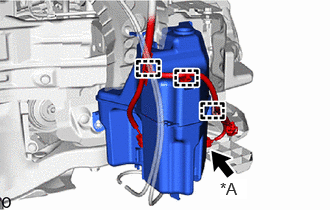
| *A | w/ Level Warning Switch |
Detach the clamp.
w/ Level Warning Switch:
Disconnect the connector.
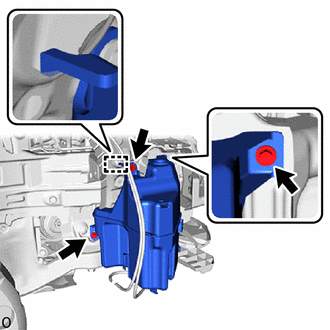
Remove the 3 bolts. Then detach the guide and remove the windshield washer jar assembly.
85397
15.REMOVE LEVEL WARNING SWITCH ASSEMBLY (w/ Level Warning Switch)