BRAKE SYSTEM (OTHER) BRAKE PEDAL(for LHD without Vacuum Brake Booster) ADJUSTMENT
PROCEDURE

 1.INSPECT AND ADJUST BRAKE PEDAL HEIGHT
Remove the front door scuff plate LH.
Click hereVehicle Interior>INTERIOR PANELS / TRIM>ROOF HEADLINING>REMOVAL
Remove the cowl side trim board LH.
Click hereVehicle Interior>INTERIOR PANELS / TRIM>INSTRUMENT PANEL SAFETY PAD>REMOVAL
Check the brake pedal height.
- HINT:
-
Perform checks and adjustments with the service hole carpet rolled back.
Measure the shortest distance between the brake pedal pad surface and front floor footrest as shown in the illustration.
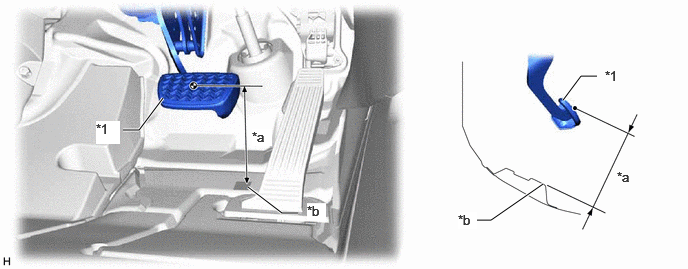
| *1 | Brake Pedal Pad | - | - |
| *a | Brake Pedal Height | *b | Measuring Plane of Floor Panel |

|
Service Hole | - | - |
- Brake Pedal Height from Floor Panel:
155.6 to 171.6 mm (6.13 to 6.75 in.)
If the brake pedal height is not as specified, inspect and adjust the push rod length according to the procedure below.
Adjust the push rod length.
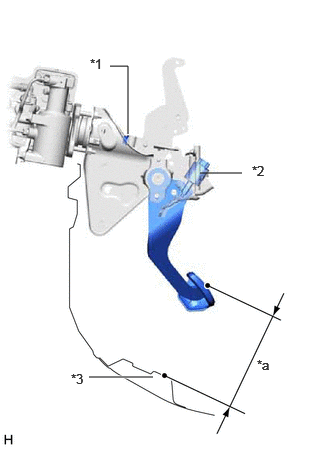
| *1 | Lock Nut |
| *2 | Stop Light Switch Assembly |
| *3 | Floor Panel |
| *a | Brake Pedal Height |
Remove the stop light switch assembly.
Click hereVehicle Exterior>LIGHTING (EXT)>STOP LIGHT SWITCH>REMOVAL
Loosen the lock nut.
Adjust the brake pedal height by turning the push rod.
- Brake Pedal Height from Floor Panel:
155.6 to 171.6 mm (6.13 to 6.75 in.)
Tighten the lock nut.
- Torque:
- 25.5 N*m (260 kgf*cm, 19 ft.*lbf)
Install the stop light switch assembly.
Click hereVehicle Exterior>LIGHTING (EXT)>STOP LIGHT SWITCH>INSTALLATION
Install the cowl side trim board LH.
Click hereVehicle Interior>INTERIOR PANELS / TRIM>INSTRUMENT PANEL SAFETY PAD>INSTALLATION
Install the front door scuff plate LH.
Click hereVehicle Interior>INTERIOR PANELS / TRIM>ROOF HEADLINING>INSTALLATION
89510D
2.INSPECT AND ADJUST BRAKE PEDAL STROKE SENSOR ASSEMBLY
Inspect the brake pedal stroke sensor assembly.
Connect the GTS to the DLC3 with the power switch off.
Turn the power switch on (IG).
Turn the GTS on and enter the following menus: Chassis / ABS/VSC/TRC / Data List / Stroke Sensor.
- Chassis > ABS/VSC/TRC > Data List
-
Tester Display Stroke Sensor - 50003 105 11
Read the stroke sensor value without the brake pedal depressed.
- Standard Voltage (without the brake pedal depressed):
0.8 to 1.2 V
- HINT:
-
If the stroke sensor value is not within the standard voltage, adjust the brake pedal stroke sensor assembly.
Adjust the brake pedal stroke sensor assembly.
Remove the front door scuff plate LH.
Click hereVehicle Interior>INTERIOR PANELS / TRIM>ROOF HEADLINING>REMOVAL
Remove the cowl side trim board LH.
Click hereVehicle Interior>INTERIOR PANELS / TRIM>INSTRUMENT PANEL SAFETY PAD>REMOVAL
Remove the No. 1 instrument panel under cover sub-assembly.
Click hereVehicle Interior>INTERIOR PANELS / TRIM>INSTRUMENT PANEL SAFETY PAD>REMOVAL
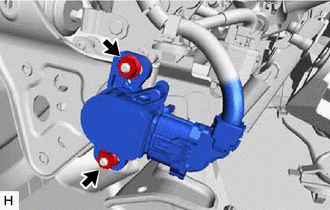
Loosen the 2 nuts.
- NOTICE:
-
Do not depress the brake pedal after turning the power switch on (IG).
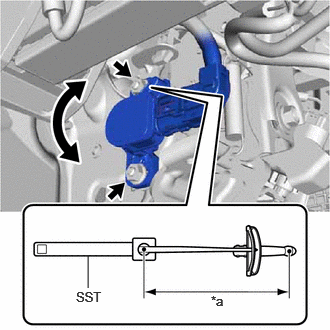
| *a | Torque Wrench Fulcrum Length |
Read the stroke sensor value in the Data List, and turn the brake pedal stroke sensor assembly slowly to the right or left to adjust the output voltage so that it is within the following range.
- Standard Voltage (without the brake pedal depressed):
0.8 to 1.2 V
Using SST, fully tighten the 2 nuts.
- SST
- 09961-00950
- Torque:
- Specified tightening torque : 8.5 N*m (87 kgf*cm, 75 in.*lbf)
- HINT:
- ·
Calculate the torque wrench reading when changing the fulcrum length of the torque wrench.
Click hereGeneral>INTRODUCTION>REPAIR INSTRUCTION>PRECAUTION
·When using SST (fulcrum length of 150 mm (5.91 in.)) + torque wrench (fulcrum length of 185 mm (7.28 in.)):
4.7 N*m (48 kgf*cm, 42 in.*lbf)
Perform initialization and calibration of linear solenoid valve and zero point of yaw rate and acceleration sensor.
Turn the GTS off and turn the power switch off.
Disconnect the GTS.
Install the cowl side trim board LH.
Click hereVehicle Interior>INTERIOR PANELS / TRIM>INSTRUMENT PANEL SAFETY PAD>INSTALLATION
Install the front door scuff plate LH.
Click hereVehicle Interior>INTERIOR PANELS / TRIM>ROOF HEADLINING>INSTALLATION
Install the No. 1 instrument panel under cover sub-assembly.
Click hereVehicle Interior>INTERIOR PANELS / TRIM>INSTRUMENT PANEL SAFETY PAD>INSTALLATION
3.INSPECT BRAKE PEDAL FREE PLAY
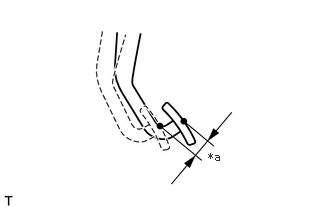
| *a | Brake Pedal Free Play |
Depress the brake pedal until a slight resistance is felt. Measure the distance as shown in the illustration.
- Brake Pedal Free Play:
1.0 to 6.0 mm (0.0394 to 0.236 in.)
If the brake pedal free play is not as specified, check the stop light switch clearance.
Click hereVehicle Exterior>LIGHTING (EXT)>STOP LIGHT SWITCH>INSTALLATION
If the brake pedal free play is as specified, proceed to the Inspect Brake Pedal Reserve Distance procedure.
4.INSPECT BRAKE PEDAL RESERVE DISTANCE
With the engine running, depress the brake pedal and measure the brake pedal reserve distance as shown in the illustration.
- HINT:
-
Perform checks with the service hole carpet rolled back.
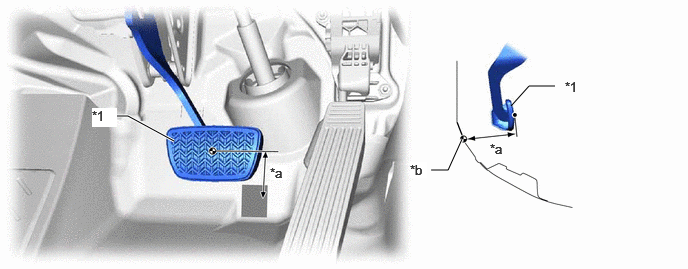
| *1 | Brake Pedal Pad | - | - |
| *a | Brake Pedal Reserve Distance | *b | Measuring Plane of Floor Panel |
|
|
Service Hole | - | - |
- Brake Pedal Reserve Distance from Floor Panel at 300 N (30.5 kgf, 67.4 lbf):
124 mm (4.89 in.) or more
If the distance is not as specified, troubleshoot the brake system.
Click hereBrake>BRAKE SYSTEM (OTHER)>BRAKE SYSTEM (w/o Vacuum Brake Booster)>PROBLEM SYMPTOMS TABLE