K120 MULTIDRIVE / CVT CONTINUOUSLY VARIABLE TRANSAXLE SYSTEM P084000 Transmission Fluid Pressure Sensor/Switch "A" Circuit Range/Performance P28287F Pressure Control Solenoid "K" Actuator Stuck Off
DESCRIPTION
The TCM controls the secondary oil pressure based on the secondary oil pressure signal output by the oil pressure sensor.
| DTC No. | Detection Item | DTC Detection Condition | Trouble Area | MIL | Memory | Note |
|---|---|---|---|---|---|---|
| P084000 | Transmission Fluid Pressure Sensor/Switch "A" Circuit Range/Performance | Either of the following conditions is met (1-trip detection logic):
·
When the requested oil pressure is less than 1.0 MPa (10.2 kgf/cm2, 145 psi), the oil pressure sensor output is 2.5 MPa (25.5 kgf/cm2, 363 psi) or more for 3 seconds or more. ·
When the requested oil pressure is 1.4 MPa (14.3 kgf/cm2, 203 psi) or more, the oil pressure sensor output is less than 0.5 MPa (5.1 kgf/cm2, 73 psi) for 2 seconds or more. |
·
Oil pressure sensor ·
Transmission valve body assembly ·
TCM ·
Continuously variable transaxle assembly |
Comes on | DTC stored | SAE Code:
P0841 |
| P28287F | Pressure Control Solenoid "K" Actuator Stuck Off | Either of the following conditions is met (1-trip detection logic):
·
When the requested oil pressure is less than 1.0 MPa (10.2 kgf/cm2, 145 psi), the oil pressure sensor output is 2.5 MPa (25.5 kgf/cm2, 363 psi) or more for 3 seconds or more. ·
When the requested oil pressure is 1.4 MPa (14.3 kgf/cm2, 203 psi) or more, the oil pressure sensor output is less than 0.5 MPa (5.1 kgf/cm2, 73 psi) for 2 seconds or more. |
·
Oil pressure sensor ·
Transmission valve body assembly ·
TCM ·
Continuously variable transaxle assembly |
Comes on | DTC stored | SAE Code:
P2829 |
| Vehicle Condition | |||
|---|---|---|---|
| Pattern 1 | Pattern 2 | ||
| Diagnostic Condition | The requested oil pressure value is less than 1.0 MPa (10.2 kgf/cm2, 145 psi) | ○ | - |
| The requested oil pressure value is 1.4 MPa (14.3 kgf/cm2, 203 psi) or more | - | ○ | |
| Malfunction Condition | The oil pressure sensor output value is 2.5 MPa (25.5 kgf/cm2, 363 psi) or more | ○ | - |
| The oil pressure sensor output value is less than 0.5 MPa (5.1 kgf/cm2, 73 psi) | - | ○ | |
| Duration | 3 seconds or more | 2 seconds or more | |
| Detection Logic | 1-trip detection logic | 1-trip detection logic | |
- HINT:
-
These DTCs are output when either of the above detection patterns is met.
MONITOR DESCRIPTION
The TCM checks for belt clamping high-pressure or low-pressure malfunctions. If a mechanical malfunction of the shift solenoid valve SLS or a malfunction of the oil pressure sensor is detected by the TCM, it illuminates the MIL and stores a DTC.
CONFIRMATION DRIVING PATTERN
- CAUTION:
-
When performing the confirmation driving pattern, obey all speed limits and traffic laws.
- HINT:
-
After repairs have been completed, clear the DTCs and then check that the vehicle has returned to normal by performing the following All Readiness check procedure.
Connect the GTS to the DLC3.
Turn the ignition switch to ON and turn the GTS on.
Clear the DTCs (even if no DTCs are stored, perform the clear DTC procedure).
Turn the ignition switch off and wait for at least 30 seconds.
Turn the ignition switch to ON and turn the GTS on.
Start the engine.
Perform the D Position Test inspection in Road Test.
Click hereDrivetrain>K120 (MULTIDRIVE / CVT)>CONTINUOUSLY VARIABLE TRANSAXLE SYSTEM>ROAD TEST
Stop the vehicle.
Enter the following menus: Powertrain / Transmission / Utility / All Readiness.
Input the DTC: P084000 or P28287F.
Check the DTC judgment result.
| GTS Display | Description |
|---|---|
| NORMAL | ·
DTC judgment completed ·
System normal |
| ABNORMAL | ·
DTC judgment completed ·
System abnormal |
| INCOMPLETE | ·
DTC judgment not completed ·
Perform driving pattern after confirming DTC enabling conditions |
| N/A | ·
Unable to perform DTC judgment ·
Number of DTCs which do not fulfill DTC preconditions has reached ECU memory limit |
- HINT:
- ·
If the judgment result shows NORMAL, the system is normal.
·If the judgment result shows ABNORMAL, the system has a malfunction.
·If the judgment result shows INCOMPLETE or N/A, perform the Confirmation Driving Pattern and check the DTC judgment result again.
WIRING DIAGRAM
Refer to DTC P084011.
Click hereDrivetrain>K120 (MULTIDRIVE / CVT)>CONTINUOUSLY VARIABLE TRANSAXLE SYSTEM>P084011
CAUTION / NOTICE / HINT
- CAUTION:
- ·
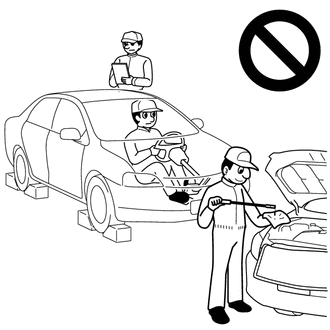
Do not perform a stall test if there are any people or objects near the vehicle.
·The vehicle could begin moving suddenly, resulting in a serious accident.
- ·
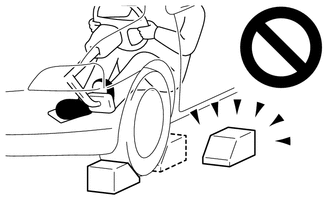
Do not perform a stall test if any wheel chocks are out of position.
·The vehicle could begin moving suddenly, resulting in a serious accident.
- ·
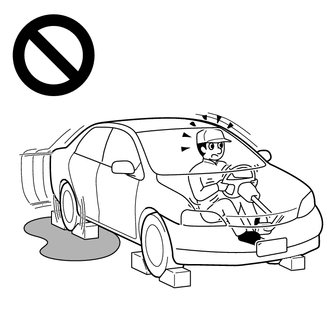
Do not perform the stall test on a slippery or low-friction surface that could allow the tires to spin.
·The vehicle could begin moving suddenly, resulting in a serious accident.
- NOTICE:
- ·
Perform registration and/or initialization when parts related to the continuously variable transaxle system are replaced.
Click hereDrivetrain>K120 (MULTIDRIVE / CVT)>CONTINUOUSLY VARIABLE TRANSAXLE SYSTEM>PRECAUTION
·Check that no DTCs are stored after performing initialization.
Click hereDrivetrain>K120 (MULTIDRIVE / CVT)>CONTINUOUSLY VARIABLE TRANSAXLE SYSTEM>DTC CHECK / CLEAR
- HINT:
-
If any DTCs other than P084000 or P28287F are output, perform troubleshooting for those DTCs first.
PROCEDURE
Connect the GTS to the DLC3.
Turn the ignition switch to ON.
Turn the GTS on.
Enter the following menus: Powertrain / Transmission / Trouble Codes.
- Powertrain > Transmission > Trouble Codes
- 50001 373
Read the DTCs using the GTS.
- HINT:
- ·
If DTC P084011 or P084015 is output, perform troubleshooting for that DTC first.
·If DTCs P084011 and P084015 are not output but DTC P282812 or P282814 is output, perform troubleshooting for DTC P282812 or P282814 first.
- Result:
Result Proceed to Only DTC P084000 is output A Only DTC P28287F is output B Both DTC P084000 and P28287F are output C DTC P084000 and/or P28287F and P084011 are output D DTC P084000 and/or P28287F and P084015 are output E DTC P084000 and/or P28287F and P282812 output F DTC P084000 and/or P28287F and P282814 output G DTC P084000 and/or P28287F and DTCs other than P084011, P084015, P282812 and P282814 are output H
A
B
C
D
E
F
G
H
- CAUTION:
-
A stall speed test should always be performed with at least 2 people. One person should observe the condition of the wheels and wheel chocks while the other is performing the test.
- NOTICE:
- ·
This test must be performed after checking and confirming that the engine is normal.
·Perform this test with the CVT fluid temperature between 50 and 100°C (122 and 212°F).
·Perform this test with the air conditioning off.
·Do not perform the stall speed test for longer than 5 seconds.
·When performing the stall speed test repeatedly, wait for 15 seconds or more between tests.
·Perform this test with the AUTO function (shift-linked function) of the electric parking brake system off.
Warm up the engine.
Fully apply the parking brake and chock all 4 wheels.
- HINT:
-
When the parking brake indicator (red) is illuminated after the electric parking brake switch (integration control and panel assembly) has been pulled to the lock side, the maximum amount of braking force is applied if the electric parking brake switch (integration control and panel assembly) is pulled to the lock side one more time.
Connect the GTS to the DLC3.
Turn the ignition switch to ON.
Turn the GTS on.
Enter the following menus: Powertrain / Transmission / Active Test / Activate the TC Terminal.
According to the display on the GTS, perform the Active Test.
- Powertrain > Transmission > Active Test
-
Tester Display Measurement Item Control Range Diagnostic Note Activate the TC Terminal Turn on and off TC and TE1 (CG) connection ON or OFF ·ON: TC and TE1 are connected.
·OFF: TC and TE1 are disconnected.
(Vehicle Condition)Ignition switch ON, engine stopped and shift lever in P
Enter the following menus: Powertrain / Transmission / Data List / Belt Clamping Force Sensor.
According to the display on the GTS, read the Data List.
- Powertrain > Transmission > Data List
-
Tester Display Measurement Item Range Normal Condition Diagnostic Note Belt Clamping Force Sensor Secondary oil pressure value Min.: -64 MPa
Max.: 63.998 MPaSecondary oil pressure inspection:
·3.5 to 4.3 MPa (35.7 to 43.8 kgf/cm2, 508 to 624 psi): D position stall test
·1.6 to 2.4 MPa (16.3 to 24.5 kgf/cm2, 232 to 348 psi): R position stall test
-
- Powertrain > Transmission > Active Test
-
Active Test Display Activate the TC Terminal -
Data List Display Belt Clamping Force Sensor - 50004 373 22 367
- Result:
Result Proceed to Data List value is normal A Data List value is not normal B
A
B
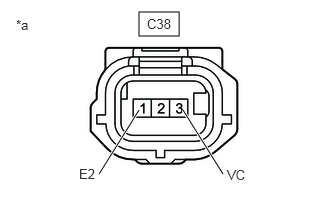
| *a | Front view of wire harness connector
(to Oil Pressure Sensor) |
Disconnect the oil pressure sensor connector.
Measure the voltage according to the value(s) in the table below.
- Standard Voltage:
Tester Connection Switch Condition Specified Condition C38-3 (VC) - C38-1 (E2) Ignition switch ON 4.75 to 5.25 V
Connect the oil pressure sensor connector.
- Result:
Proceed to OK NG
OK
NG
Replace the oil pressure sensor.
Click hereDrivetrain>K120 (MULTIDRIVE / CVT)>OIL PRESSURE SENSOR>REMOVAL
- Result:
Proceed to NEXT
NEXT
Replace the TCM.
- Result:
Proceed to NEXT
NEXT
for Registration: Click hereDrivetrain>K120 (MULTIDRIVE / CVT)>CONTINUOUSLY VARIABLE TRANSAXLE SYSTEM>REGISTRATION
for Initialization: Click hereDrivetrain>K120 (MULTIDRIVE / CVT)>CONTINUOUSLY VARIABLE TRANSAXLE SYSTEM>INITIALIZATION
- CAUTION:
-
A stall speed test should always be performed with at least 2 people. One person should observe the condition of the wheels and wheel chocks while the other is performing the test.
- NOTICE:
- ·
This test must be performed after checking and confirming that the engine is normal.
·Perform this test with the CVT fluid temperature between 50 and 100°C (122 and 212°F).
·Perform this test with the air conditioning off.
·Do not perform the stall speed test for longer than 5 seconds.
·When performing the stall speed test repeatedly, wait for 15 seconds or more between tests.
·Perform this test with the AUTO function (shift-linked function) of the electric parking brake system off.
Warm up the engine.
Fully apply the parking brake and chock all 4 wheels.
- HINT:
-
When the parking brake indicator (red) is illuminated after the electric parking brake switch (integration control and panel assembly) has been pulled to the lock side, the maximum amount of braking force is applied if the electric parking brake switch (integration control and panel assembly) is pulled to the lock side one more time.
Connect the GTS to the DLC3.
Turn the ignition switch to ON.
Turn the GTS on.
Enter the following menus: Powertrain / Transmission / Active Test / Activate the TC Terminal.
According to the display on the GTS, perform the Active Test.
- Powertrain > Transmission > Active Test
-
Tester Display Measurement Item Control Range Diagnostic Note Activate the TC Terminal Turn on and off TC and TE1 (CG) connection ON or OFF ·ON: TC and TE1 are connected.
·OFF: TC and TE1 are disconnected.
(Vehicle Condition)Ignition switch ON, engine stopped and shift lever in P
Enter the following menus: Powertrain / Transmission / Data List / Belt Clamping Force Sensor.
According to the display on the GTS, read the Data List.
- Powertrain > Transmission > Data List
-
Tester Display Measurement Item Range Normal Condition Diagnostic Note Belt Clamping Force Sensor Secondary oil pressure value Min.: -64 MPa
Max.: 63.998 MPaSecondary oil pressure inspection:
·3.5 to 4.3 MPa (35.7 to 43.8 kgf/cm2, 508 to 624 psi): D position stall test
·1.6 to 2.4 MPa (16.3 to 24.5 kgf/cm2, 232 to 348 psi): R position stall test
-
- Powertrain > Transmission > Active Test
-
Active Test Display Activate the TC Terminal -
Data List Display Belt Clamping Force Sensor - 50004 373 22 367
- Result:
Result Proceed to Data List value is normal A Data List value is not normal B
A
B
Replace the continuously variable transaxle assembly.
Click hereDrivetrain>K120 (MULTIDRIVE / CVT)>CONTINUOUSLY VARIABLE TRANSAXLE ASSEMBLY>REMOVAL
- Result:
Proceed to NEXT
NEXT
for Registration: Click hereDrivetrain>K120 (MULTIDRIVE / CVT)>CONTINUOUSLY VARIABLE TRANSAXLE SYSTEM>REGISTRATION
for Initialization: Click hereDrivetrain>K120 (MULTIDRIVE / CVT)>CONTINUOUSLY VARIABLE TRANSAXLE SYSTEM>INITIALIZATION
- CAUTION:
-
A stall speed test should always be performed with at least 2 people. One person should observe the condition of the wheels and wheel chocks while the other is performing the test.
- NOTICE:
- ·
This test must be performed after checking and confirming that the engine is normal.
·Perform this test with the CVT fluid temperature between 50 and 100°C (122 and 212°F).
·Perform this test with the air conditioning off.
·Do not perform the stall speed test for longer than 5 seconds.
·When performing the stall speed test repeatedly, wait for 15 seconds or more between tests.
·Perform this test with the AUTO function (shift-linked function) of the electric parking brake system off.
Warm up the engine.
Fully apply the parking brake and chock all 4 wheels.
- HINT:
-
When the parking brake indicator (red) is illuminated after the electric parking brake switch (integration control and panel assembly) has been pulled to the lock side, the maximum amount of braking force is applied if the electric parking brake switch (integration control and panel assembly) is pulled to the lock side one more time.
Connect the GTS to the DLC3.
Turn the ignition switch to ON.
Turn the GTS on.
Enter the following menus: Powertrain / Transmission / Active Test / Activate the TC Terminal.
According to the display on the GTS, perform the Active Test.
- Powertrain > Transmission > Active Test
-
Tester Display Measurement Item Control Range Diagnostic Note Activate the TC Terminal Turn on and off TC and TE1 (CG) connection ON or OFF ·ON: TC and TE1 are connected.
·OFF: TC and TE1 are disconnected.
(Vehicle Condition)Ignition switch ON, engine stopped and shift lever in P
Enter the following menus: Powertrain / Transmission / Data List / Belt Clamping Force Sensor.
According to the display on the GTS, read the Data List.
- Powertrain > Transmission > Data List
-
Tester Display Measurement Item Range Normal Condition Diagnostic Note Belt Clamping Force Sensor Secondary oil pressure value Min.: -64 MPa
Max.: 63.998 MPaSecondary oil pressure inspection:
·3.5 to 4.3 MPa (35.7 to 43.8 kgf/cm2, 508 to 624 psi): D position stall test
·1.6 to 2.4 MPa (16.3 to 24.5 kgf/cm2, 232 to 348 psi): R position stall test
-
- Powertrain > Transmission > Active Test
-
Active Test Display Activate the TC Terminal -
Data List Display Belt Clamping Force Sensor - 50004 373 22 367
- Result:
Result Proceed to Data List value is normal A Data List value is not normal B
A
B
| *a | Front view of wire harness connector
(to Oil Pressure Sensor) |
Disconnect the oil pressure sensor connector.
Measure the voltage according to the value(s) in the table below.
- Standard Voltage:
Tester Connection Switch Condition Specified Condition C38-3 (VC) - C38-1 (E2) Ignition switch ON 4.75 to 5.25 V
Connect the oil pressure sensor connector.
- Result:
Proceed to OK NG
OK
NG
Disconnect the transmission wire connector from the shift solenoid valve SLS.
Click hereDrivetrain>K120 (MULTIDRIVE / CVT)>VALVE BODY ASSEMBLY>REMOVAL
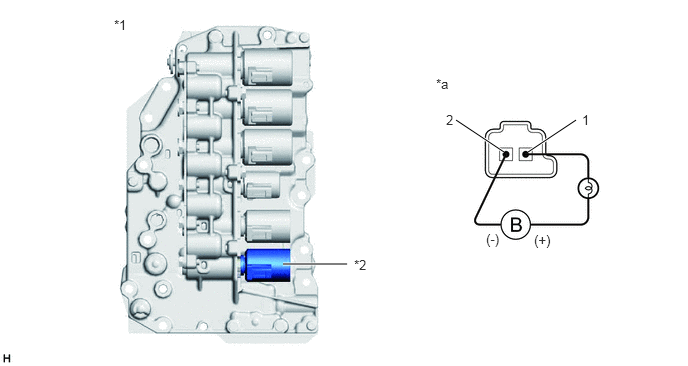
| *1 | Transmission Valve Body Assembly | *2 | Shift Solenoid Valve SLS |
| *a | Component without harness connected
(Shift Solenoid Valve SLS) |
- | - |
Connect a positive (+) lead from the battery with a 21 W bulb to terminal 1 and a negative (-) lead to terminal 2 of the shift solenoid valve SLS connector. Check that the valve moves and makes an operating sound.
- OK:
Valve moves and makes an operating sound.
- Result:
Proceed to OK NG
OK
NG
Replace the oil pressure sensor.
Click hereDrivetrain>K120 (MULTIDRIVE / CVT)>OIL PRESSURE SENSOR>REMOVAL
- Result:
Proceed to NEXT
NEXT
Replace the continuously variable transaxle assembly.
Click hereDrivetrain>K120 (MULTIDRIVE / CVT)>CONTINUOUSLY VARIABLE TRANSAXLE ASSEMBLY>REMOVAL
- Result:
Proceed to NEXT
NEXT
for Registration: Click hereDrivetrain>K120 (MULTIDRIVE / CVT)>CONTINUOUSLY VARIABLE TRANSAXLE SYSTEM>REGISTRATION
for Initialization: Click hereDrivetrain>K120 (MULTIDRIVE / CVT)>CONTINUOUSLY VARIABLE TRANSAXLE SYSTEM>INITIALIZATION
Replace the TCM.
- Result:
Proceed to NEXT
NEXT
for Registration: Click hereDrivetrain>K120 (MULTIDRIVE / CVT)>CONTINUOUSLY VARIABLE TRANSAXLE SYSTEM>REGISTRATION
for Initialization: Click hereDrivetrain>K120 (MULTIDRIVE / CVT)>CONTINUOUSLY VARIABLE TRANSAXLE SYSTEM>INITIALIZATION