DOOR / HATCH KICK SENSOR INSTALLATION
PROCEDURE

 891B2
1.INSTALL KICK DOOR CONTROL SENSOR
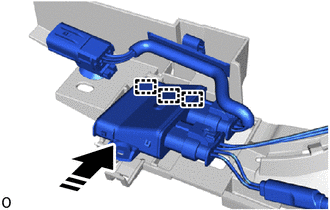

|
Install in this Direction |
Attach the guide in the direction indicated by the arrow shown in the illustration.
- NOTICE:
- ·
Do not subject the kick door control sensor to strong impacts or force, and do not drop it.
·Do not reuse a kick door control sensor which has been subjected to an impact or dropped.
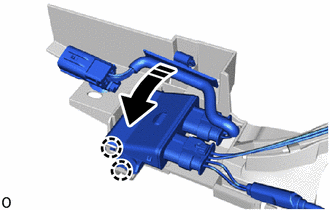
|
|
Install in this Direction |
Attach the claw and install the kick door control sensor in the direction indicated by the arrow as shown in the illustration.
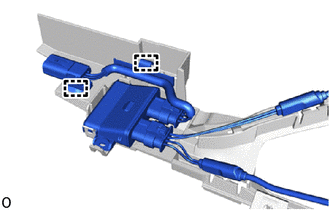
Attach the clamp.
- NOTICE:
- ·
Do not pull strongly on the wire.
·Do not twist the wire.
Attach the guide and claw in the order shown in the illustration and connect the antenna cable.
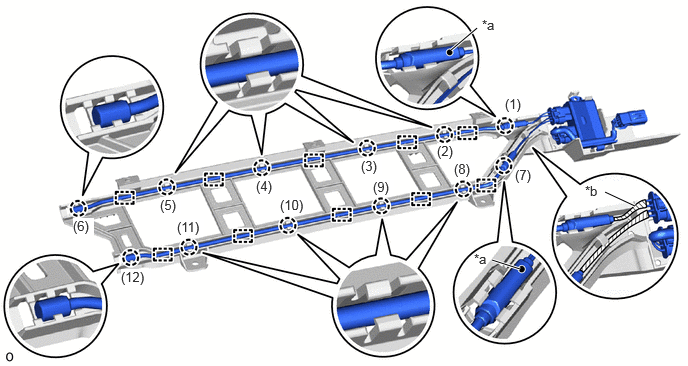
| *a | Paint Mark | *b | Tape (Red) |
- NOTICE:
- ·
Securely insert the antenna cable into the bracket until it reaches the bottom.
·Do not cross the red and black wires.
- HINT:
- ·
Install so that the paint mark is facing the top of the vehicle.
·Install the end of the antenna cable wrapped in tape to the rear side of the vehicle.
891B1
2.INSTALL KICK DOOR CONTROL BRACKET
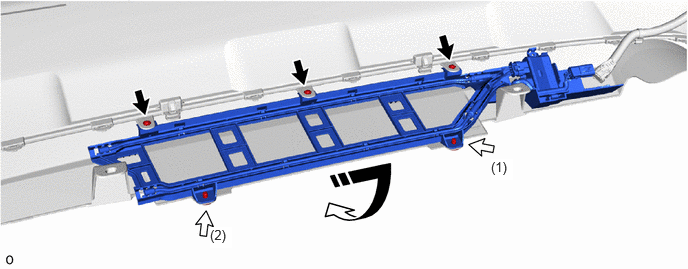
Install the 2 clips in the order shown in the illustration and install the kick door control bracket together with the kick door control sensor.
|
|
Install in this Direction | 
|
Screw |

|
Clip | - | - |
Install the 3 screws.
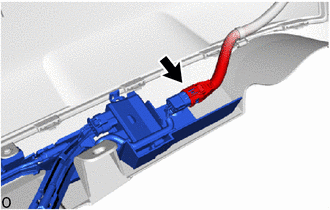
Connect the connector.
- NOTICE:
-
Do not touch the terminal of the kick door control sensor connector.
52159
3.INSTALL REAR BUMPER COVER
4.CONNECT CABLE TO NEGATIVE AUXILIARY BATTERY TERMINAL
for A25A-FXS:
Click hereGeneral>MAINTENANCE>A25A-FXS AUXILIARY BATTERY>INSTALLATION
for A25A-FKS:
for M20A-FKS:
for A25B-FXS:
Click hereGeneral>MAINTENANCE>A25B-FXS AUXILIARY BATTERY>INSTALLATION
- NOTICE:
-
When disconnecting the cable, some systems need to be initialized after the cable is reconnected.
-
Click hereGeneral>INTRODUCTION>REPAIR INSTRUCTION>INITIALIZATION
65351A
5.INSTALL BATTERY HOLE COVER (for HV Model)
58416K
6.INSTALL REAR NO. 2 FLOOR BOARD (for HV Model)
58410B
7.INSTALL DECK BOARD ASSEMBLY (for HV Model)
891B2
8.CHECK KICK DOOR CONTROL SENSOR
for HV Model:
Click hereVehicle Exterior>DOOR / HATCH>POWER BACK DOOR SYSTEM (for HV Model)>DATA LIST / ACTIVE TEST
for Gasoline Model:
Click hereVehicle Exterior>DOOR / HATCH>POWER BACK DOOR SYSTEM (for Gasoline Model)>DATA LIST / ACTIVE TEST
9.PERFORM CALIBRATION (w/ Parking Support Brake System)
for Gasoline Model: