REAR SUSPENSION REAR STABILIZER BAR INSTALLATION
PROCEDURE

 48818
1.INSTALL REAR STABILIZER BUSHING
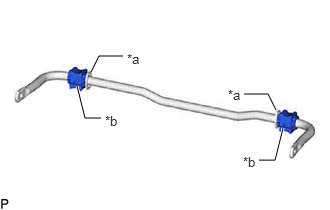
| *a | Stopper |
| *b | Cutout |
Install the 2 rear stabilizer bushings to the outside of the stoppers on the rear stabilizer bar.
- NOTICE:
-
Be sure to install the rear stabilizer bushings so that each cutout faces the front of the vehicle.
- HINT:
-
The cutout of the rear stabilizer bushing can be positioned either up or down.
48832A
2.INSTALL REAR NO. 1 STABILIZER BAR BRACKET LH
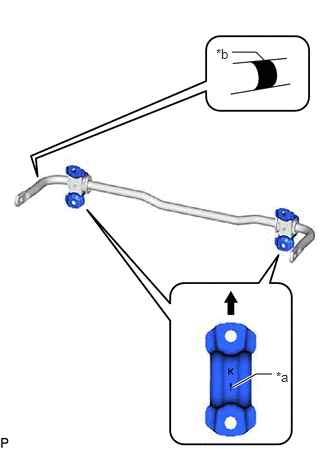
| *a | Arrow Mark |
| *b | Identification Mark |

|
Upper of the Vehicle |
Install the rear No. 1 stabilizer bar bracket LH to the rear stabilizer bushing.
- NOTICE:
- ·
Ensure that the identification mark faces the right side of the vehicle.
·Be sure to install the rear No. 1 stabilizer bar bracket LH so that each arrow mark faces the upper of the vehicle.
48832A
3.INSTALL REAR NO. 1 STABILIZER BAR BRACKET RH
- HINT:
-
Perform the same procedure as for the LH side.
48835
4.INSTALL REAR LOWER STABILIZER BRACKET
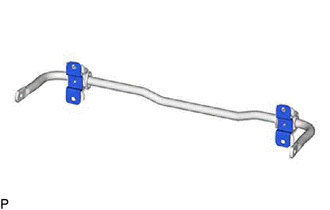
Install the 2 rear lower stabilizer brackets to the rear stabilizer bushing.
48812
5.INSTALL REAR STABILIZER BAR
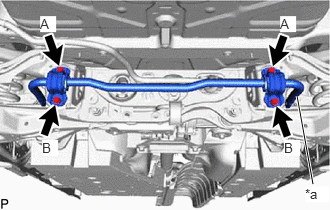
| *a | Identification Mark |
Install the rear stabilizer bar, rear No. 1 stabilizer bar bracket LH, rear No. 1 stabilizer bar bracket RH, rear No. 2 stabilizer bar bracket LH, rear No. 2 stabilizer bar bracket RH and 2 rear stabilizer bushings to the rear suspension member sub-assembly with the 4 bolts.
- Torque:
- 78 N*m (795 kgf*cm, 58 ft.*lbf)
- NOTICE:
- ·
Ensure that the identification mark faces the right side of the vehicle.
·Temporarily tighten the bolt (A) and then fully tighten the 2 bolts in the order of (B) and (A).
6.STABILIZE SUSPENSION
48840A
7.INSTALL REAR STABILIZER LINK ASSEMBLY LH
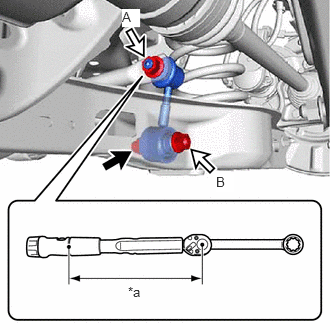
| *a | Torque Wrench Fulcrum Length |
Using a ball joint lock nut wrench, install the rear stabilizer link assembly LH with the nut (A).
- Torque:
- 100 N*m (1020 kgf*cm, 74 ft.*lbf)
- HINT:
- ·
If the ball joint turns together with the nut, use a 6 mm hexagon socket wrench to hold the stud bolt.
·Calculate the torque wrench reading when changing the fulcrum length of the torque wrench.
Click hereGeneral>INTRODUCTION>REPAIR INSTRUCTION>PRECAUTION
·When using a ball joint lock nut wrench (fulcrum length of 159 mm (6.260 in.)) + torque wrench (fulcrum length of 400 mm (15.748 in.)):
71.6 N*m (730 kgf*cm, 53 ft.*lbf)
Install the rear stabilizer link assembly LH with the bolt and nut (B).
- Torque:
- 81 N*m (826 kgf*cm, 60 ft.*lbf)
- NOTICE:
-
Because the nut has its own stopper, do not turn the nut. Tighten the bolt with the nut secured.
48830D
8.INSTALL REAR STABILIZER LINK ASSEMBLY RH
- HINT:
-
Perform the same procedure as for the LH side.
48738C
9.INSTALL LOWER NO. 2 CONTROL ARM COVER LH (w/ Cover)
48737C
10.INSTALL LOWER NO. 2 CONTROL ARM COVER RH (w/ Cover)
- HINT:
-
Perform the same procedure as for the LH side.
58399D
11.INSTALL NO. 2 FLOOR UNDER COVER (w/ Floor Under Cover)
for A25A-FKS:
Click hereEngine / Hybrid System>A25A-FKS (FUEL)>FUEL TANK (w/ Canister Pump Module)>INSTALLATION
for M20A-FKS:
Click hereEngine / Hybrid System>M20A-FKS (FUEL)>FUEL TANK>INSTALLATION
58398F
12.INSTALL NO. 1 FLOOR UNDER COVER (w/ Floor Under Cover)
for A25A-FKS:
Click hereEngine / Hybrid System>A25A-FKS (FUEL)>FUEL TANK (w/ Canister Pump Module)>INSTALLATION
for M20A-FKS:
Click hereEngine / Hybrid System>M20A-FKS (FUEL)>FUEL TANK>INSTALLATION
58166A
13.INSTALL FRONT FLOOR COVER LH (w/ Floor Under Cover)
for A25A-FKS:
Click hereEngine / Hybrid System>A25A-FKS (FUEL)>FUEL TANK (w/ Canister Pump Module)>INSTALLATION
for M20A-FKS:
Click hereEngine / Hybrid System>M20A-FKS (FUEL)>FUEL TANK>INSTALLATION
58166A
14.INSTALL FRONT FLOOR COVER RH (w/ Floor Under Cover)
for A25A-FKS:
Click hereEngine / Hybrid System>A25A-FKS (FUEL)>FUEL TANK (w/ Canister Pump Module)>INSTALLATION
for M20A-FKS:
Click hereEngine / Hybrid System>M20A-FKS (FUEL)>FUEL TANK>INSTALLATION
51420
15.INSTALL NO. 2 ENGINE UNDER COVER ASSEMBLY
for A25A-FKS:
Click hereEngine / Hybrid System>A25A-FKS (ENGINE MECHANICAL)>ENGINE ASSEMBLY>INSTALLATION
for M20A-FKS:
Click hereEngine / Hybrid System>M20A-FKS (ENGINE MECHANICAL)>ENGINE ASSEMBLY>INSTALLATION
51441
16.INSTALL NO. 1 ENGINE UNDER COVER
for A25A-FKS:
Click hereEngine / Hybrid System>A25A-FKS (ENGINE MECHANICAL)>ENGINE ASSEMBLY>INSTALLATION
for M20A-FKS:
Click hereEngine / Hybrid System>M20A-FKS (ENGINE MECHANICAL)>ENGINE ASSEMBLY>INSTALLATION
53896B
17.INSTALL FRONT FENDER FRONT SPLASH SHIELD LH
for A25A-FKS:
Click hereEngine / Hybrid System>A25A-FKS (ENGINE MECHANICAL)>ENGINE ASSEMBLY>INSTALLATION
for M20A-FKS:
Click hereEngine / Hybrid System>M20A-FKS (ENGINE MECHANICAL)>ENGINE ASSEMBLY>INSTALLATION
53895B
18.INSTALL FRONT FENDER FRONT SPLASH SHIELD RH
for A25A-FKS:
Click hereEngine / Hybrid System>A25A-FKS (ENGINE MECHANICAL)>ENGINE ASSEMBLY>INSTALLATION
for M20A-FKS:
Click hereEngine / Hybrid System>M20A-FKS (ENGINE MECHANICAL)>ENGINE ASSEMBLY>INSTALLATION
58327B
19.INSTALL MAIN MUFFLER HEAT INSULATOR
Install the main muffler heat insulator to the vehicle body with the 4 nuts.
- Torque:
- 4.9 N*m (50 kgf*cm, 43 in.*lbf)
17430
20.INSTALL TAIL EXHAUST PIPE ASSEMBLY
for A25A-FKS:
Click hereEngine / Hybrid System>A25A-FKS (INTAKE / EXHAUST)>EXHAUST PIPE>INSTALLATION
for M20A-FKS:
Click hereEngine / Hybrid System>M20A-FKS (INTAKE / EXHAUST)>EXHAUST PIPE>INSTALLATION
for A25A-FXS:
Click hereEngine / Hybrid System>A25A-FXS (INTAKE / EXHAUST)>EXHAUST PIPE>INSTALLATION
for A25B-FXS:
Click hereEngine / Hybrid System>A25B-FXS (INTAKE / EXHAUST)>EXHAUST PIPE>INSTALLATION
21.INSTALL REAR WHEEL
22.INSPECT FOR EXHAUST GAS LEAK
for A25A-FKS:
Click hereEngine / Hybrid System>A25A-FKS (INTAKE / EXHAUST)>EXHAUST PIPE>INSTALLATION
for M20A-FKS:
Click hereEngine / Hybrid System>M20A-FKS (INTAKE / EXHAUST)>EXHAUST PIPE>INSTALLATION
for A25A-FXS:
Click hereEngine / Hybrid System>A25A-FXS (INTAKE / EXHAUST)>EXHAUST PIPE>INSTALLATION
for A25B-FXS:
Click hereEngine / Hybrid System>A25B-FXS (INTAKE / EXHAUST)>EXHAUST PIPE>INSTALLATION