UB80E AUTOMATIC TRANSMISSION / TRANSAXLE TRANSMISSION CONTROL CABLE REMOVAL
CAUTION / NOTICE / HINT
The necessary procedures (adjustment, calibration, initialization or registration) that must be performed after parts are removed and installed, or replaced during transmission control cable assembly removal/installation are shown below.
| Replaced Part or Performed Procedure | Necessary Procedure | Effect/Inoperative Function when Necessary Procedure not Performed | Link |
|---|---|---|---|
|
*: When performing learning using the GTS. Click here( |
|||
| Battery terminal is disconnected/reconnected | Perform steering sensor zero point calibration | Lane control system | ( ) |
| Parking support brake system (for Gasoline model)* | |||
| Pre-collision system | |||
| Memorize steering angle neutral point | Parking assist monitor system | ()
|
|
| Panoramic view monitor system (for Gasoline model) | ()
|
||
| Reset back door close position | Power back door system (for Gasoline model) | ()
|
|
| Power back door initialization | Power door lock control system | ()
|
|
| ECM | Perform Vehicle Identification Number (VIN) or frame number registration | DTC P063051 is output | w/ Canister Pump Module:()
w/o Canister Pump Module:( )
|
| ECU communication ID registration | Engine start function | See Service Bulletin for the registration method. | |
If transaxle compensation code read from ECM -
Perform reset memory -
Transfer transaxle compensation code -
Perform road test to allow ECM to learn |
·
Large shift shock ·
Deterioration of fuel efficiency |
for Initialization:()
for Registration:( )
|
|
If transaxle compensation code not read from ECM -
Perform reset memory -
Transfer transaxle compensation code -
Perform road test to allow ECM to learn |
|||
- NOTICE:
-
After the ignition switch is turned off, the navigation system requires approximately a minute to record various types of memory and settings. As a result, after turning the ignition switch off, wait a minute or more before disconnecting the cable from the negative (-) battery terminal.
PROCEDURE

 1.SECURE VEHICLE
Fully apply the parking brake and chock a wheel.
- CAUTION:
-
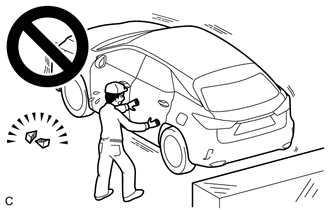
- ·
Make sure to apply the parking brake and chock a wheel before performing this procedure.
·If the vehicle is not secure and the shift lever is moved to N, the vehicle may suddenly move, possibly resulting in an accident or serious injury.
2.REMOVE BATTERY
89661
3.REMOVE ECM
74404B
4.REMOVE BATTERY CLAMP SUB-ASSEMBLY
53896B
5.REMOVE FRONT FENDER FRONT SPLASH SHIELD LH
53895B
6.REMOVE FRONT FENDER FRONT SPLASH SHIELD RH
51441
7.REMOVE NO. 1 ENGINE UNDER COVER
51420
8.REMOVE NO. 2 ENGINE UNDER COVER ASSEMBLY
58166A
9.REMOVE FRONT FLOOR COVER LH (w/ Cover)
58810J
10.REMOVE CONSOLE BOX ASSEMBLY
58861B
11.REMOVE NO. 1 CONSOLE BOX DUCT
33820B
12.DISCONNECT TRANSMISSION CONTROL CABLE ASSEMBLY
33820B
13.REMOVE TRANSMISSION CONTROL CABLE ASSEMBLY
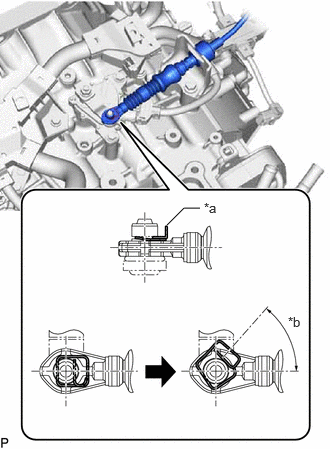
| *a | Clip |
| *b | 45° to 60° |
While disengaging the clip as shown in the illustration, disconnect the transmission control cable assembly from the transmission control shaft lever together with the clip.
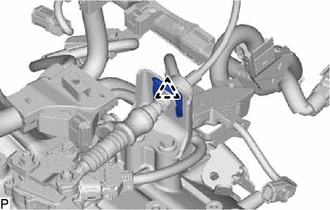
Remove the clip and disconnect the transmission control cable assembly from the No. 1 transmission control cable bracket.
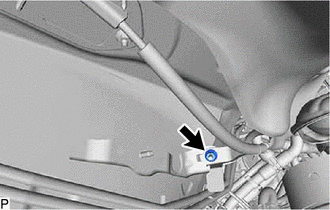
Remove the nut and disconnect the transmission control cable assembly from the vehicle body.
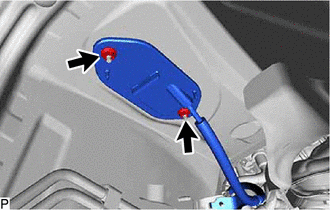
Remove the 2 nuts and then remove the transmission control cable assembly from the vehicle body.