3UR-FE ENGINE MECHANICAL CYLINDER HEAD GASKET INSTALLATION
CAUTION / NOTICE / HINT
- HINT:
-
Perform "Inspection After Repairs" after replacing the cylinder head LH or Cylinder head sub-assembly (See page Engine / Hybrid System>3UR-FE ENGINE CONTROL>SFI SYSTEM>INITIALIZATION).
PROCEDURE

 11101A
1.INSPECT CYLINDER HEAD SET BOLT
11102
2.INSPECT CYLINDER HEAD LH
11101
3.INSPECT CYLINDER HEAD SUB-ASSEMBLY
11116
4.INSTALL NO. 2 CYLINDER HEAD GASKET
Check the piston protrusions for each cylinder.
Clean the cylinder block with solvent.
Set the piston of the cylinder to be measured to slightly ATDC.
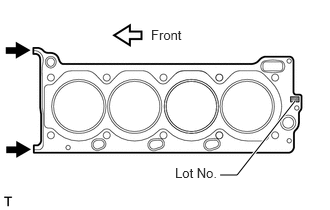
Place the cylinder head gasket on the cylinder block surface with the front face of the Lot No. stamp upward.
- NOTICE:
- ·
Be careful of the installation direction.
·Make sure that no oil is on the front end (indicated by the arrows) of the cylinder head gasket.
11102
5.INSTALL CYLINDER HEAD LH
- HINT:
-
Perform "Inspection After Repairs" after replacing the cylinder head LH (See page Engine / Hybrid System>3UR-FE ENGINE CONTROL>SFI SYSTEM>INITIALIZATION).
Place the cylinder head on the cylinder block.
- NOTICE:
- ·
Gently place the cylinder head in order not to damage the gasket with the bottom part of the head.
·Ensure that no oil is on the mounting surface of the cylinder head.
- HINT:
-
The cylinder head bolts are tightened in 3 progressive steps.
Apply a light coat of engine oil to the threads and under the heads of the cylinder head bolts.
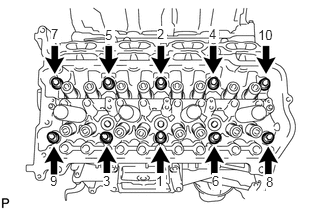
Using a 10 mm bi-hexagon wrench, install and uniformly tighten the 10 cylinder head bolts with the plate washers in several steps, in the sequence shown in the illustration.
- Torque:
- 36 N*m (367 kgf*cm, 27 ft.*lbf)
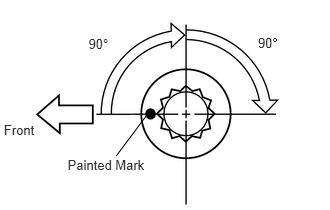
Mark the front of the cylinder head bolts with paint.
Further tighten the cylinder head bolts 90° and then an additional 90° as shown in the illustration.
Check that the paint mark is now at a 180° angle from the front.
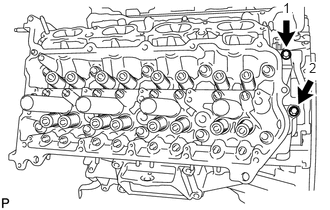
Install and uniformly tighten the 2 cylinder head bolts.
- Torque:
- 21 N*m (214 kgf*cm, 16 ft.*lbf)
11115
6.INSTALL CYLINDER HEAD GASKET
Check the piston protrusions for each cylinder.
Clean the cylinder block with solvent.
Set the piston of the cylinder to be measured to slightly ATDC.
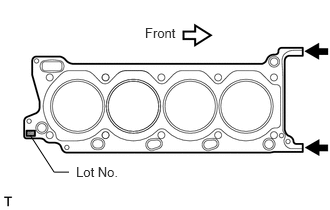
Place the cylinder head gasket on the cylinder block surface with the front face of the Lot No. stamp upward.
- NOTICE:
- ·
Be careful of the installation direction.
·Make sure that no oil is on the front end (indicated by the arrows) of the cylinder head gasket.
11101
7.INSTALL CYLINDER HEAD SUB-ASSEMBLY
- HINT:
-
Perform "Inspection After Repairs" after replacing the cylinder head sub-assembly (See page Engine / Hybrid System>3UR-FE ENGINE CONTROL>SFI SYSTEM>INITIALIZATION).
Place the cylinder head on the cylinder block.
- NOTICE:
- ·
Gently place the cylinder head in order not to damage the gasket with the bottom part of the head.
·Ensure that no oil is on the mounting surface of the cylinder head.
- HINT:
-
The cylinder head bolts are tightened in 3 progressive steps.
Apply a light coat of engine oil to the threads and under the heads of the cylinder head bolts.
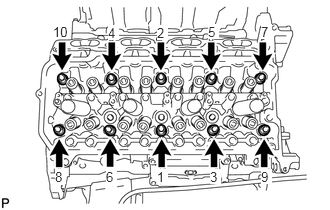
Using a 10 mm bi-hexagon wrench, install and uniformly tighten the 10 cylinder head bolts with the plate washers in several steps, in the sequence shown in the illustration.
- Torque:
- 36 N*m (367 kgf*cm, 27 ft.*lbf)
Mark the front of the cylinder head bolts with paint.
Further tighten the cylinder head bolts 90° and then an additional 90° as shown in the illustration.
Check that the paint mark is now at a 180° angle from the front.
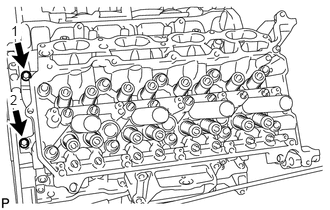
Install and uniformly tighten the 2 cylinder head bolts.
- Torque:
- 21 N*m (214 kgf*cm, 16 ft.*lbf)
13716
8.INSTALL VALVE STEM CAP
Apply a light coat of engine oil to the valve stem caps.
Install the 32 valve stem caps to the cylinder head.
13750
9.INSTALL VALVE LASH ADJUSTER ASSEMBLY
Inspect the valve lash adjuster (See page Engine / Hybrid System>3UR-FE ENGINE MECHANICAL>ENGINE UNIT>INSPECTION).
Install the 32 valve lash adjusters to the cylinder head.
- NOTICE:
-
Install the lash adjuster at the same place it was removed from.
13801
10.INSTALL NO. 1 VALVE ROCKER ARM SUB-ASSEMBLY
Apply engine oil to the lash adjuster tips and valve stem cap ends.
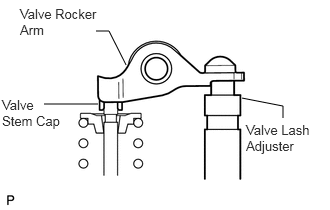
Install the 32 valve rocker arms as shown in the illustration.
11.INSTALL CAMSHAFTS
Install the camshaft (See page Engine / Hybrid System>3UR-FE ENGINE MECHANICAL>CAMSHAFT>INSTALLATION).
12.INSTALL EXHAUST MANIFOLD
Install the exhaust manifold (See page Engine / Hybrid System>3UR-FE INTAKE / EXHAUST>EXHAUST MANIFOLD>INSTALLATION).