3UR-FE INTAKE / EXHAUST EXHAUST MANIFOLD INSTALLATION
CAUTION / NOTICE / HINT
- HINT:
-
If an exhaust gas leak has been repaired, perform an inspection following the repair (See page Engine / Hybrid System>3UR-FE ENGINE CONTROL>SFI SYSTEM>INITIALIZATION).
PROCEDURE

 17104
1.INSTALL EXHAUST MANIFOLD SUB-ASSEMBLY RH
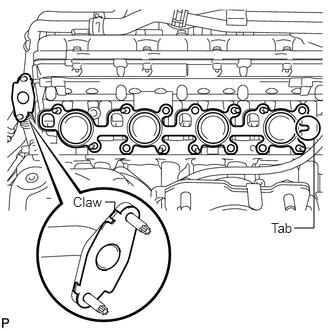
Install a new gasket to the cylinder head and a new gasket to the No. 2 air tube.
- HINT:
- ·
Install the exhaust manifold gasket with the gasket tab facing toward the front of the engine.
·Install the air tube gasket with the gasket's claws facing the tube side.
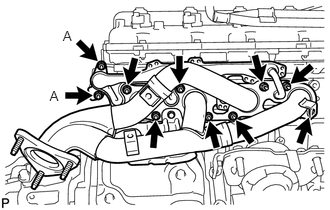
Temporarily install the exhaust manifold with the 2 nuts labeled A and 8 new nuts.
Uniformly tighten the nuts that are not labeled A, and then tighten the 2 nuts labeled A.
for nut A
- Torque:
- 10 N*m (102 kgf*cm, 7 ft.*lbf)
except nut A
- Torque:
- 21 N*m (214 kgf*cm, 16 ft.*lbf)
17167
2.INSTALL NO. 1 EXHAUST MANIFOLD HEAT INSULATOR
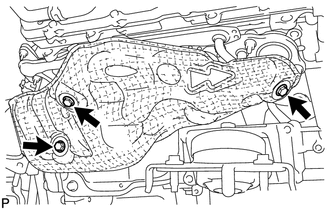
Install the No. 1 exhaust manifold heat insulator with the 3 bolts.
- Torque:
- 10 N*m (102 kgf*cm, 7 ft.*lbf)
17105
3.INSTALL EXHAUST MANIFOLD SUB-ASSEMBLY LH
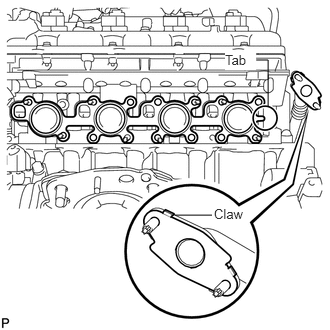
Install a new gasket to the cylinder head and a new gasket to the No. 3 air tube.
- HINT:
- ·
Install the exhaust manifold gasket with the gasket tab facing toward the rear of the engine.
·Install the air tube gasket with the gasket's claws facing the tube side.
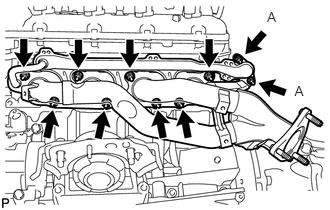
Temporarily install the exhaust manifold with the 2 nuts labeled A and 8 new nuts.
Uniformly tighten the nuts that are not labeled A, and then tighten the 2 nuts labeled A.
for nut A
- Torque:
- 10 N*m (102 kgf*cm, 7 ft.*lbf)
except nut A
- Torque:
- 21 N*m (214 kgf*cm, 16 ft.*lbf)
17168
4.INSTALL NO. 2 EXHAUST MANIFOLD HEAT INSULATOR
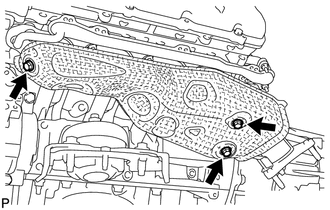
Install the No. 2 exhaust manifold heat insulator with the 3 bolts.
- Torque:
- 10 N*m (102 kgf*cm, 7 ft.*lbf)
45203
5.INSTALL NO. 2 STEERING INTERMEDIATE SHAFT SUB-ASSEMBLY
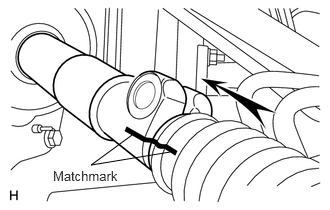
Align the matchmarks and insert the No. 2 steering intermediate shaft sub-assembly into the intermediate shaft.
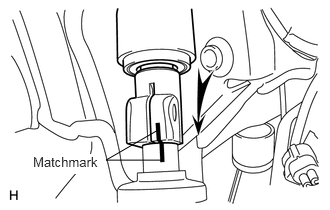
Align the matchmarks and insert the No. 2 steering intermediate shaft sub-assembly into the power steering gear.
Install the 2 bolts.
- Torque:
- 35 N*m (357 kgf*cm, 26 ft.*lbf)
58156
6.INSTALL FRONT NO. 4 FLOOR HEAT INSULATOR
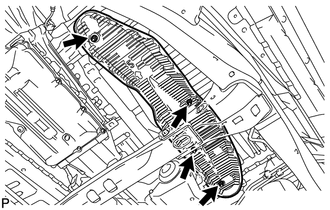
Install the front No. 4 floor heat insulator with the 4 bolts.
- Torque:
- 5.5 N*m (56 kgf*cm, 49 in.*lbf)
58155
7.INSTALL FRONT NO. 3 FLOOR HEAT INSULATOR
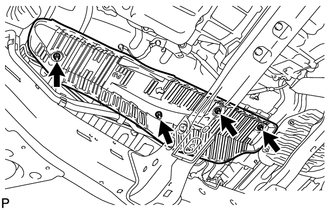
Install the front No. 3 floor heat insulator with the 4 bolts.
- Torque:
- 5.5 N*m (56 kgf*cm, 49 in.*lbf)
17410
8.INSTALL FRONT EXHAUST PIPE ASSEMBLY
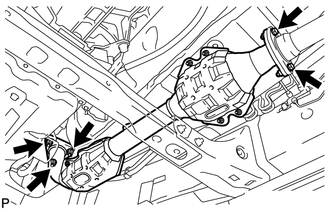
Install a new gasket and the front exhaust pipe assembly to the exhaust manifold RH with 3 new nuts.
- Torque:
- 54 N*m (554 kgf*cm, 40 ft.*lbf)
Install a new gasket and the front exhaust pipe assembly to the center exhaust pipe assembly with the 2 bolts.
- Torque:
- 48 N*m (489 kgf*cm, 35 ft.*lbf)
Connect the air fuel ratio sensor connector.
Connect the heated oxygen sensor connector and 2 clamps.
17450B
9.INSTALL FRONT NO. 2 EXHAUST PIPE ASSEMBLY
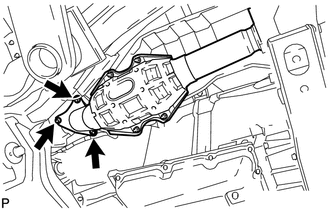
Install a new gasket and the front No. 2 exhaust pipe sub-assembly to the exhaust manifold LH with 3 new nuts.
- Torque:
- 54 N*m (554 kgf*cm, 40 ft.*lbf)
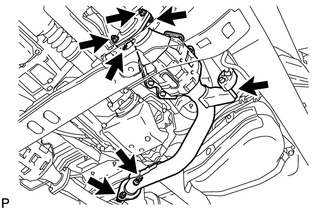
Connect the front No. 3 exhaust pipe sub-assembly to the exhaust pipe support.
Install 2 new gaskets and the front No. 3 exhaust pipe sub-assembly with the 4 bolts and 2 new nuts.
- Torque:
- 48 N*m (489 kgf*cm, 35 ft.*lbf)
Connect the air fuel ratio sensor connector.
Connect the heated oxygen sensor connector.
37140
10.INSTALL FRONT PROPELLER SHAFT ASSEMBLY (for 4WD)
37117B
11.INSTALL PROPELLER SHAFT HEAT INSULATOR (for 4WD)
11452
12.INSTALL ENGINE OIL LEVEL DIPSTICK GUIDE
13.INSPECT FOR EXHAUST GAS LEAK
- HINT:
-
If an exhaust gas leak has been repaired, perform an inspection following the repair (See page Engine / Hybrid System>3UR-FE ENGINE CONTROL>SFI SYSTEM>INITIALIZATION).
If gas is leaking, tighten the areas necessary to stop the leak. Replace damaged parts as necessary.
53739A
14.INSTALL FRONT FENDER APRON SEAL REAR LH
Install the fender apron seal with the 5 clips.
53737B
15.INSTALL FRONT FENDER APRON SEAL LH
Install the fender apron seal with the 6 clips.
53736A
16.INSTALL FRONT FENDER APRON SEAL REAR RH
Install the fender apron seal with the 5 clips.
53736
17.INSTALL FRONT FENDER APRON SEAL RH
Install the fender apron seal with the 6 clips.
51441
18.INSTALL NO. 1 ENGINE UNDER COVER