PARK ASSIST / MONITORING BLIND SPOT MONITOR SYSTEM Turn Signal Switch Circuit
DESCRIPTION
The blind spot monitor sensor receives a turn signal light information signal from the headlight dimmer switch assembly.
WIRING DIAGRAM
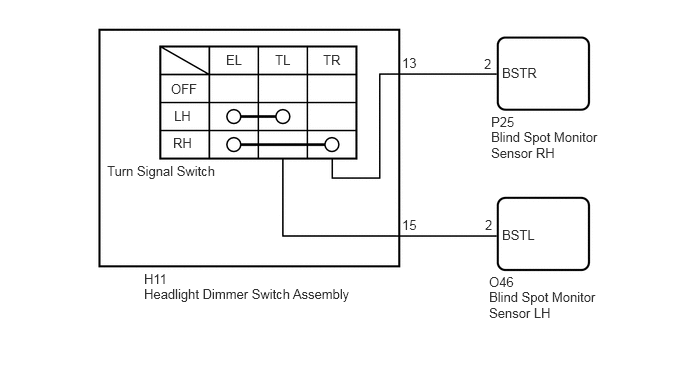
CAUTION / NOTICE / HINT
- NOTICE:
-
Before performing the inspection, check that there are no problems related to the Lighting system.
PROCEDURE
Connect the Techstream to the DLC3.
Turn the ignition switch to ON.
Turn the Techstream on.
Enter the following menus: Body Electrical / Blind Spot Monitor Master or Blind Spot Monitor Slave / Data List.
According to the display on the Techstream, read the Data List.
| Tester Display | Measurement Item/Range | Normal Condition | Diagnostic Note |
|---|---|---|---|
| Master Side Turn Signal | State of the master side turn signal / OFF or ON | ON: Right turn signal received
OFF: Right turn signal not received |
- |
| Tester Display | Measurement Item/Range | Normal Condition | Diagnostic Note |
|---|---|---|---|
| Slave Side Turn Switch | State of the slave side turn signal / OFF or ON | ON: Left turn signal received
OFF: Left turn signal not received |
- |
| Result | Proceed to |
|---|---|
| The display changes as shown above when the right turn switch or left turn switch is operated. | A |
| The display does not change as shown above when the right turn switch is operated. | B |
| The display does not change as shown above when the left turn switch is operated. | C |
A
B
C
Disconnect the P25 blind spot monitor sensor RH connector.
Disconnect the H11 headlight dimmer switch assembly connector.
Measure the resistance according to the value(s) in the table below.
- Standard Resistance:
Tester Connection Condition Specified Condition P25-2 (BSTR) - H11-13 (TR) Always Below 1 Ω P25-2 (BSTR) - Body ground Always 10 kΩ or higher
OK
NG
Disconnect the O46 blind spot monitor sensor LH connector.
Disconnect the H11 headlight dimmer switch assembly connector.
Measure the resistance according to the value(s) in the table below.
- Standard Resistance:
Tester Connection Condition Specified Condition O46-2 (BSTL) - H11-15 (TL) Always Below 1 Ω O46-2 (BSTL) - Body ground Always 10 kΩ or higher
OK
NG