HEATING / AIR CONDITIONING REAR AIR CONDITIONING UNIT INSTALLATION
PROCEDURE

 87030A
1.INSTALL REAR COOLING UNIT ASSEMBLY
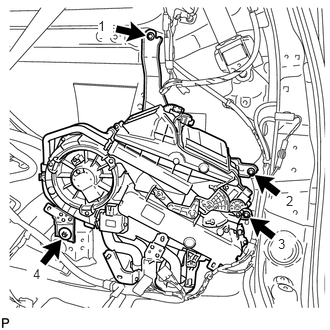
Install the rear cooling unit with the 3 bolts and nut.
- Torque:
- 5.4 N*m (55 kgf*cm, 48 in.*lbf)
- HINT:
-
Tighten the bolts in the order shown in the illustration.
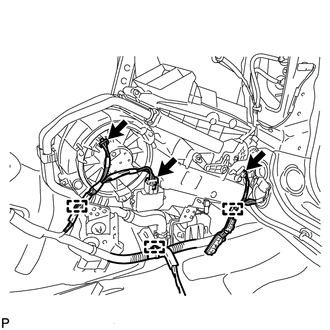
Connect the 3 connectors.
Attach the 3 clamps.
89715
2.INSTALL FOLD SEAT CONTROL ECU
86300C
3.INSTALL AMPLIFIER ANTENNA ASSEMBLY
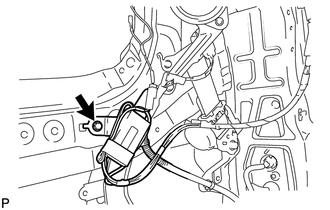
Install the amplifier antenna with the bolt.
87217D
4.INSTALL REAR SIDE NO. 1 AIR DUCT
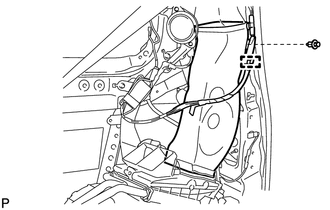
Install the air duct with the clip.
Attach the clamp.
88892J
5.INSTALL COVER SUB-ASSEMBLY
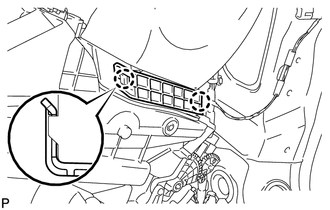
Attach the 2 claws and install the cover.
62533D
6.INSTALL QUARTER TRIM BRACKET RH
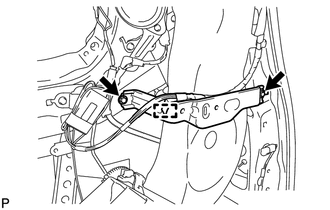
Install the quarter trim bracket with the 2 bolts.
Attach the clamp.
87217E
7.INSTALL REAR SIDE NO. 2 AIR DUCT
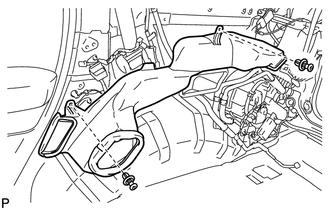
Install the air duct with the 2 clips.
62550F
8.INSTALL REAR WINDOW SIDE GARNISH ASSEMBLY RH
62570D
9.INSTALL REAR WINDOW NO. 2 SIDE GARNISH ASSEMBLY RH
62510P
10.INSTALL QUARTER TRIM PANEL ASSEMBLY RH (for Standard)
62510P
11.INSTALL QUARTER TRIM PANEL ASSEMBLY RH (for Power Seat)
58573A
12.INSTALL REAR FLOOR MAT SUPPORT PLATE
66310D
13.INSTALL ROPE HOOK ASSEMBLY
62331C
14.INSTALL REAR DOOR OPENING TRIM WEATHERSTRIP RH
67917A
15.INSTALL REAR DOOR SCUFF PLATE RH
58371F
16.INSTALL REAR FLOOR STEP NO. 1 COVER
58372E
17.INSTALL REAR FLOOR STEP NO. 2 COVER
71693
18.INSTALL REAR SEAT CUSHION HINGE LOWER COVER RH
19.INSTALL REAR NO. 2 SEAT ASSEMBLY RH (for Power Seat)
20.INSTALL REAR NO. 2 SEAT ASSEMBLY RH (for Manual Seat)
72127E
21.INSTALL SEAT TRACK BRACKET FRONT COVER INNER
72123A
22.INSTALL SEAT TRACK BRACKET FRONT COVER OUTER
58417F
23.INSTALL DECK BOARD BRACKET
58403K
24.INSTALL DECK BOARD REINFORCEMENT SUB-ASSEMBLY
58401A
25.INSTALL NO. 1 DECK BOARD SUB-ASSEMBLY
66310D
26.INSTALL ROPE HOOK ASSEMBLY
64429G
27.INSTALL LUGGAGE COMPARTMENT TRIM BOX
58408D
28.INSTALL NO. 2 DECK BOARD SUB-ASSEMBLY
88716D
29.CONNECT COOLER REFRIGERANT LIQUID PIPE D
Remove the attached vinyl tape from the pipe.
Sufficiently apply compressor oil to a new O-ring and the fitting surface of the cooler refrigerant liquid pipe.
- Compressor oil:
ND-OIL 8 or equivalent
Install the O-ring on the cooler refrigerant liquid pipe.
Install the cooler refrigerant liquid pipe.
88717B
30.CONNECT COOLER REFRIGERANT SUCTION PIPE B
Remove the attached vinyl tape from the pipe.
Sufficiently apply compressor oil to a new O-ring and the fitting surface of the cooler refrigerant suction pipe.
- Compressor oil:
ND-OIL 8 or equivalent
Install the O-ring on the cooler refrigerant suction pipe.
Move the hook connector in the direction indicated by the arrow in the illustration.
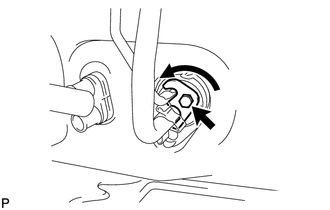
Insert the pipe joint into the fitting hole securely and tighten the bolt.
- Torque:
- 5.4 N*m (55 kgf*cm, 48 in.*lbf)
87246E
31.CONNECT HEATER WATER HOSE OUTLET E
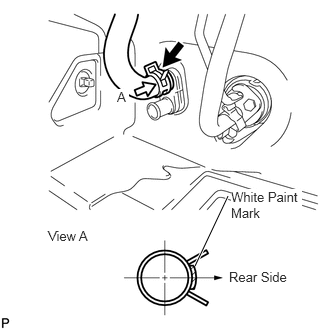
Connect the water hose onto the cooling unit.
- NOTICE:
-
Perform the installation with the hose clip and mark at the correct angle.
87245H
32.CONNECT HEATER WATER HOSE INLET H
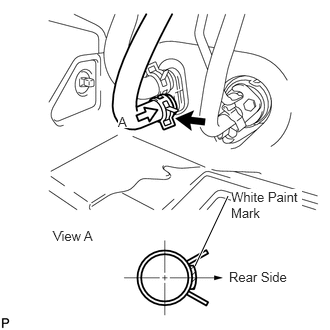
Connect the water hose onto the cooling unit.
- NOTICE:
-
Perform the installation with the hose clip and mark at the correct angle.
33.ADD ENGINE COOLANT (for 3UR-FE)
34.ADD ENGINE COOLANT (for 3UR-FBE)
35.INSPECT FOR COOLANT LEAK (for 3UR-FE)
36.INSPECT FOR COOLANT LEAK (for 3UR-FBE)
37.CHARGE REFRIGERANT
38. WARM UP ENGINE
39.INSPECT FOR REFRIGERANT LEAK
51441
40.INSTALL NO. 1 ENGINE UNDER COVER