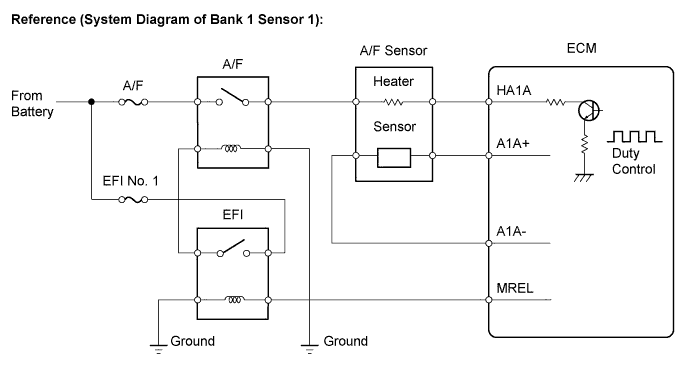
DTC P0031 Oxygen (A/F) Sensor Heater Control Circuit Low (Bank 1 Sensor 1) |
DTC P0032 Oxygen (A/F) Sensor Heater Control Circuit High (Bank 1 Sensor 1) |
DTC P0051 Oxygen (A/F) Sensor Heater Control Circuit Low (Bank 2 Sensor 1) |
DTC P0052 Oxygen (A/F) Sensor Heater Control Circuit High (Bank 2 Sensor 1) |
| DTC No. | DTC Detection Condition | Trouble Area |
| P0031 P0051 | Air-Fuel Ratio (A/F) sensor heater current less than 0.8 A (1 trip detection logic) |
|
| P0032 P0052 | Air-Fuel Ratio (A/F) sensor heater current fail (1 trip detection logic) |
|
| Related DTCs | P0031: A/F sensor heater (Bank 1) range check (Low current) P0032: A/F sensor heater (Bank 1) range check (High current) P0051: A/F sensor heater (Bank 2) range check (Low current) P0052: A/F sensor heater (Bank 2) range check (High current) |
| Required sensors / components (Main) | A/F sensor heater |
| Required sensors / components (Related) | - |
| Frequency of operation | Continuous |
| Duration | 10 seconds |
| MIL operation | Immediate |
| Sequence operation | None |
| The monitor will run whenever these DTCs are not present | None |
| Battery voltage | 10.5 V or more |
| Heater ON duty ratio | 50% or more |
| Time after engine starts | 10 seconds or more |
| Time after engine starts | 10 seconds or more |
| Heater current | Less than 0.8 A |
| Hybrid IC high current limit port | Fail |
| A/F sensor heater current | 0.8 A or more |
| 1.INSPECT AIR FUEL RATIO SENSOR (HEATER RESISTANCE) |
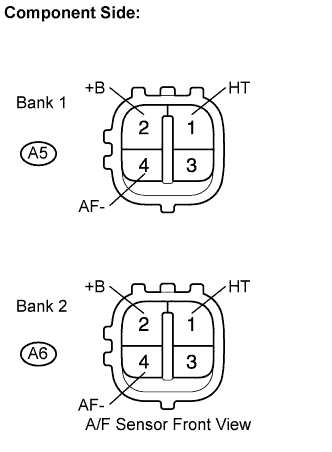 |
Disconnect the A5 or A6 A/F sensor connector.
Measure the resistance according to the value(s) in the table below.
| Tester Connection | Condition | Specified Condition |
| HT (1) - +B (2) | 20°C (68°F) | 1.8 to 3.4 Ω |
| HT (1) - AF- (4) | Always | 10 kΩ or higher |
| Tester Connection | Condition | Specified Condition |
| HT (1) - +B (2) | 20°C (68°F) | 1.8 to 3.4 Ω |
| HT (1) - AF- (4) | Always | 10 kΩ or higher |
Reconnect the A/F sensor connector.
| Result | Proceed to |
| OK | A |
| NG (for 2WD model) | B |
| NG (for 4WD model) | C |
|
| ||||
|
| ||||
| A | |
 |
| 2.CHECK TERMINAL VOLTAGE (+B OF A/F SENSOR) |
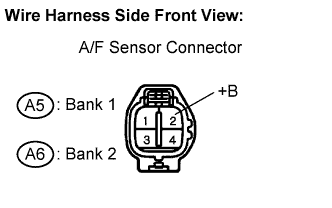 |
Disconnect the A5 or A6 A/F sensor connector.
Turn the ignition switch to the ON position.
Measure the voltage according to the value(s) in the table below.
| Tester Connection | Specified Condition |
| +B (A5-2) - Body ground | 9 to 14 V |
| +B (A6-2) - Body ground | 9 to 14 V |
Reconnect the A/F sensor connector.
|
| ||||
| NG | |
|
| 3.INSPECT FUSE (A/F FUSE) |
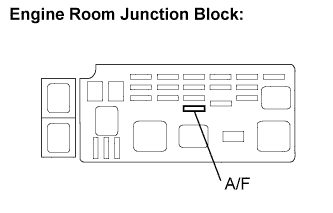 |
Remove the A/F fuse from the engine room junction block.
Measure the resistance according to the value(s) in the table below.
Reinstall the A/F fuse.
|
| ||||
| OK | |
|
| 4.INSPECT RELAY (A/F RELAY) |
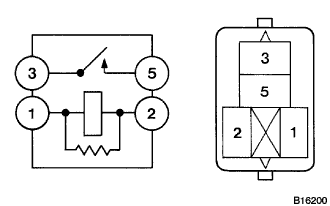 |
Remove the A/F relay from the No. 6 engine room relay block.
Measure the resistance according to the value(s) in the table below.
| Tester Connection | Specified Condition |
| 3 - 5 | 10 kΩ or higher |
| 3 - 5 | Below 1 Ω (Apply battery voltage between terminals 1 and 2) |
Reinstall the A/F relay.
|
| ||||
| OK | |
|
| 5.CHECK HARNESS AND CONNECTOR (A/F SENSOR - A/F RELAY) |
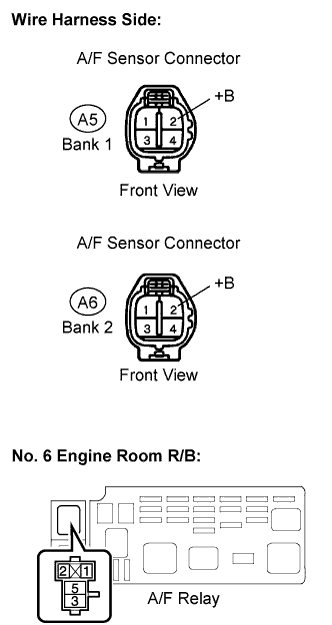 |
Disconnect the A5 or A6 A/F sensor connector.
Remove the A/F relay from the No. 6 engine room relay block.
Measure the resistance according to the value(s) in the table below.
| Tester Connection | Specified Condition |
| A/F relay terminal (3) - +B (A5-2) | Below 1 Ω |
| A/F relay terminal (3) - +B (A6-2) | Below 1 Ω |
| Tester Connection | Specified Condition |
| A/F relay terminal (3) - +B (A5-2) - Body ground | 10 kΩ or higher |
| A/F relay terminal (3) - +B (A6-2) - Body ground | 10 kΩ or higher |
Reinstall the A/F relay.
Reconnect the A/F sensor connector.
|
| ||||
| OK | |
|
| 6.CHECK HARNESS AND CONNECTOR (A/F RELAY - BODY GROUND) |
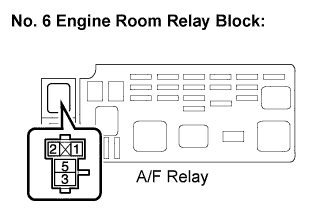 |
Remove the A/F relay from the No. 6 engine room relay block.
Measure the resistance according to the value(s) in the table below.
| Tester Connection | Specified Condition |
| A/F relay terminal (2) - Body ground | Below 1 Ω |
|
| ||||
| OK | ||
 | ||
| ||
| 7.CHECK HARNESS AND CONNECTOR (A/F RELAY - ECM) |
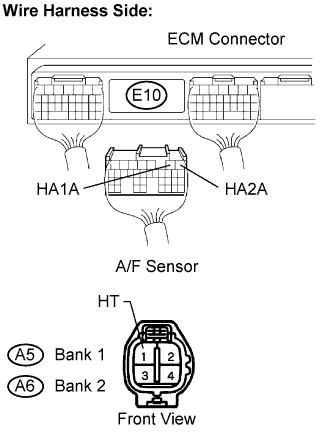 |
Disconnect the A5 or A6 A/F sensor connector.
Disconnect the E10 ECM connector.
Measure the resistance according to the value(s) in the table below.
| Tester Connection | Specified Condition |
| HT (A5-1) - HA1A (E10-2) | Below 1 Ω |
| HT (A6-1) - HA2A (E10-1) | Below 1 Ω |
| Tester Connection | Specified Condition |
| HT (A5-1) or HA1A (E10-2) - Body ground | 10 kΩ or higher |
| HT (A6-1) or HA2A (E10-1) - Body ground | 10 kΩ or higher |
Reconnect the ECM connector.
Reconnect the A/F sensor connectors.
|
| ||||
| OK | |
|
| 8.CHECK WHETHER DTC OUTPUT RECURS |
Connect the Techstream to the DLC3.
Turn the ignition switch to the ON position.
Turn the Techstream ON.
Clear the DTCs (Click here).
Start the engine.
Allow the engine to idle for 1 minute or more.
Select the following menu items: Powertrain / Engine and ECT / Trouble Code.
Read the DTCs.
| Display (DTC Output) | Proceed to |
| No output | A |
| P0031, P0032, P0051 and/or P0052 | B |
|
| ||||
| A | ||
| ||
| ||

