SEAT BELT FRONT SEAT OUTER BELT ASSEMBLY INSTALLATION
CAUTION / NOTICE / HINT
- HINT:
- ·
Use the same procedure for RHD and LHD vehicles.
·The procedure listed below is for LHD vehicles.
·Use the same procedure for the driver side and front passenger side.
·The procedure listed below is for the driver side.
PROCEDURE

 64034D
1.INSTALL REAR SPEAKER GRILLE SUB-ASSEMBLY
- HINT:
-
Perform this procedure only when replacement of the rear speaker grille sub-assembly is necessary.
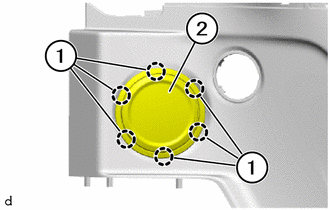
Attach the claws (1) to install the rear speaker grille sub-assembly (2).
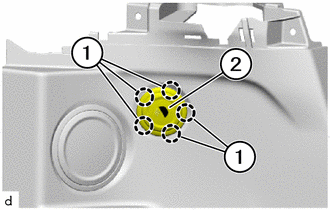
Attach the claws (1) to install the rear speaker grille sub-assembly (2).
73220
2.INSTALL FRONT SEAT OUTER BELT ASSEMBLY
- CAUTION:
- ·
Malfunction with incorrectly secured components.
Danger of injury!
-Ask a second person to check the torque or latch mechanism (four-eyes principle).
-Both persons must document that the work has been carried out correctly in the vehicle records.
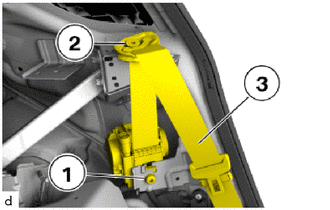
Correctly position the front seat outer belt assembly (3).
Replace the T50 bolt (2).
Tighten the T50 bolt (2).
- Torque:
- 42 N*m (428 kgf*cm, 31 ft.*lbf)
Replace the T50 bolt (1).
Tighten the T50 bolt (1).
- Torque:
- 42 N*m (428 kgf*cm, 31 ft.*lbf)
for Type A:
Connect the connector.
- NOTICE:
-
Securely lock the locking button.
for Type B:
Connect the connectors.
- NOTICE:
-
Securely lock the locking button.
86160Z
3.INSTALL REAR NO. 3 SPEAKER ASSEMBLY (w/ Front Center Speaker)
for 12 Speakers:
Click hereAudio / Visual / Telematics>AUDIO / VIDEO>QUARTER TRIM SPEAKER>INSTALLATION
86160Y
4.REMOVE REAR NO. 2 SPEAKER ASSEMBLY (w/ Front Center Speaker)
for 10 Speakers:
- HINT:
-
Use the same procedure as for the rear No. 3 speaker assembly.
64740B
5.INSTALL DECK TRIM SIDE BOARD AND DECK SIDE TRIM COVER LH (w/ Front Center Speaker)
66311
6.INSTALL ROPE HOOK (w/ Front Center Speaker)
w/ Courtesy Light:
Click hereAudio / Visual / Telematics>AUDIO / VIDEO>LUGGAGE SPEAKER>INSTALLATION
64716D
7.INSTALL DECK TRIM REAR COVER (w/ Front Center Speaker)
81604
8.INSTALL TRIANGLE REFLECTOR SET (w/ Front Center Speaker)
81330
9.INSTALL NO. 1 LUGGAGE COMPARTMENT LIGHT ASSEMBLY (w/ Front Center Speaker)
62636A
10.INSTALL QUARTER TRIM UPPER PANEL
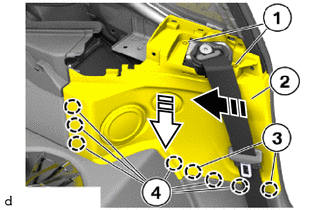

|
Install in this Direction (1) |

|
Install in this Direction (2) |
Position the quarter trim upper panel (2).
Attach the guides (4) and claws (3) to install the quarter trim upper panel (2).
Thread the quarter trim upper panel (2) under the front door opening trim weatherstrip.
Tighten the T20 screws (1).
- Torque:
- 2.0 N*m (20 kgf*cm, 18 in.*lbf)
62420A
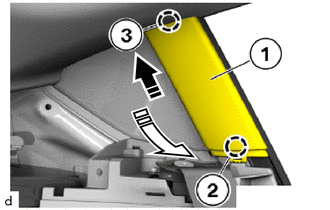
11.INSTALL CENTER PILLAR GARNISH ASSEMBLY
|
|
Install in this Direction (1) |

0,0 0,0
false
|
Install in this Direction (2) |
Attach the guide (3).
Slide in the center pillar garnish assembly (1) under the front door opening trim weatherstrip.
Attach the clamp (2) to install the center pillar garnish assembly (1).
64277L
12.INSTALL TRANSVERSE PIPE
62609
13.INSTALL SEAT BELT HOLE COVER SUB-ASSEMBLY LH
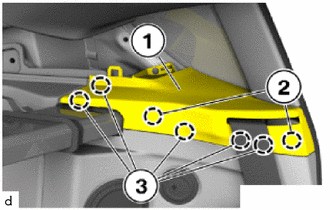
Insert the front seat outer belt assembly through the slot of the seat belt hole cover sub-assembly LH (1).
Slide the seat belt hole cover sub-assembly LH (1) in under the front door opening trim weatherstrip.
Attach the clips (2) and claws (3) to install the seat belt hole cover sub-assembly LH (1).
62608
14.INSTALL SEAT BELT HOLE COVER SUB-ASSEMBLY RH
- HINT:
-
Use the same procedure as for the LH side.
73220
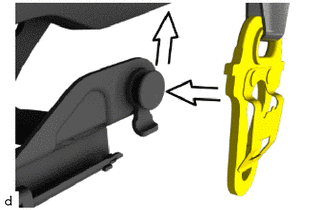
15.CONNECT FRONT SEAT OUTER BELT ASSEMBLY

|
Install in this Direction |
Insert the end fitting in the direction of the arrow.
- CAUTION:
- ·
Malfunction with incorrectly secured components.
Danger of injury!
-Ask a second person to check the torque or latch mechanism (four-eyes principle).
-Both persons must document that the work has been carried out correctly in the vehicle records.
Pull the end fitting in the direction of the arrow until the lock plate engages audibly.
- NOTICE:
-
The end fitting can be turned on the bolt if the lock plate is engaged correctly.
|
|
Slide in this Direction |
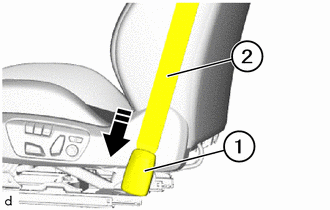
Slide the cover (1) on the front seat outer belt assembly (2) in the downward direction.
Perform the concluding check: Pull the end fitting forward, upward and backward.
64288D
16.INSTALL TRANSVERSE PIPE TRIM
62480A
17.INSTALL ROOF SIDE INNER GARNISH ASSEMBLY LH
62470A
18.INSTALL ROOF SIDE INNER GARNISH ASSEMBLY RH
- HINT:
-
Use the same procedure as for the LH side.
19.CONNECT CABLE TO NEGATIVE BATTERY TERMINAL
for B48:
for B58: