INTERIOR PANELS / TRIM ROOF HEADLINING INSTALLATION
CAUTION / NOTICE / HINT
- HINT:
- ·
Use the same procedure for LHD and RHD vehicles.
·The following procedure is for LHD vehicles.
PROCEDURE

 64373A
1.INSTALL PACKAGE TRAY TRIM STOPPER
- HINT:
- ·
Perform this procedure only when replacement of the package tray trim stopper is necessary.
·Use the same procedures for the opposite side.
Install the package tray trim stopper.
63310
2.INSTALL ROOF HEADLINING ASSEMBLY
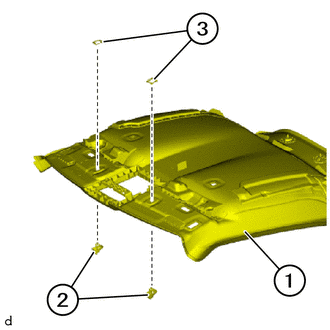
Install the visor holders (2) and visor holder retainers (3) to the roof headlining assembly (1).
Install the roof headlining assembly through the aperture of the passenger door with the help of an auxiliary person as shown in the illustration.
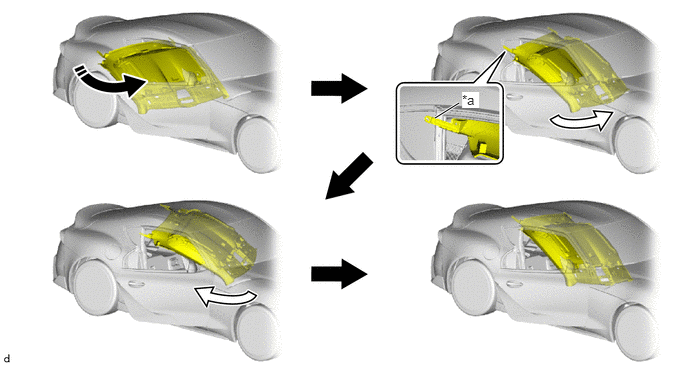
| *a | Rear RH Side of Roof Headlining Assembly | - | - |

|
Turn in this Direction | 
|
Install in this Direction |
- NOTICE:
- ·
Check that the corners of the roof headlining are not folded, twisted or otherwise deformed and that none of the mounted parts have fallen off.
·Make sure that the roof headlining does not get caught on anything as it may become bent or damaged.
·Do not damage the roof headlining or vehicle interior.
Guide in roof headlining assembly under the particular edge protection.
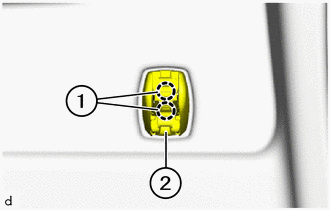
Attach clamps (1) of the visor holder (2) to the body.
- NOTICE:
-
Make sure the clamps are attached correctly.
- HINT:
-
Use the same procedures for the opposite side.
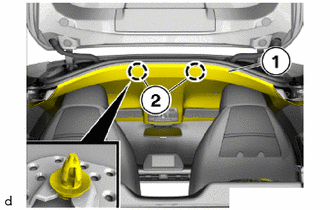
for Rear Side:
Attach the clips (2) of the roof headlining assembly (1).
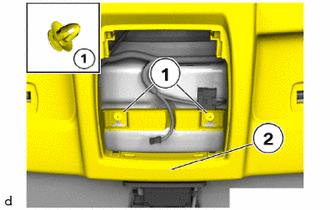
for Front Side:
Attach the clips (1) of the roof headlining assembly (2).
Tighten the T30 screw of the roof headlining assembly.
- Torque:
- 8.0 N*m (82 kgf*cm, 71 in.*lbf)
- HINT:
-
Use the same procedures for the opposite side.
62212
3.INSTALL FRONT PILLAR GARNISH LH
62211
4.INSTALL FRONT PILLAR GARNISH RH
- HINT:
-
Use the same procedure as for the LH side.
87834
5.INSTALL INNER REAR VIEW MIRROR STAY HOLDER COVER
81340
6.INSTALL VANITY LIGHT ASSEMBLY
- HINT:
-
Use the same procedures for the opposite side.
-
Click hereVehicle Interior>LIGHTING (INT)>VANITY LIGHT>INSTALLATION
86255
7.INSTALL MICROPHONE CASE
- HINT:
-
Use the same procedures for the opposite side.
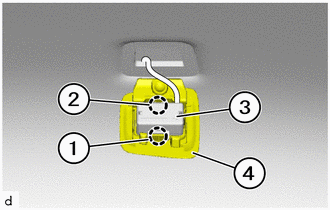
w/ Microphone:
Attach the guide (2) and claw (1) to install the microphone case (4) to the telephone microphone assembly (3).
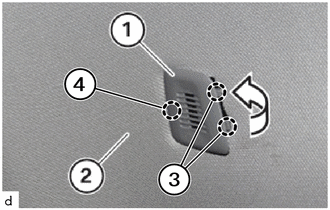
|
|
Install in this Direction |
Attach the guide (4) and claws (3) to install the microphone case (1) to the roof headlining assembly (2) in the direction of the arrow.
63605B
8.INSTALL ROOF CONSOLE BOX SUB-ASSEMBLY
74320
9.INSTALL VISOR ASSEMBLY LH
74310
10.INSTALL VISOR ASSEMBLY RH
- HINT:
-
Use the same procedure as for the LH side.
62636A
11.INSTALL QUARTER TRIM UPPER PANEL LH
62635A
12.INSTALL QUARTER TRIM UPPER PANEL RH
- HINT:
-
Use the same procedure as for the LH side.
62420A
13.INSTALL CENTER PILLAR GARNISH ASSEMBLY LH
62410A
14.INSTALL CENTER PILLAR GARNISH ASSEMBLY RH
- HINT:
-
Use the same procedure as for the LH side.
64277L
15.INSTALL TRANSVERSE PIPE
62609
16.INSTALL SEAT BELT HOLE COVER SUB-ASSEMBLY LH
62608
17.INSTALL SEAT BELT HOLE COVER SUB-ASSEMBLY RH
- HINT:
-
Use the same procedure as for the LH side.
64288D
18.INSTALL TRANSVERSE PIPE TRIM
- HINT:
-
Use the same procedures for the opposite side.
-
Click hereSuspension>REAR SUSPENSION>REAR STRUT BAR>INSTALLATION
58801D
19.INSTALL CONSOLE BOX ASSEMBLY
20.INSTALL FRONT SEAT ASSEMBLY LH (for Manual Seat)
21.INSTALL FRONT SEAT ASSEMBLY RH (for Manual Seat)
- HINT:
-
Use the same procedure as for the LH side.
22.INSTALL FRONT SEAT ASSEMBLY LH (for Power Seat)
23.INSTALL FRONT SEAT ASSEMBLY RH (for Power Seat)
- HINT:
-
Use the same procedure as for the LH side.
62480A
24.INSTALL ROOF SIDE INNER GARNISH ASSEMBLY LH
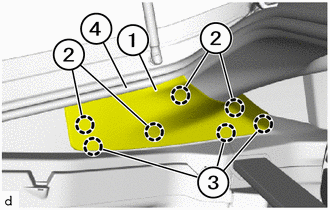
Guide in the roof side inner garnish assembly LH (1) below the sealing lip of the back door weatherstrip (4).
Attach the guides (3) and clips (2) to install the roof side inner garnish assembly LH (1).
62470A
25.INSTALL ROOF SIDE INNER GARNISH ASSEMBLY RH
- HINT:
-
Use the same procedure as for the LH side.
64330D
26.INSTALL PACKAGE TRAY TRIM PANEL ASSEMBLY
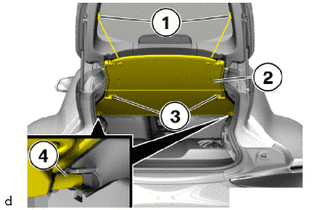
Attach the front guides (4) forward.
Attach the rear mounting (3) downward.
Fold the package tray trim panel assembly (2) open.
Attach the retaining straps (1).